- Adventurer's Guide
- Season Guide
Remaster Season Guide

Remaster Season Guide
From creating your Season Character, through Season Pass quests, to growth after graduation,
we've gathered everything Adventurers need in one place.
📖 Season Character Basic Guide ▲ Collapse
🔸 What is a Season Character?
🔸 Season Character Basic Interface
This is the screen you'll first see after creating a Season Character.
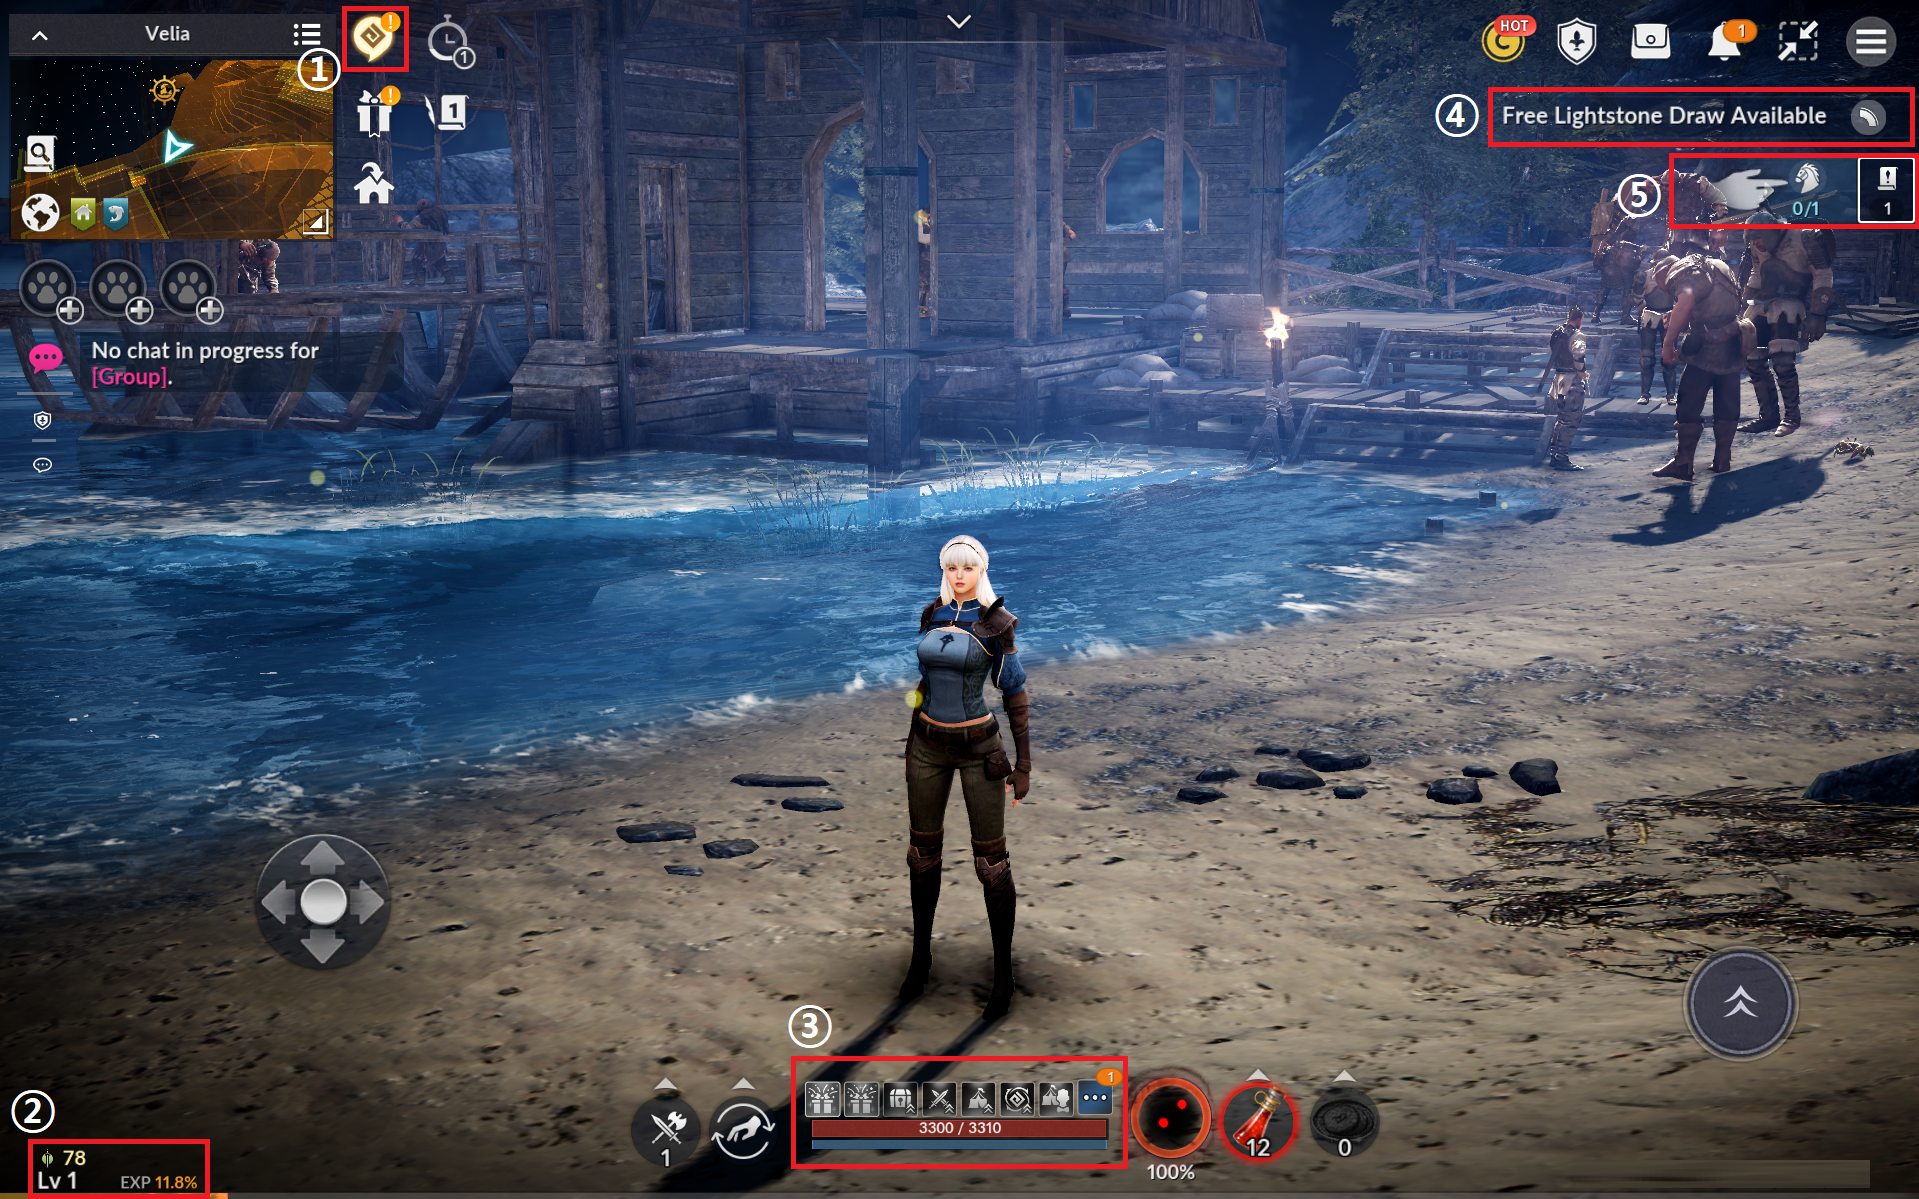
| No. | Item | Description |
|---|---|---|
| 1 | Season Pass button | Tap the yellow Black Spirit icon button to check the Season Pass. You can use functions such as claiming rewards, checking progress, and shortcuts. |
| 2 | Combat Power/Level | Check your character's current Combat Power. Tap the Lv display below to check your level and EXP earned. |
| 3 | Character Status | Check currently applied buffs, HP, MP, Black Spirit status, and recovery items. |
| 4 | Menu | Frequently used menus are located in the upper right; tap the ☰ button to check the full menu. |
| 5 | Quest Widget | Check information on your currently accepted quest, and tap it to automatically move to that quest's location and proceed. |
🔸 Season Pass
The Season Pass is made up of quests designed to help your Season Character grow quickly and get accustomed to the game.
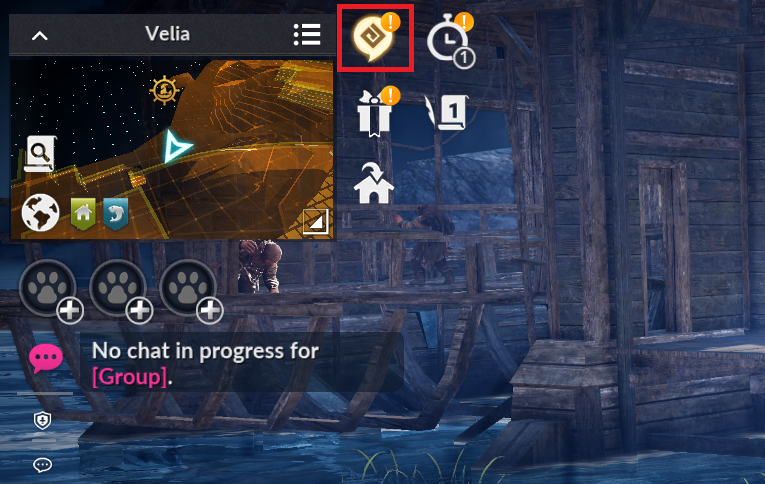 · Open it by tapping the Season Pass button.
· If there is a Season Pass reward available to claim, an exclamation mark icon will be displayed.
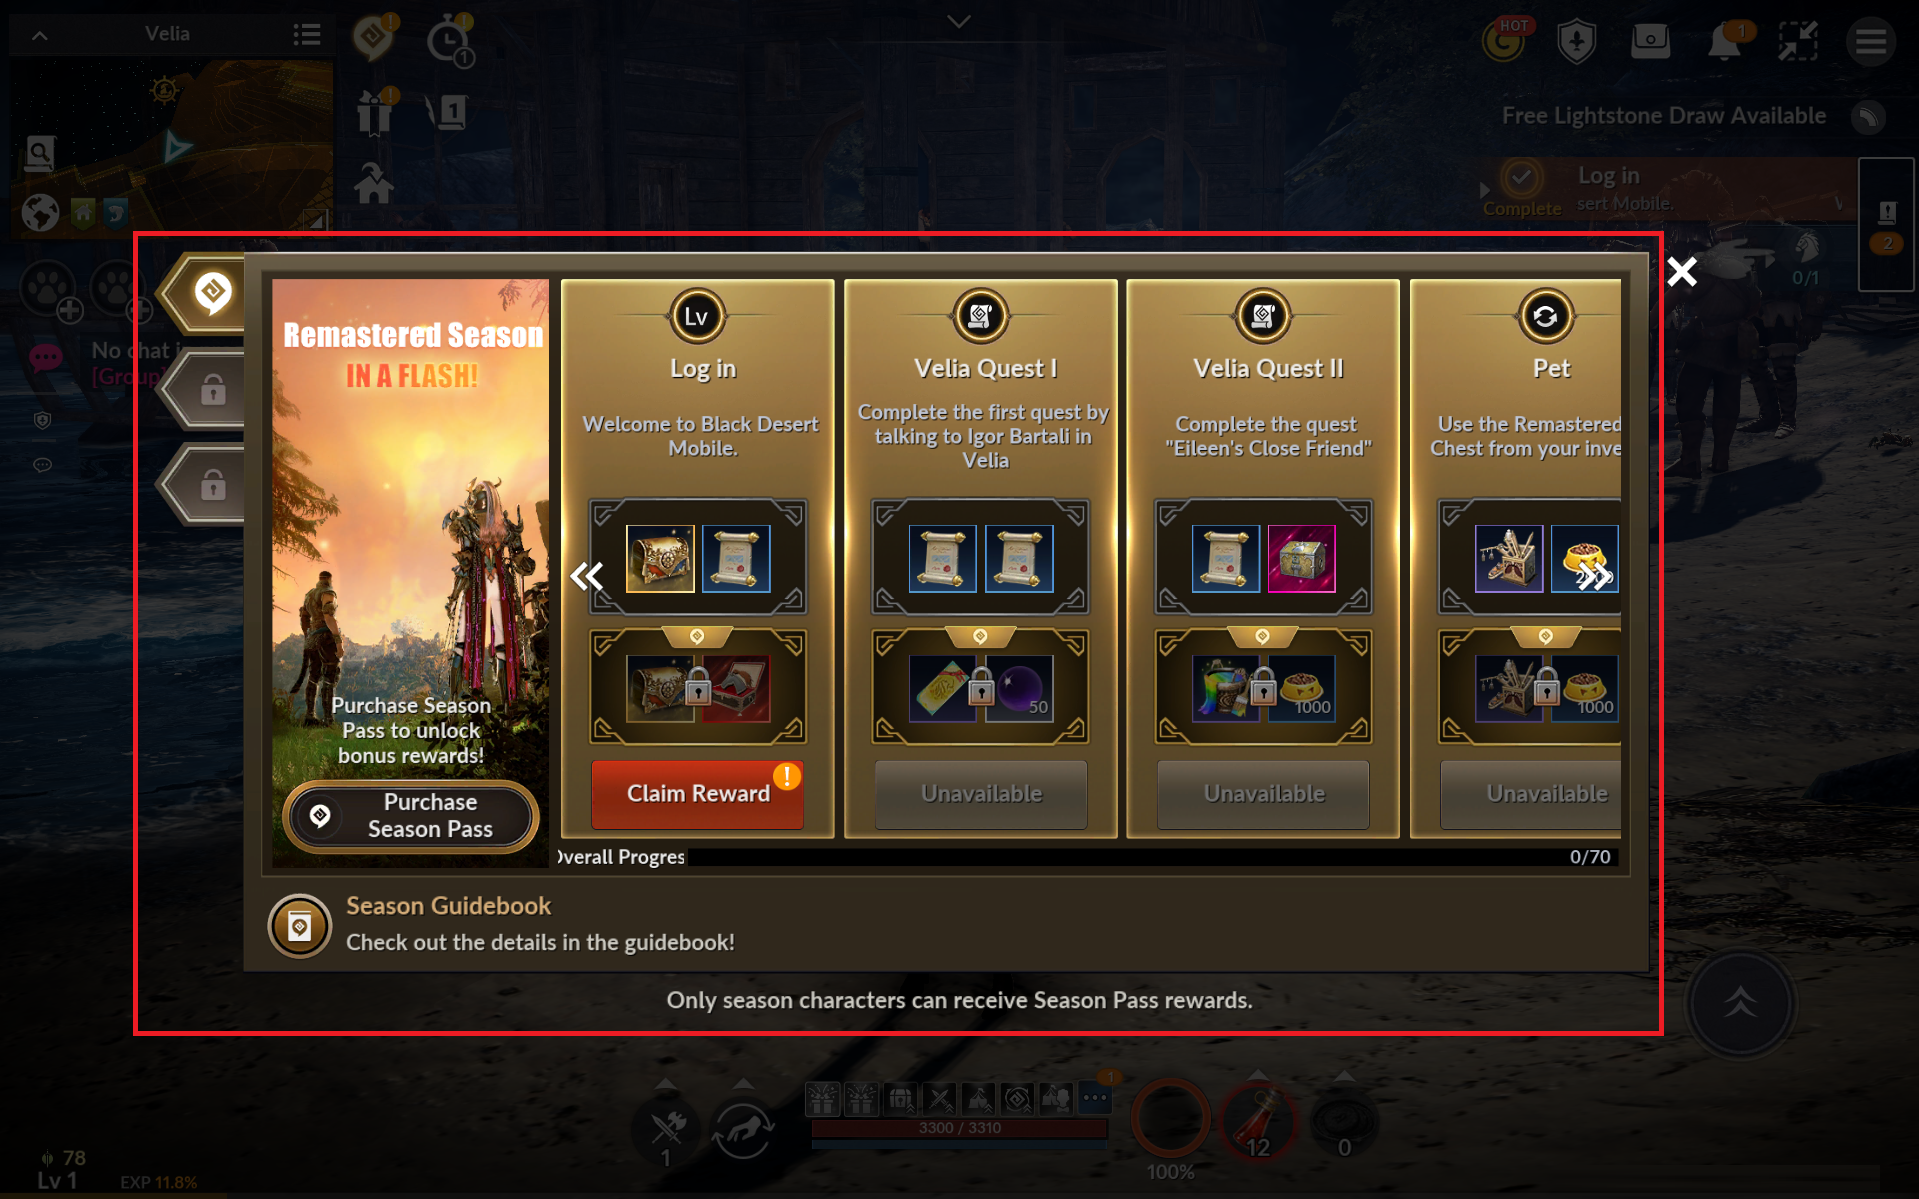
· You can check the requirements and progress of Pass quests.
· Tapping the shortcut button will take you to where you can proceed with the Season Pass.
· If tapping the shortcut button takes you to 'Main Quest,' you need to progress the main quest.
· Tap the main quest widget button to proceed with the main quest.
🗺️ Season Pass Quest Guide (1-34) ▼ Expand
If you need help while progressing, try searching for the name of the Season Pass quest in the search bar in the upper right!
1) Velia Quest I
Talk to your first questgiver, 'Igor Bartali of Velia.'
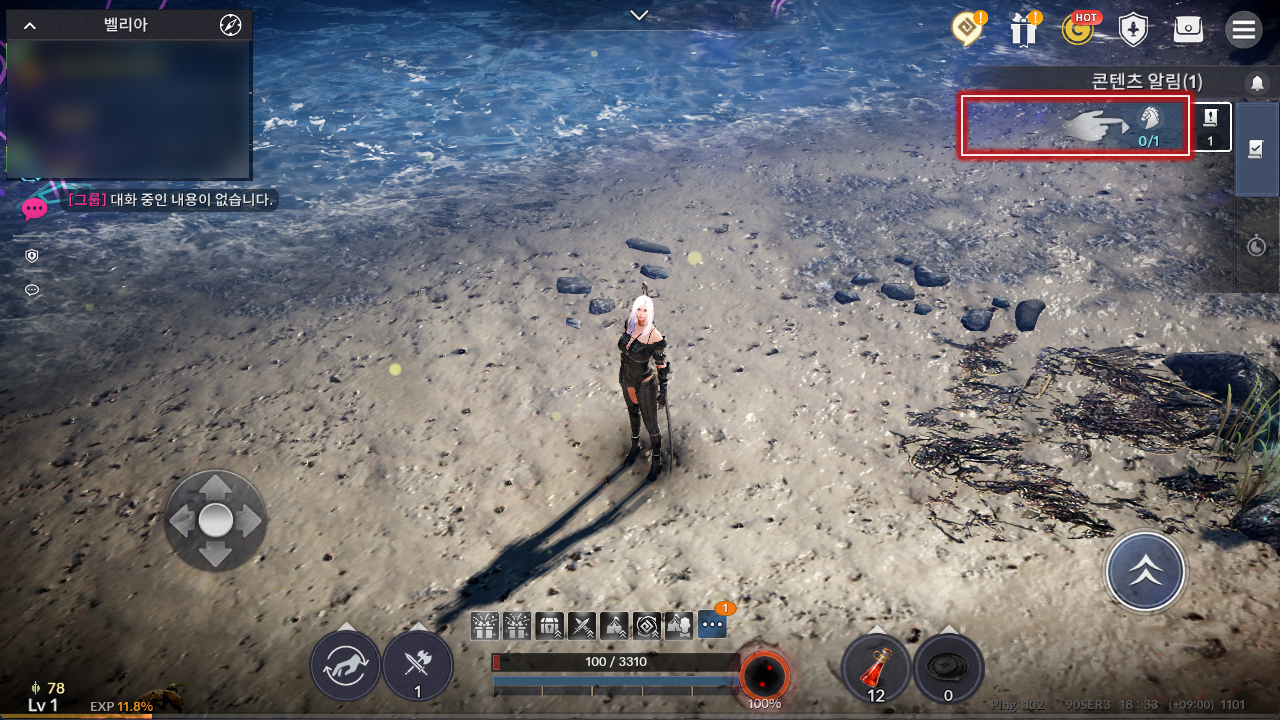
- Progress the main quest through the Quest Widget.
- Tapping a quest in the Quest Widget lets you automatically move to that quest and proceed.
2) Velia Quest II
Complete quests up through 'Eileen's Close Friend.'
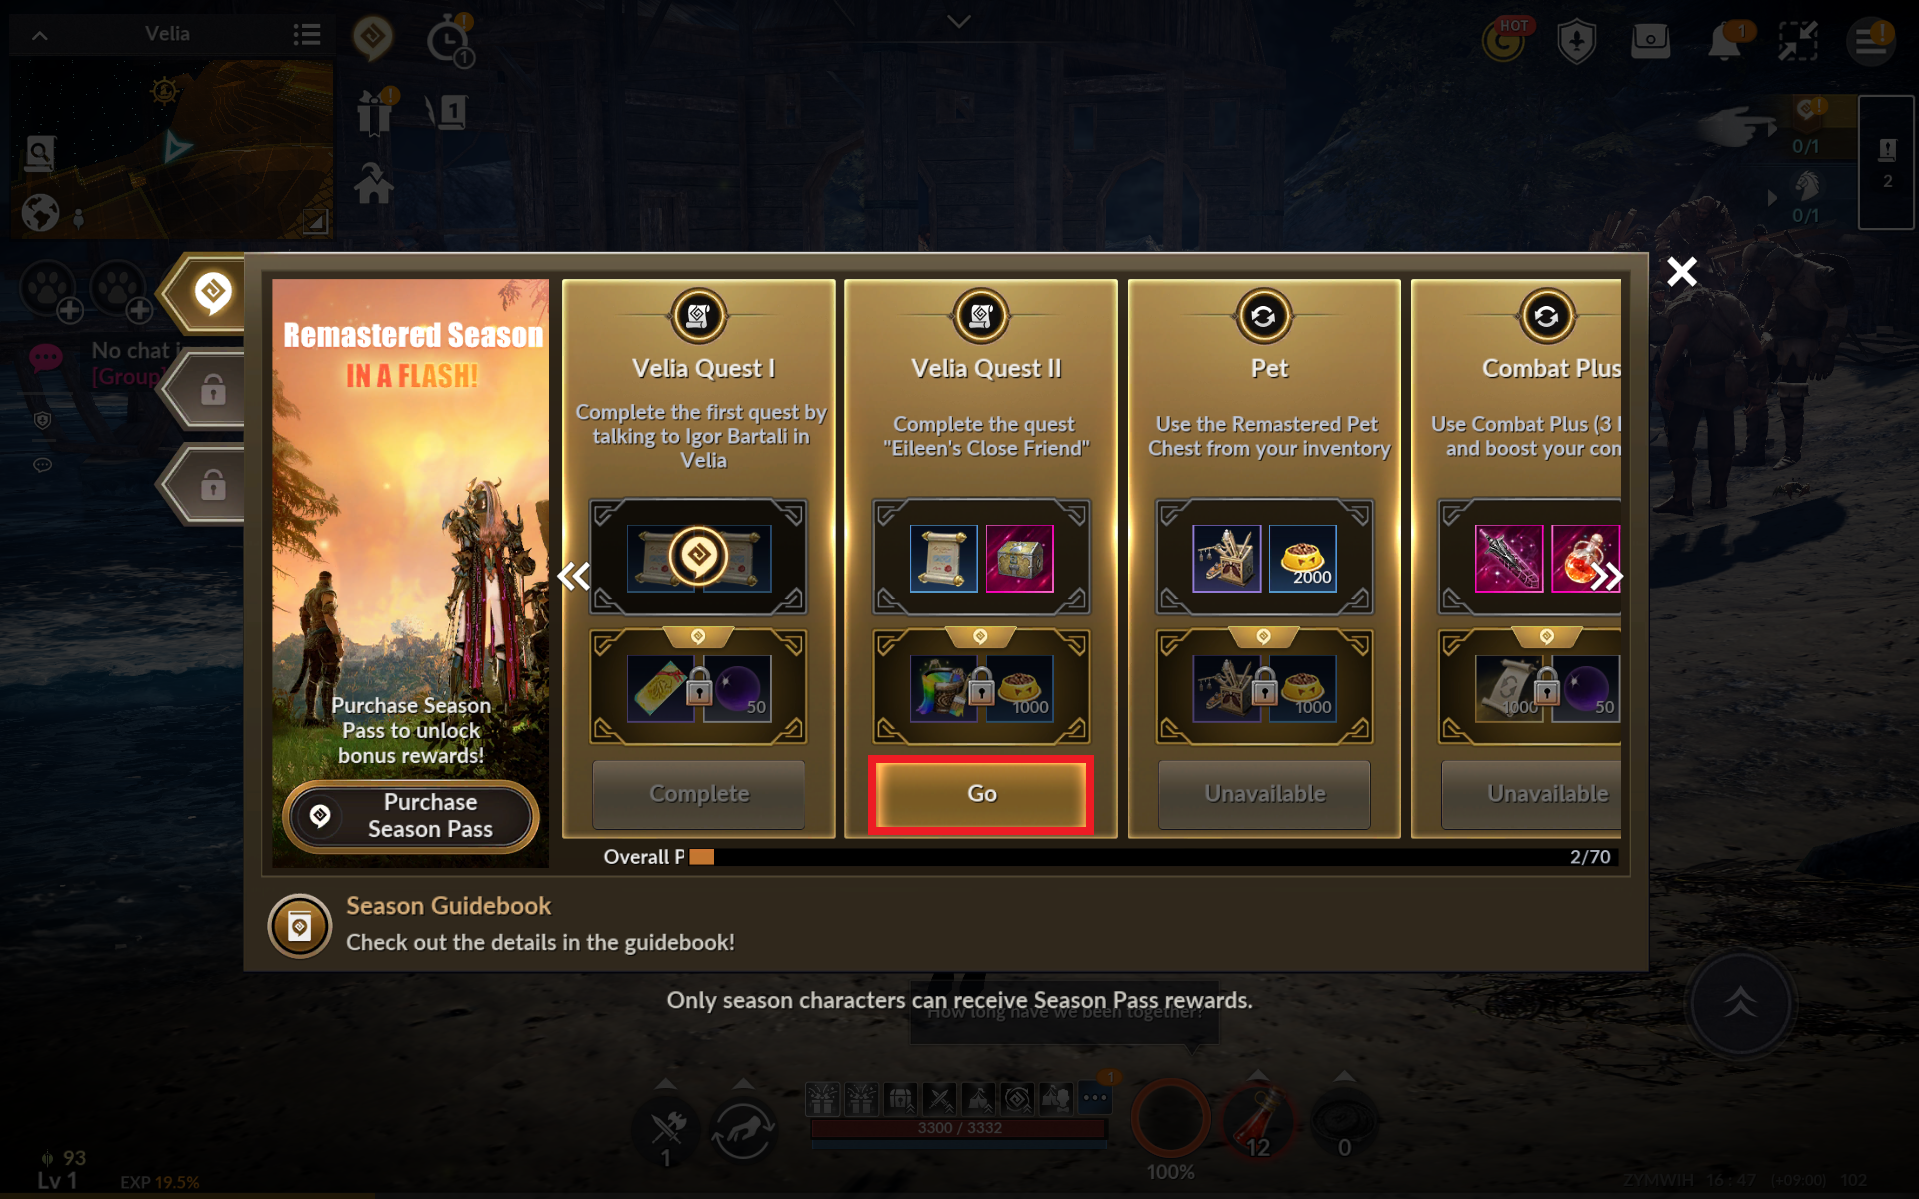 - Progress the Season Pass quest via the Season Pass's shortcut button.
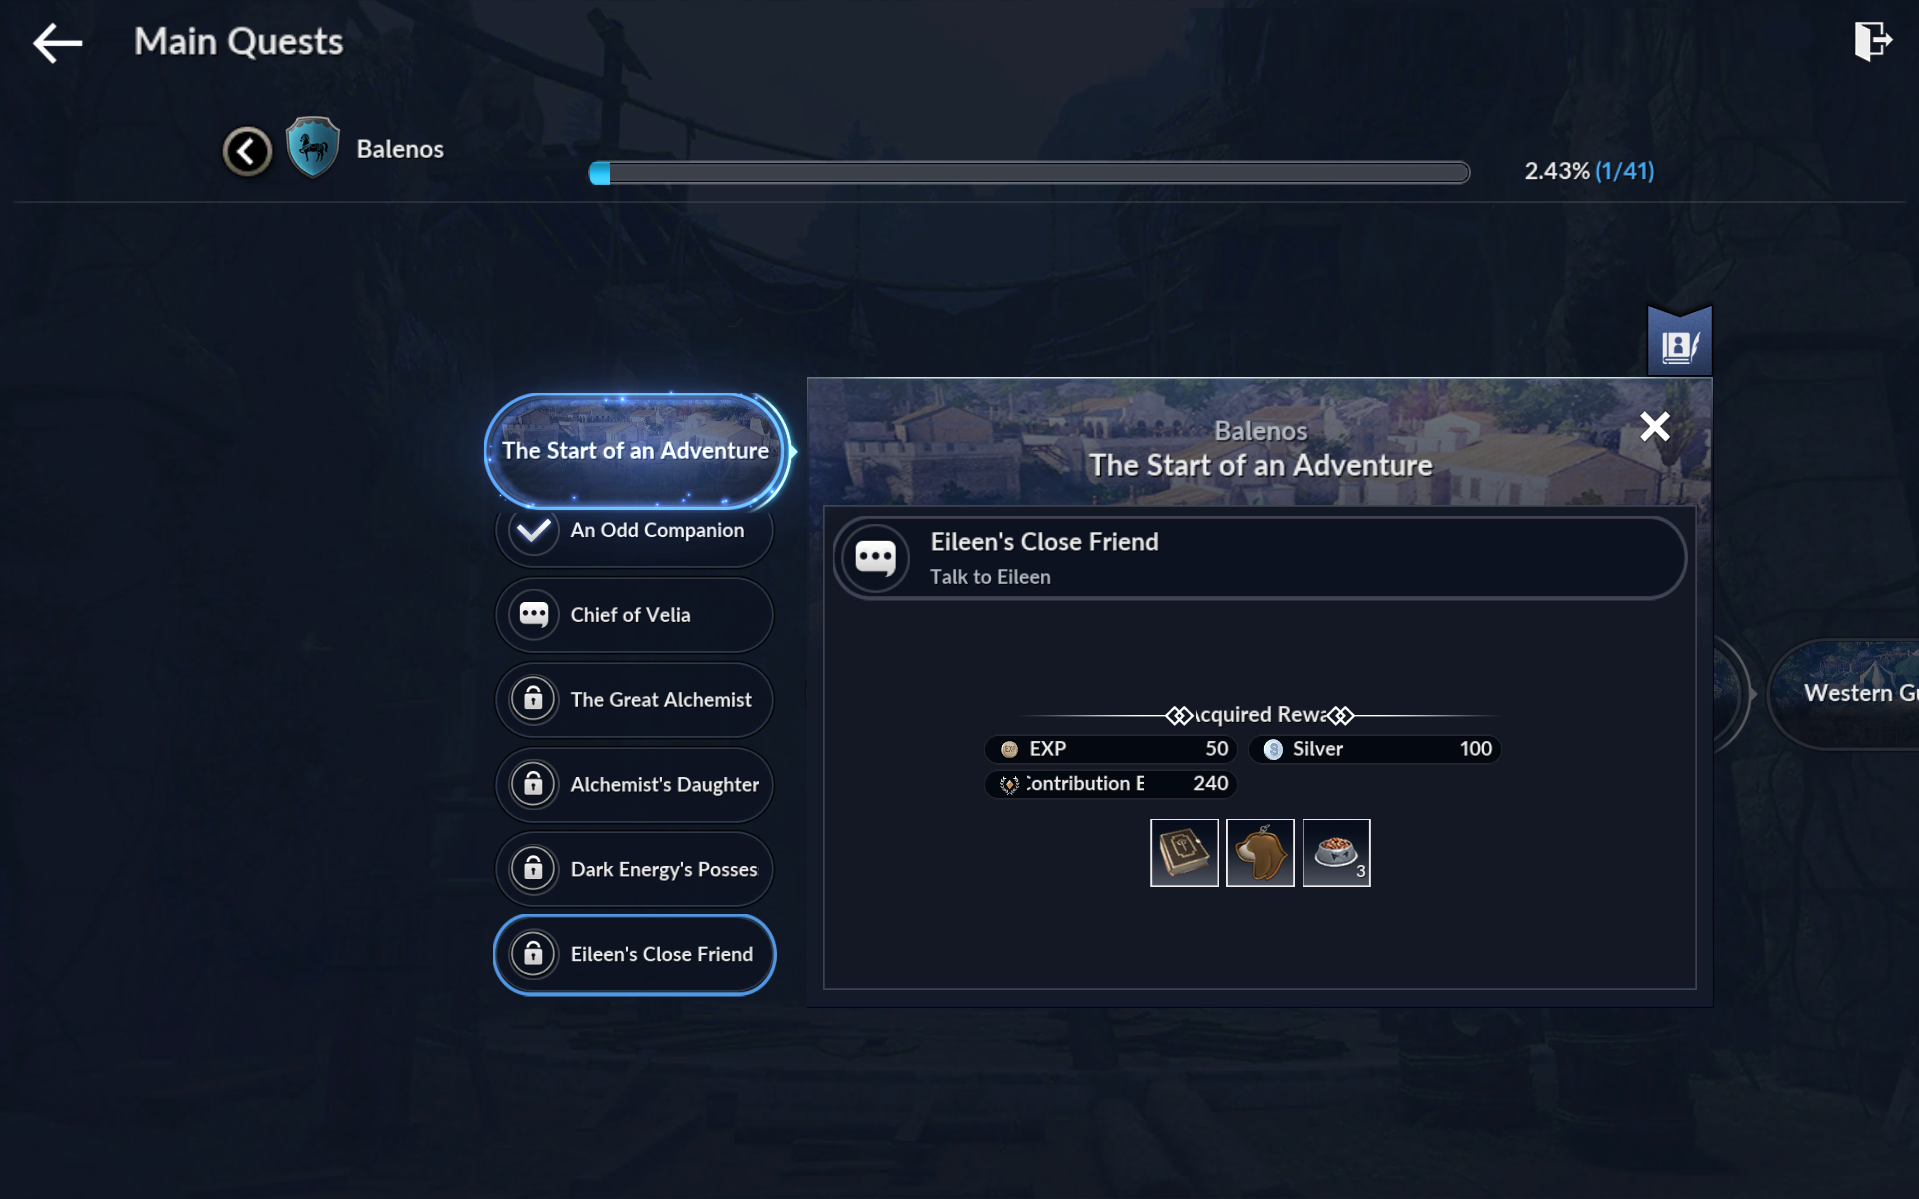 - If the Season Pass's completion condition is a main quest, tapping the shortcut opens the Main Quest window.
- Progress the main quest through the Quest Widget to complete the Season Pass.
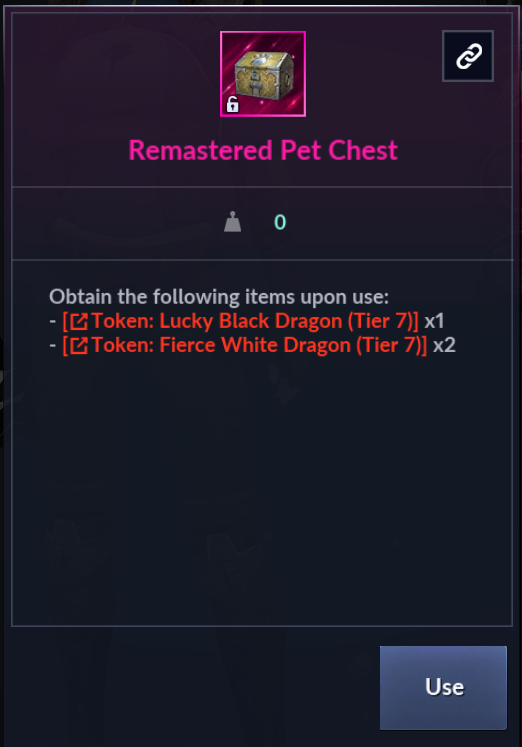
3) Pet
Use the 'Remastered Pet Chest' in your inventory.
- Check your inventory via the Season Pass's shortcut or the inventory icon.
- Use the 'Remastered Pet Chest' item you have.
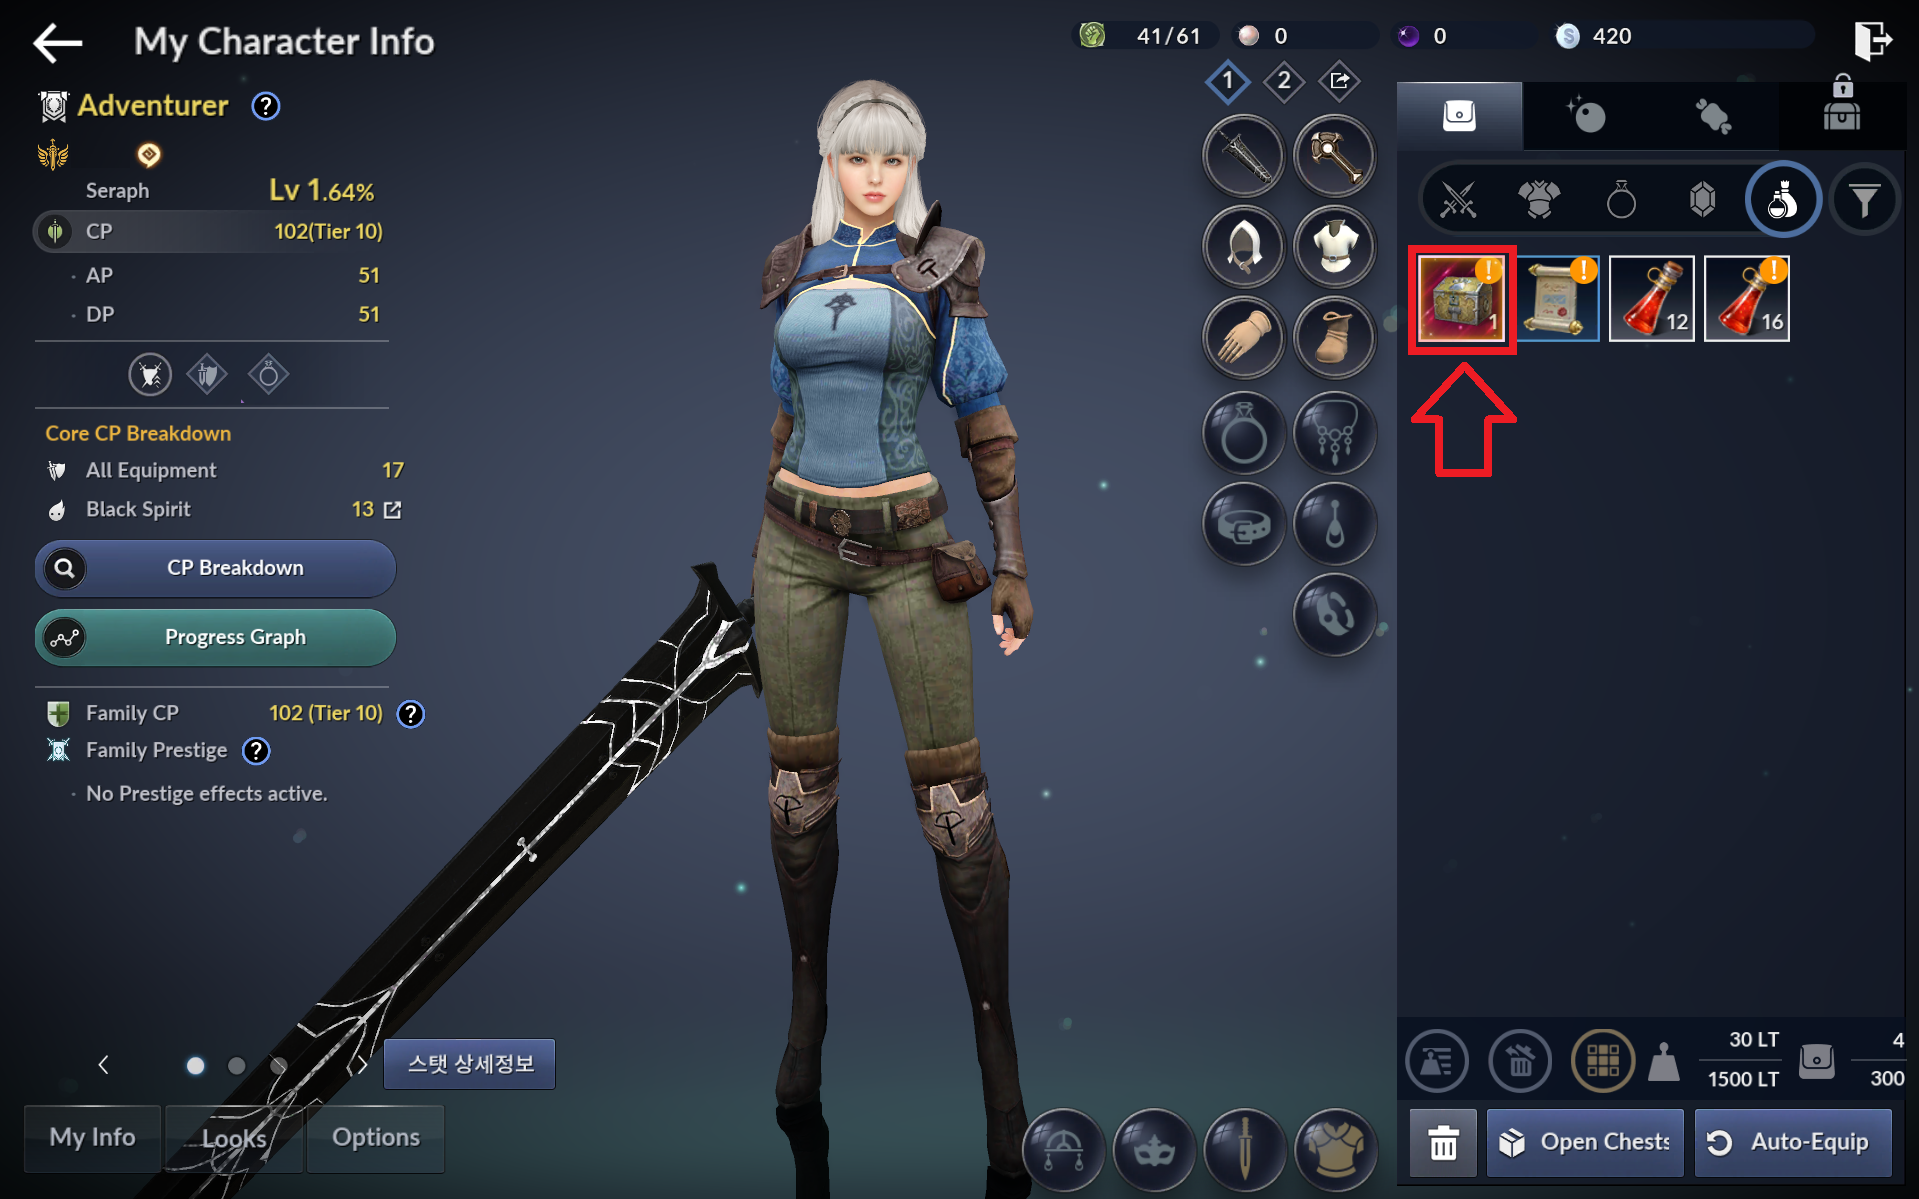
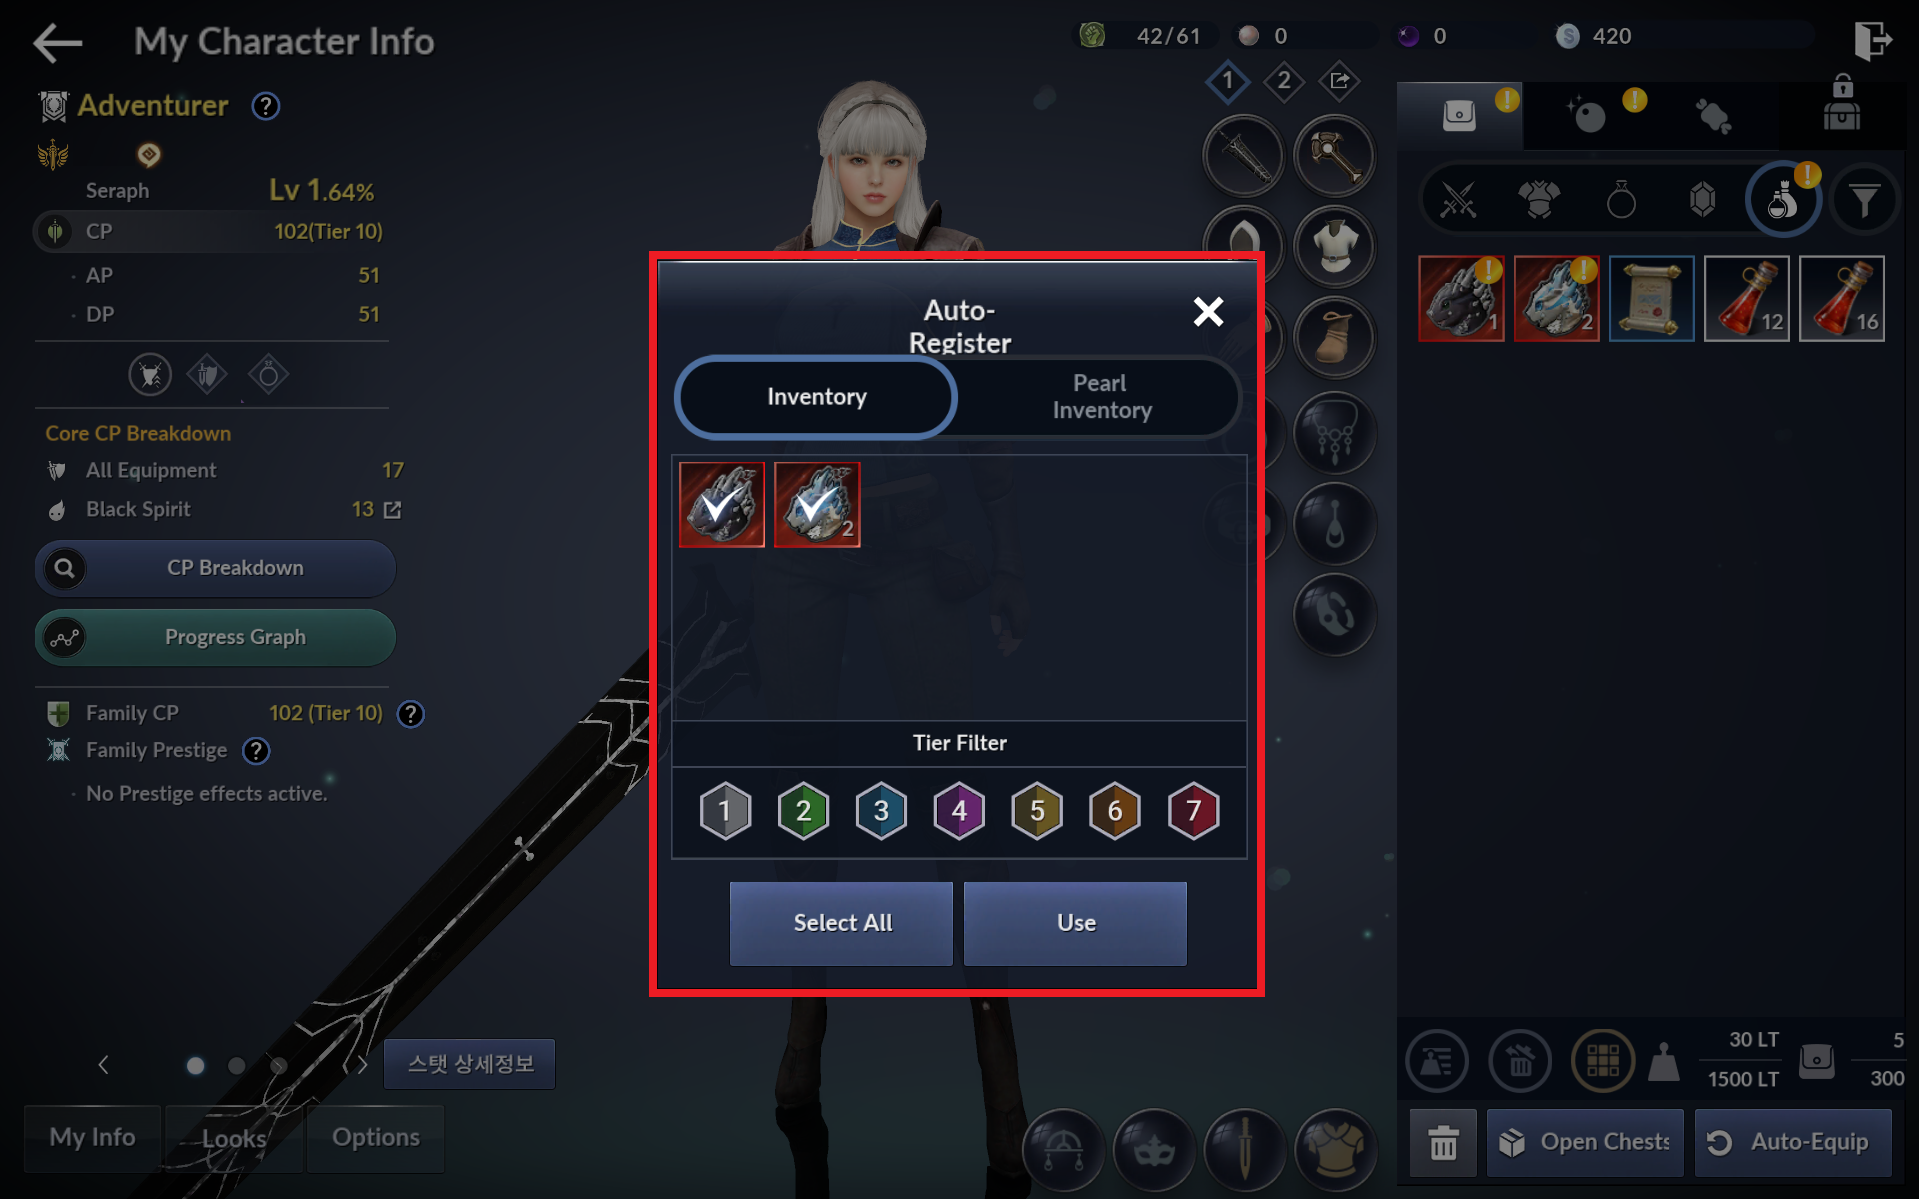
- The pet obtained by using the item can be checked in the Pearl Inventory.
- Use Auto-Register to register all your pets.
4) Combat Plus
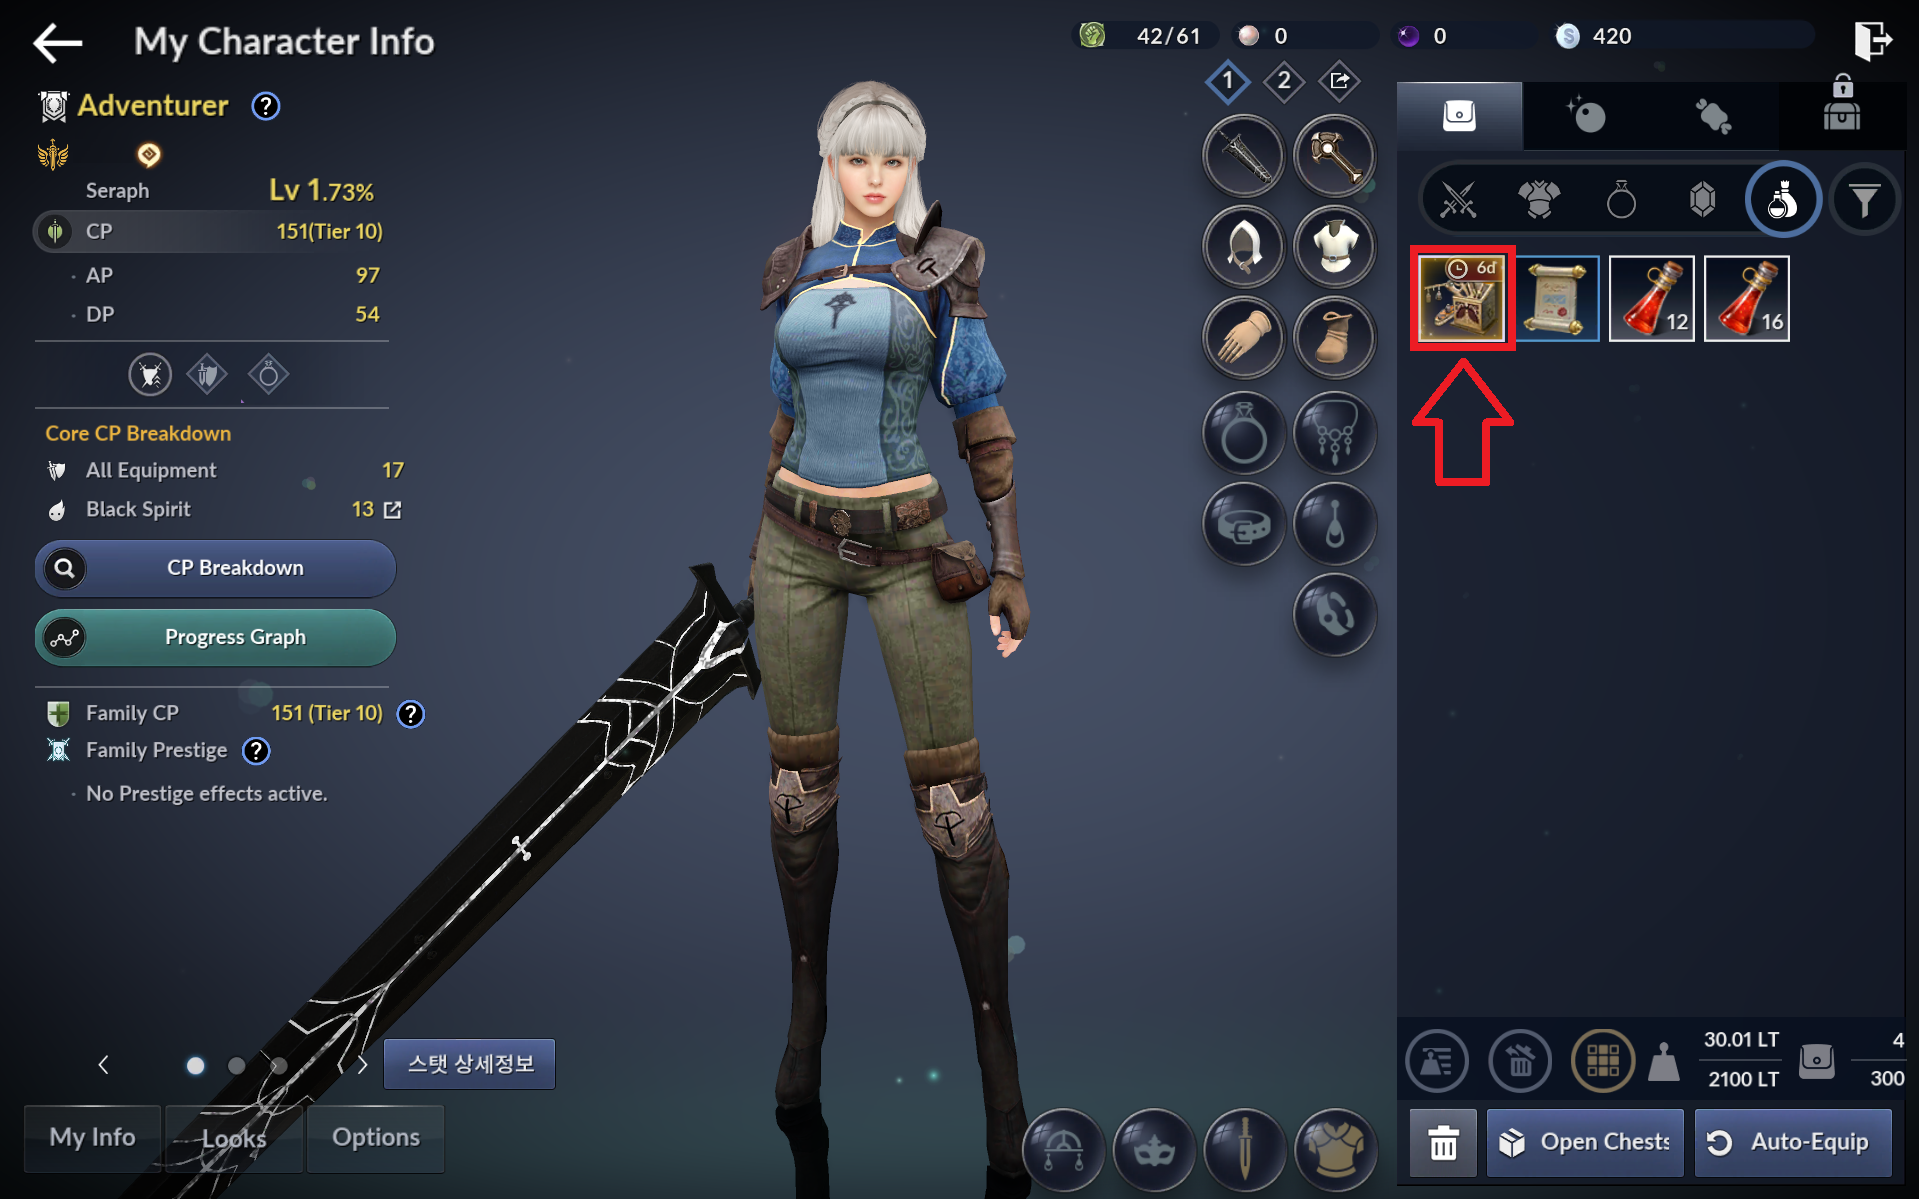
Use 'Combat Plus (3 Days),' which helps with combat.
- Check your inventory via the Season Pass's shortcut or the inventory icon.
- Find and use 'Combat Plus (3 Days)' from your inventory.
5) Equip Gear
Equip a 'Primal grade or higher Main Weapon' (Absolute Kzarka Main Weapon)
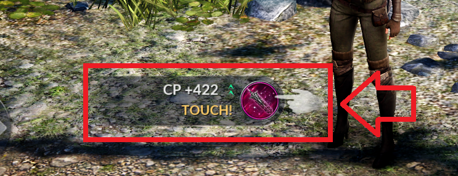
- You can immediately equip the 'Absolute Kzarka Main Weapon' received as a Season Pass reward.
 - Use the 'Auto-Equip' button in your inventory to quickly equip the gear with the highest Combat Power.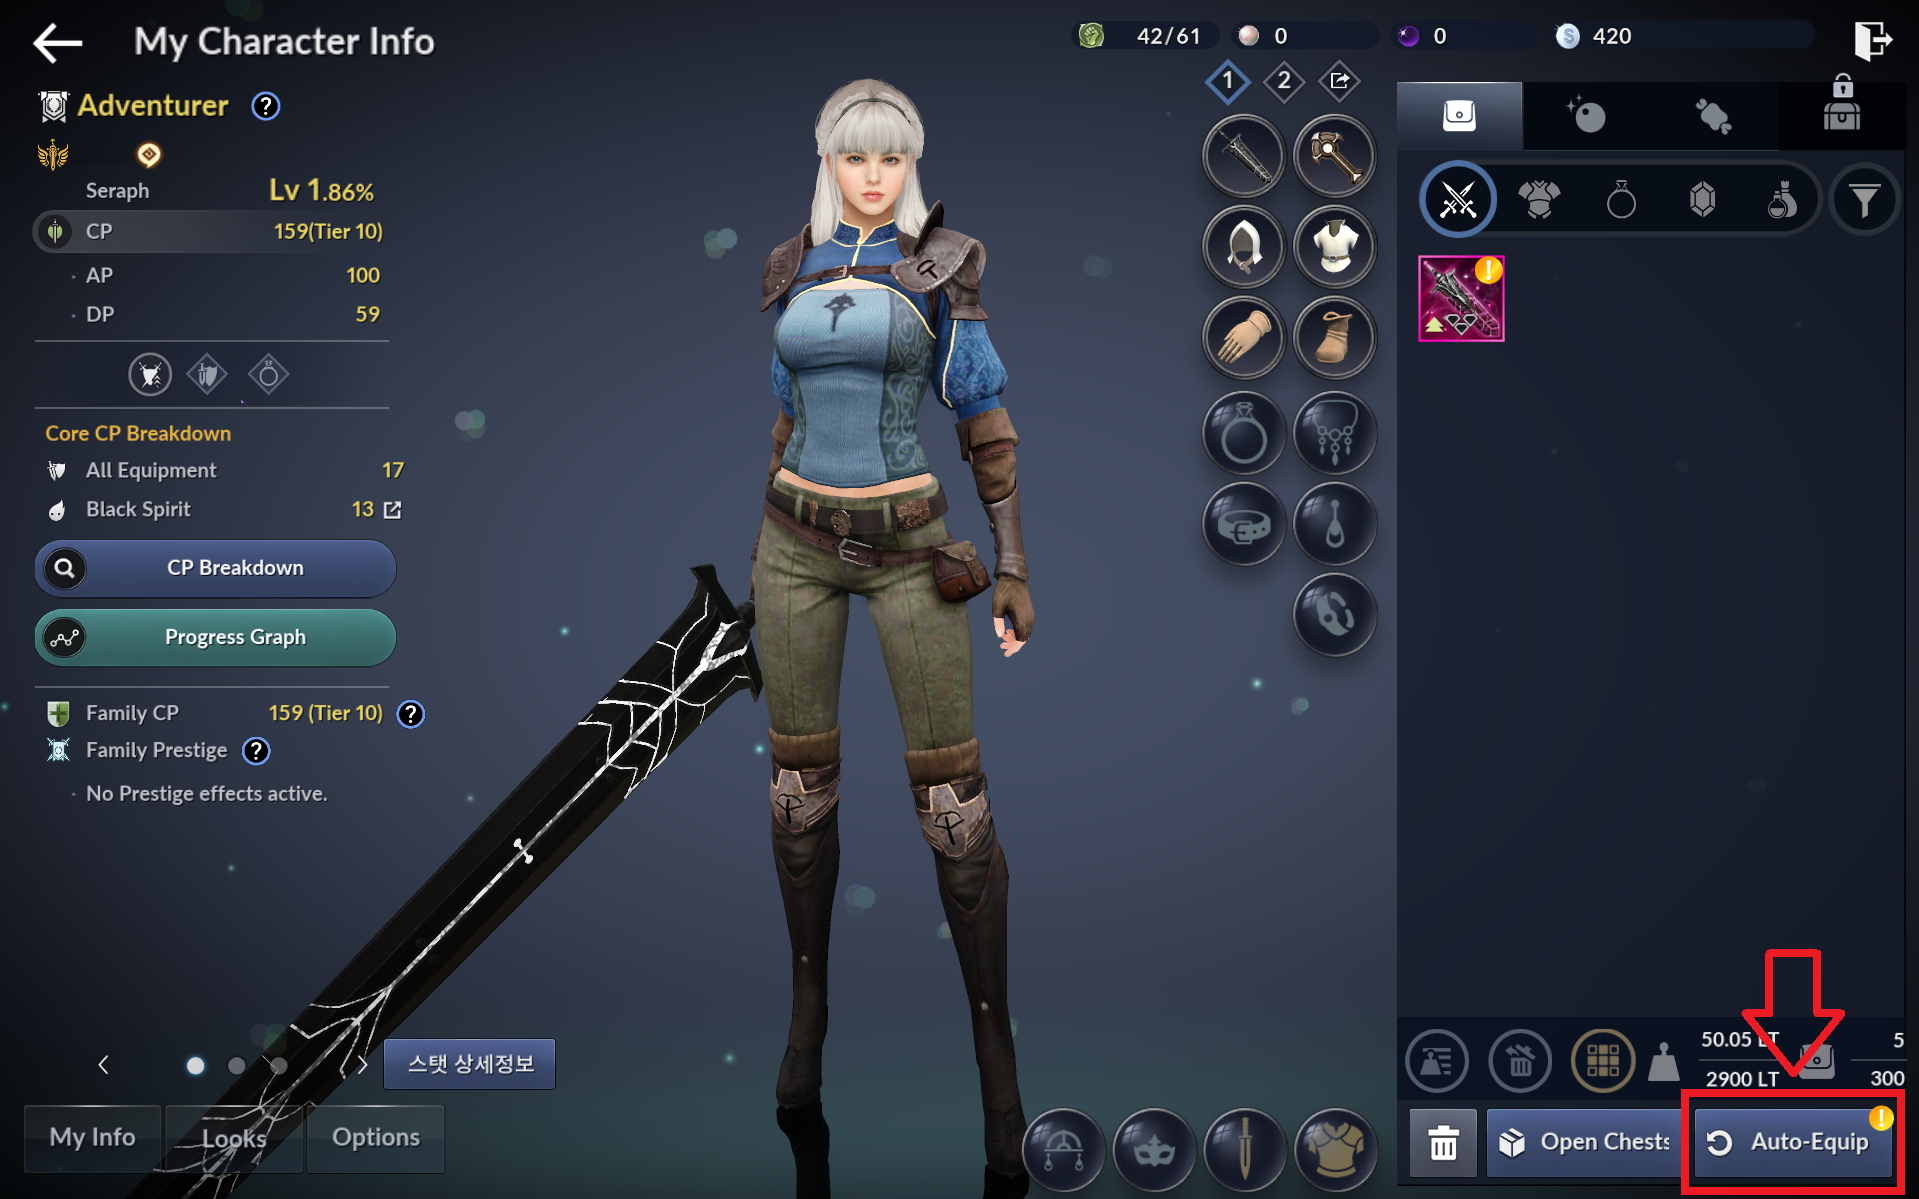
6) Black Spirit and Black Energy I
Feed 'Condensed Black Energy' to your Black Spirit to grow it.
- Via the Season Pass's shortcut, or by selecting [Black Spirit] > [Black Energy], select the gem-shaped icon at the top.
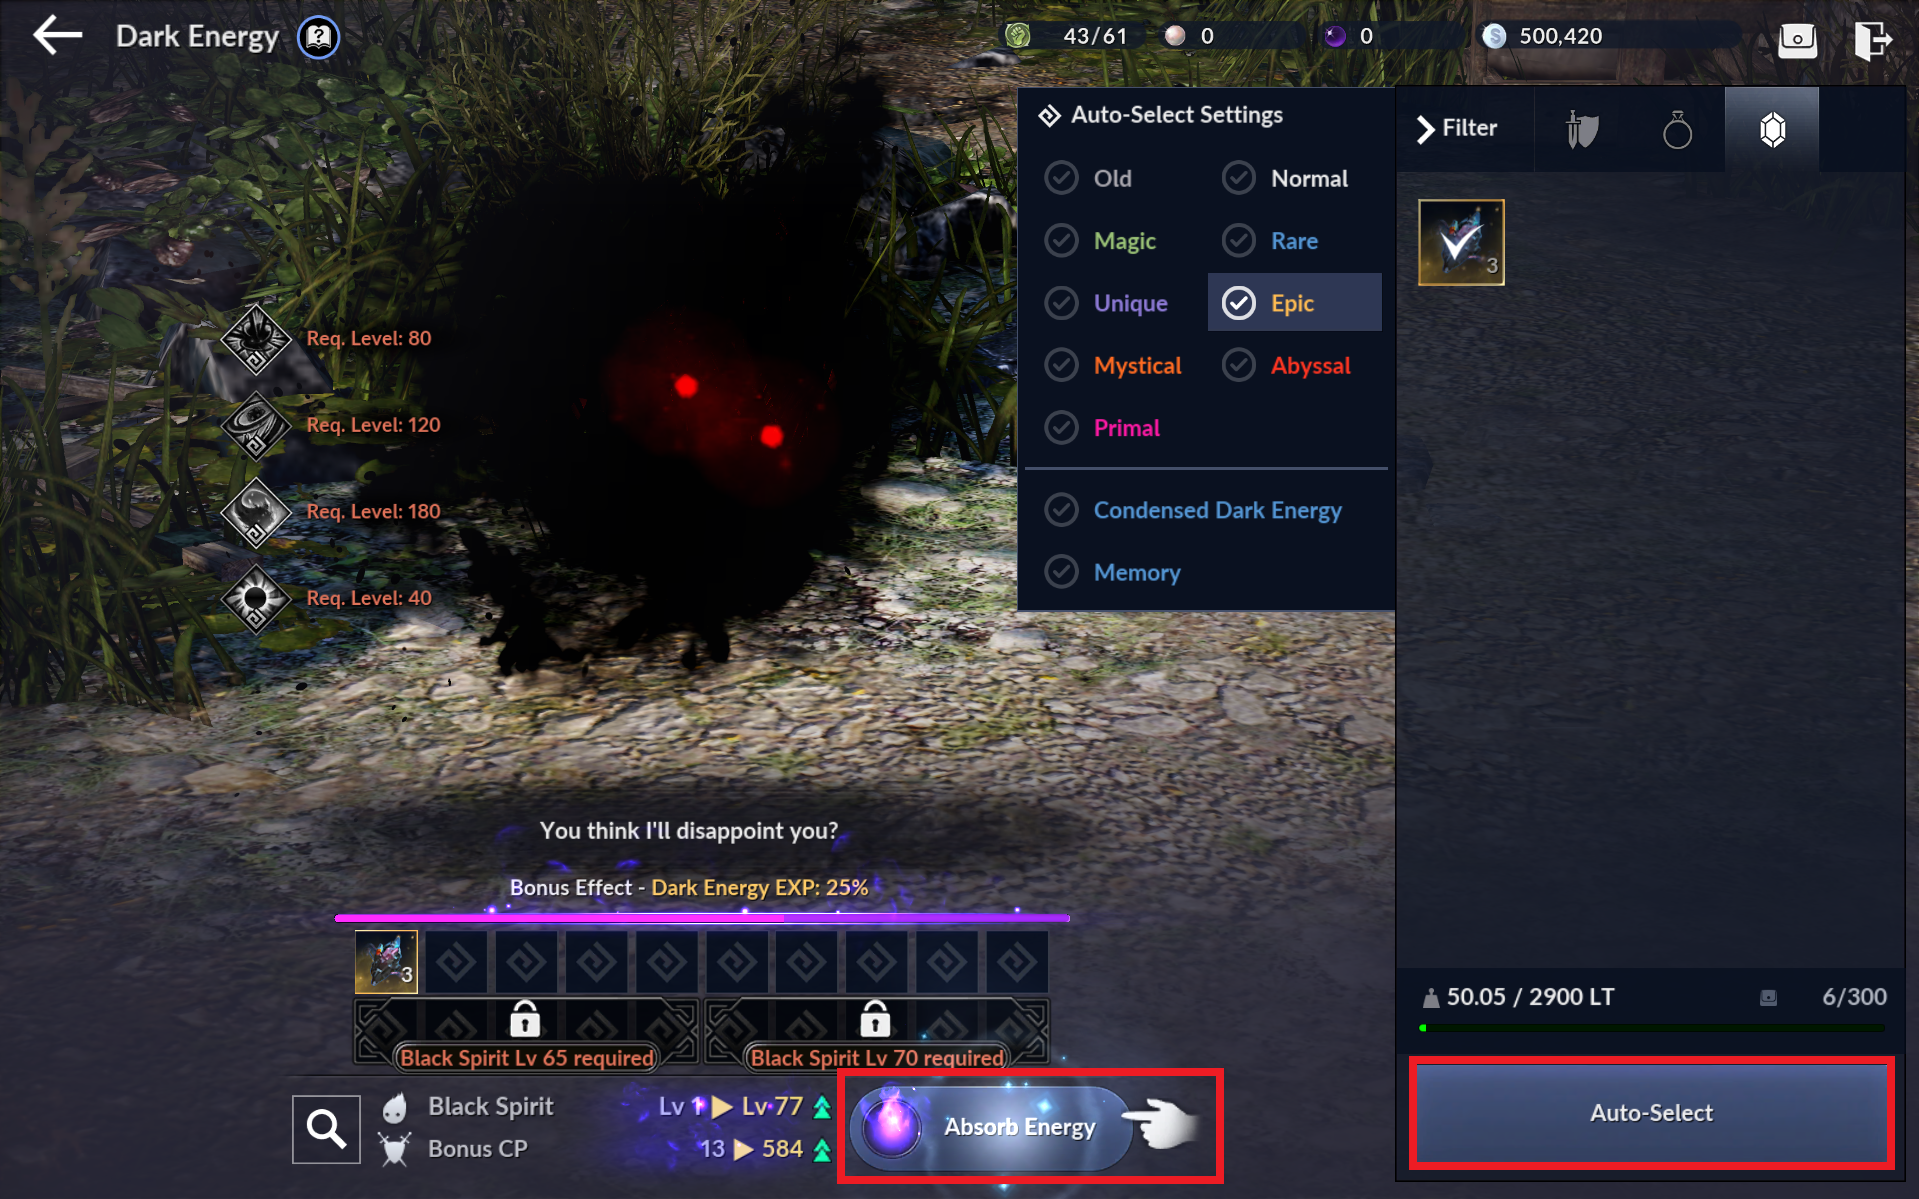 - Tap the Auto-Select button shown on screen, then absorb the Black Energy through Energy Absorption.
- Every time your Black Spirit's level increases, you gain additional Combat Power and unlock locked Black Spirit functions.
7) Equipment Potential Enhancement I
Enhance a 'Primal grade or higher Main Weapon' to +10 Potential or higher, or equip one.
- Via the Season Pass's shortcut, or [Black Spirit] > [Shortcut] > [Potential Enhancement/Forced Enhancement] menu.
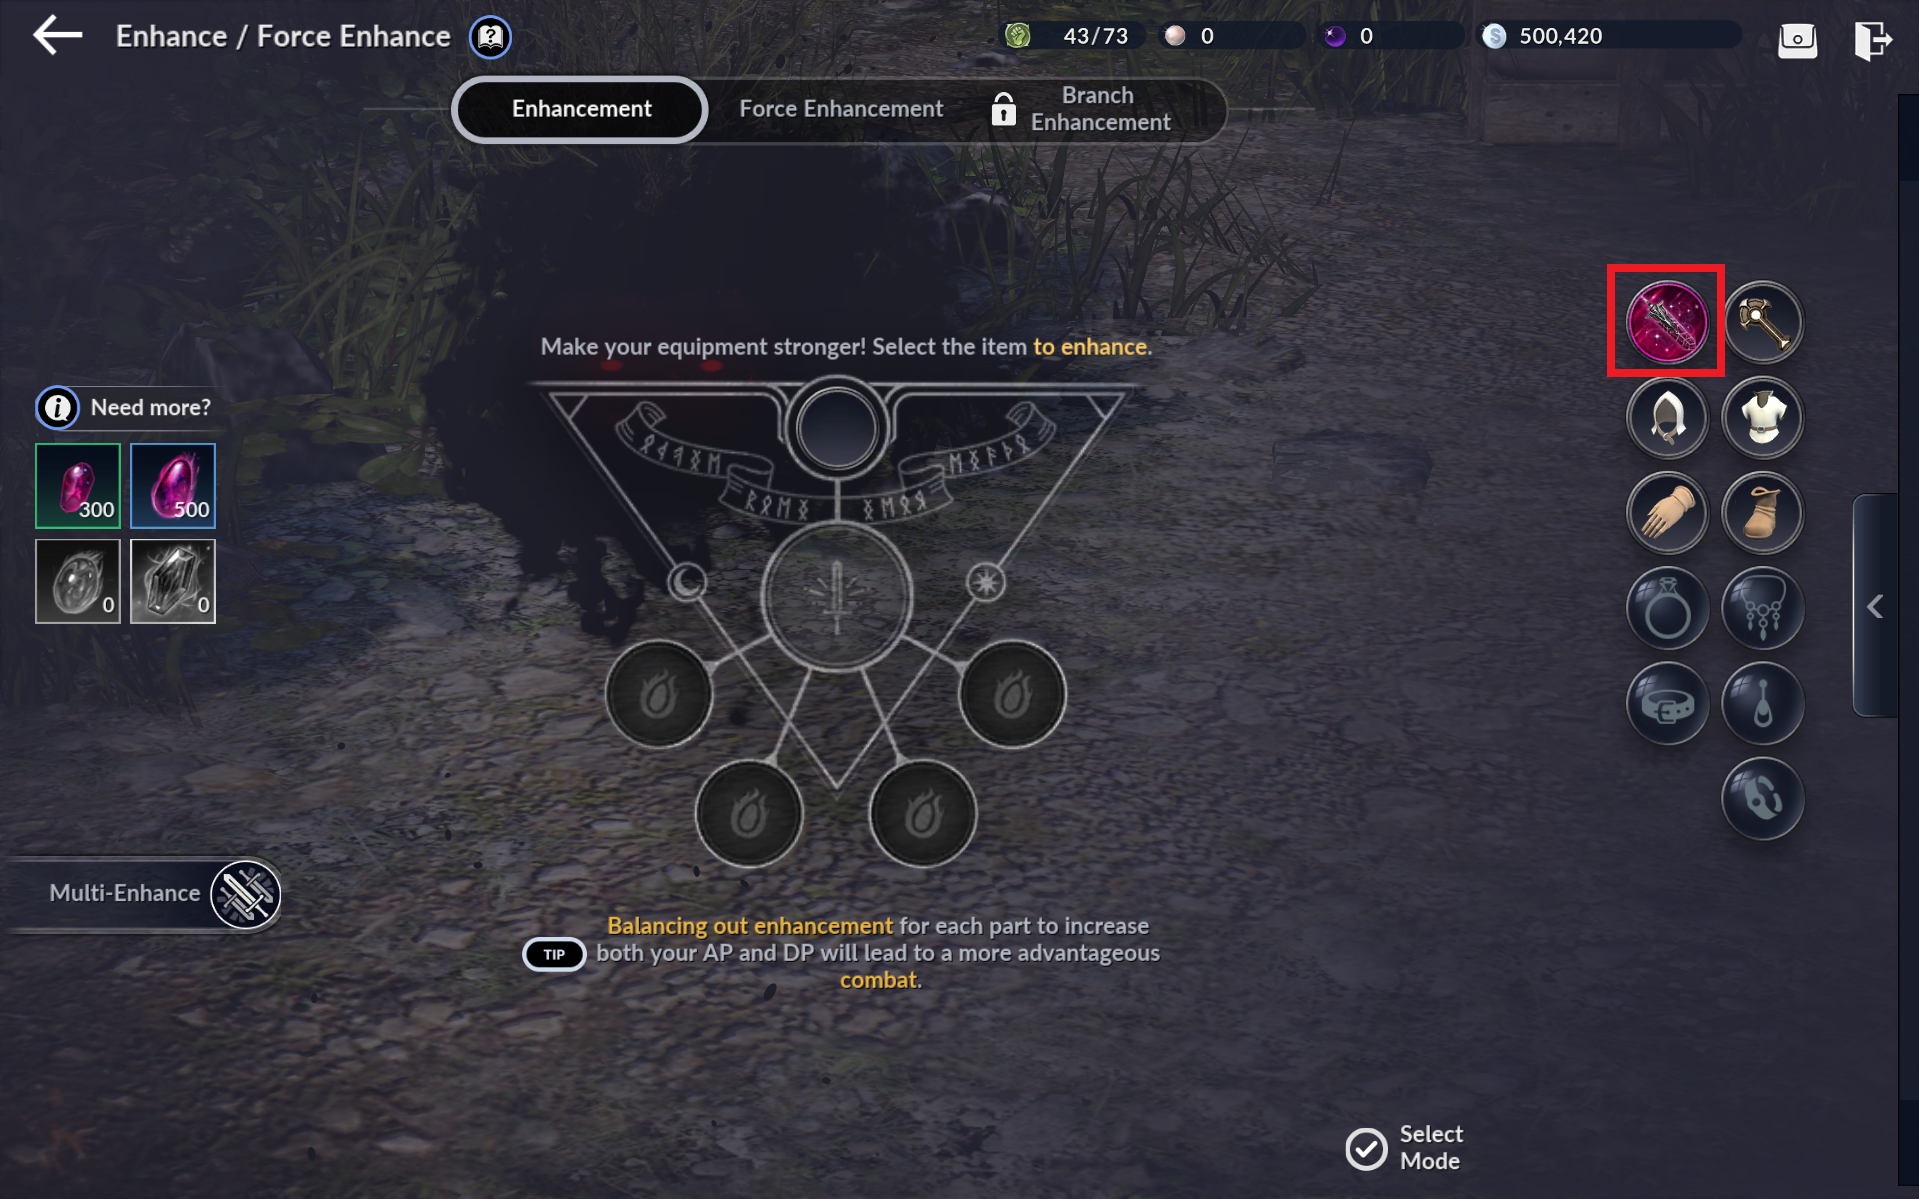
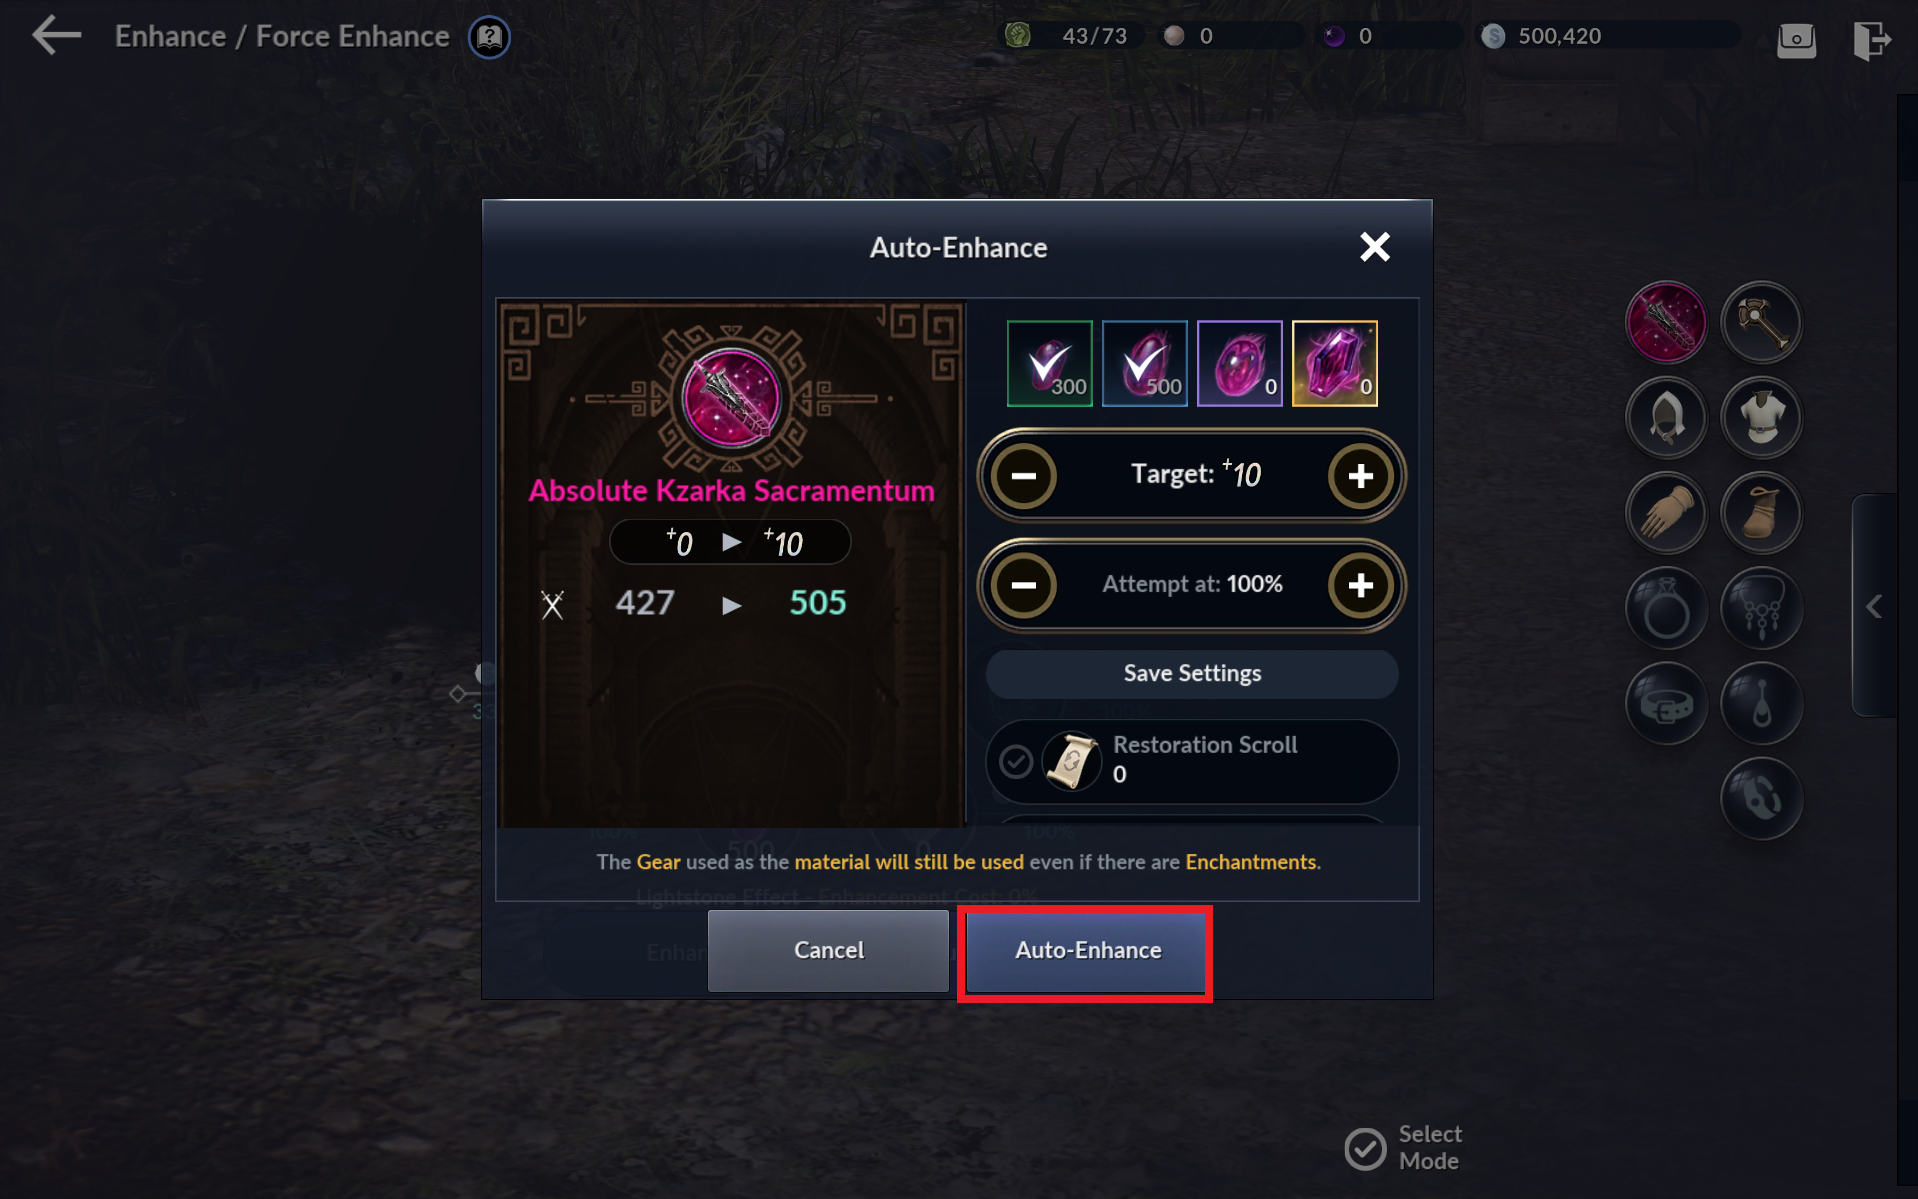 - Set Enhancement Target: +10, Attempt Success Rate: 100%, then tap [Auto-Enhance] to enhance.* With this setting, enhancement proceeds using materials at a 100% success rate up to the target enhancement level. Potential Enhancement is the most basic way to raise Combat Power in Black Desert Mobile. Keep enhancing your equipment's Potential steadily to grow.
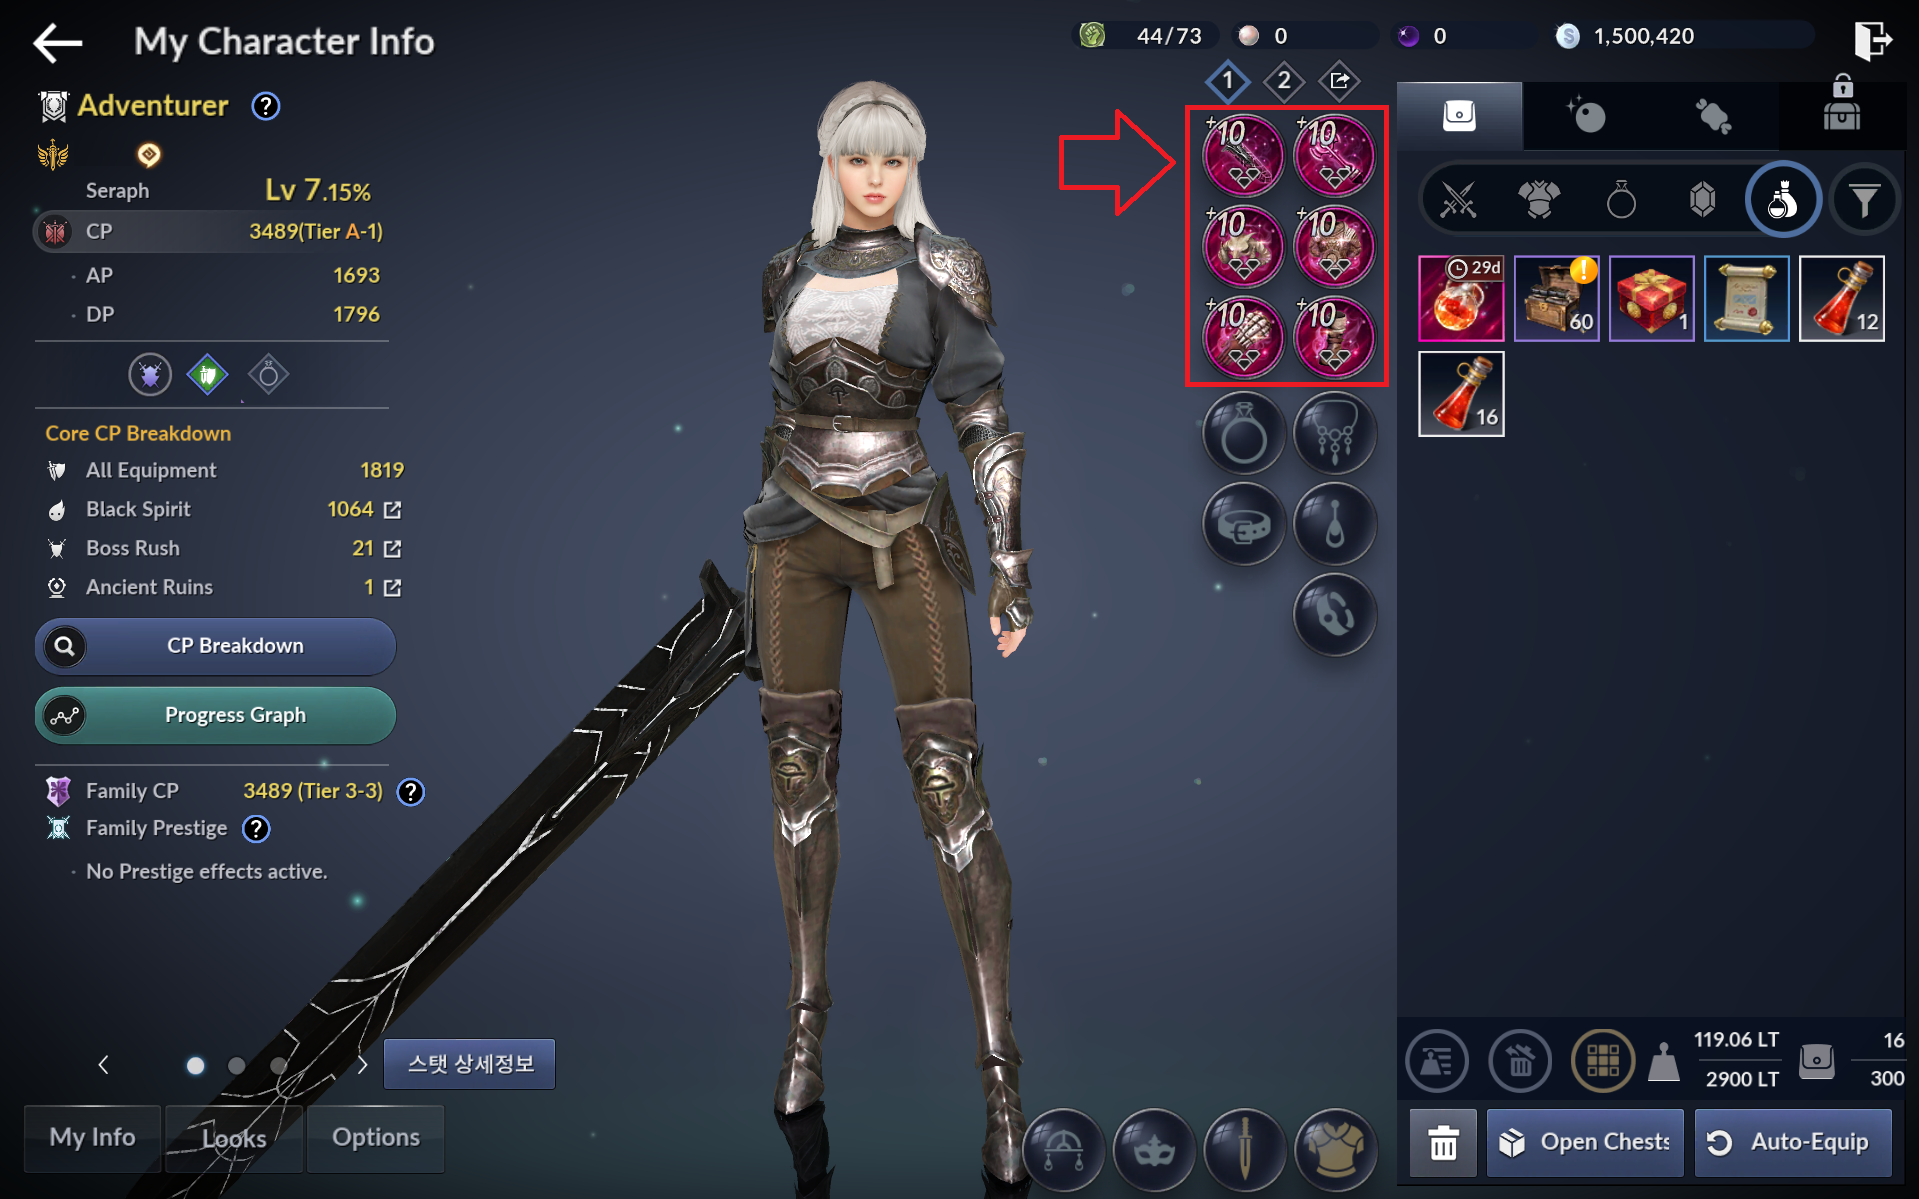
- In the same way, enhance the Sub-Weapon, Helmet, Armor, Gloves, and Shoes obtained as Season Pass rewards to +10 Potential.
8) Boss Rush Board I
Take on 'Boss Rush' once to grow.
- Enter the Boss Rush Board via the Season Pass's shortcut or [Menu] > [Boss Rush].
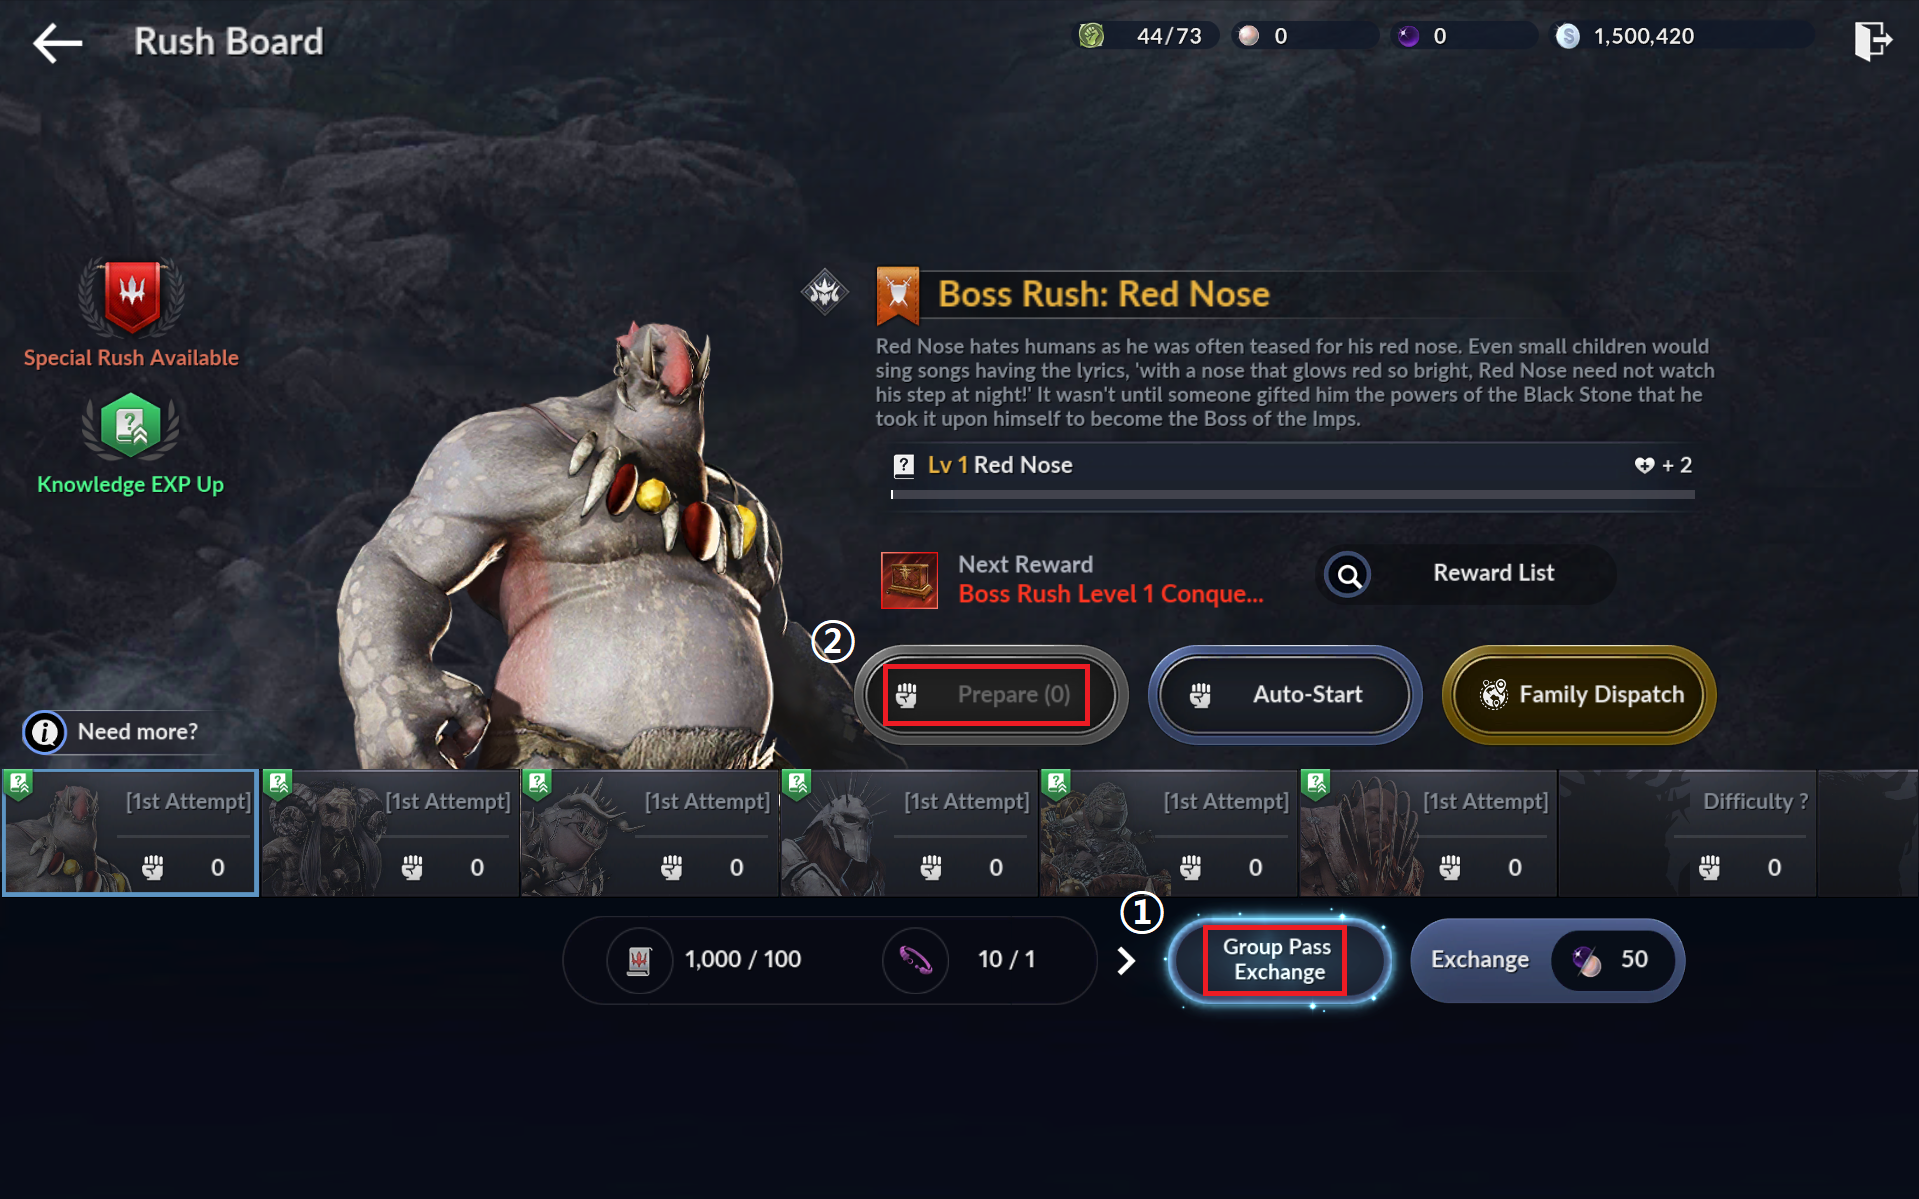
1. After [Exchange Random Attempts], use the Max button to exchange all currency you hold for Boss Rush attempts.
2. Boss Rush: Select Red Nose, then use the Prepare Boss Rush button to take on the Red Nose Boss Rush.
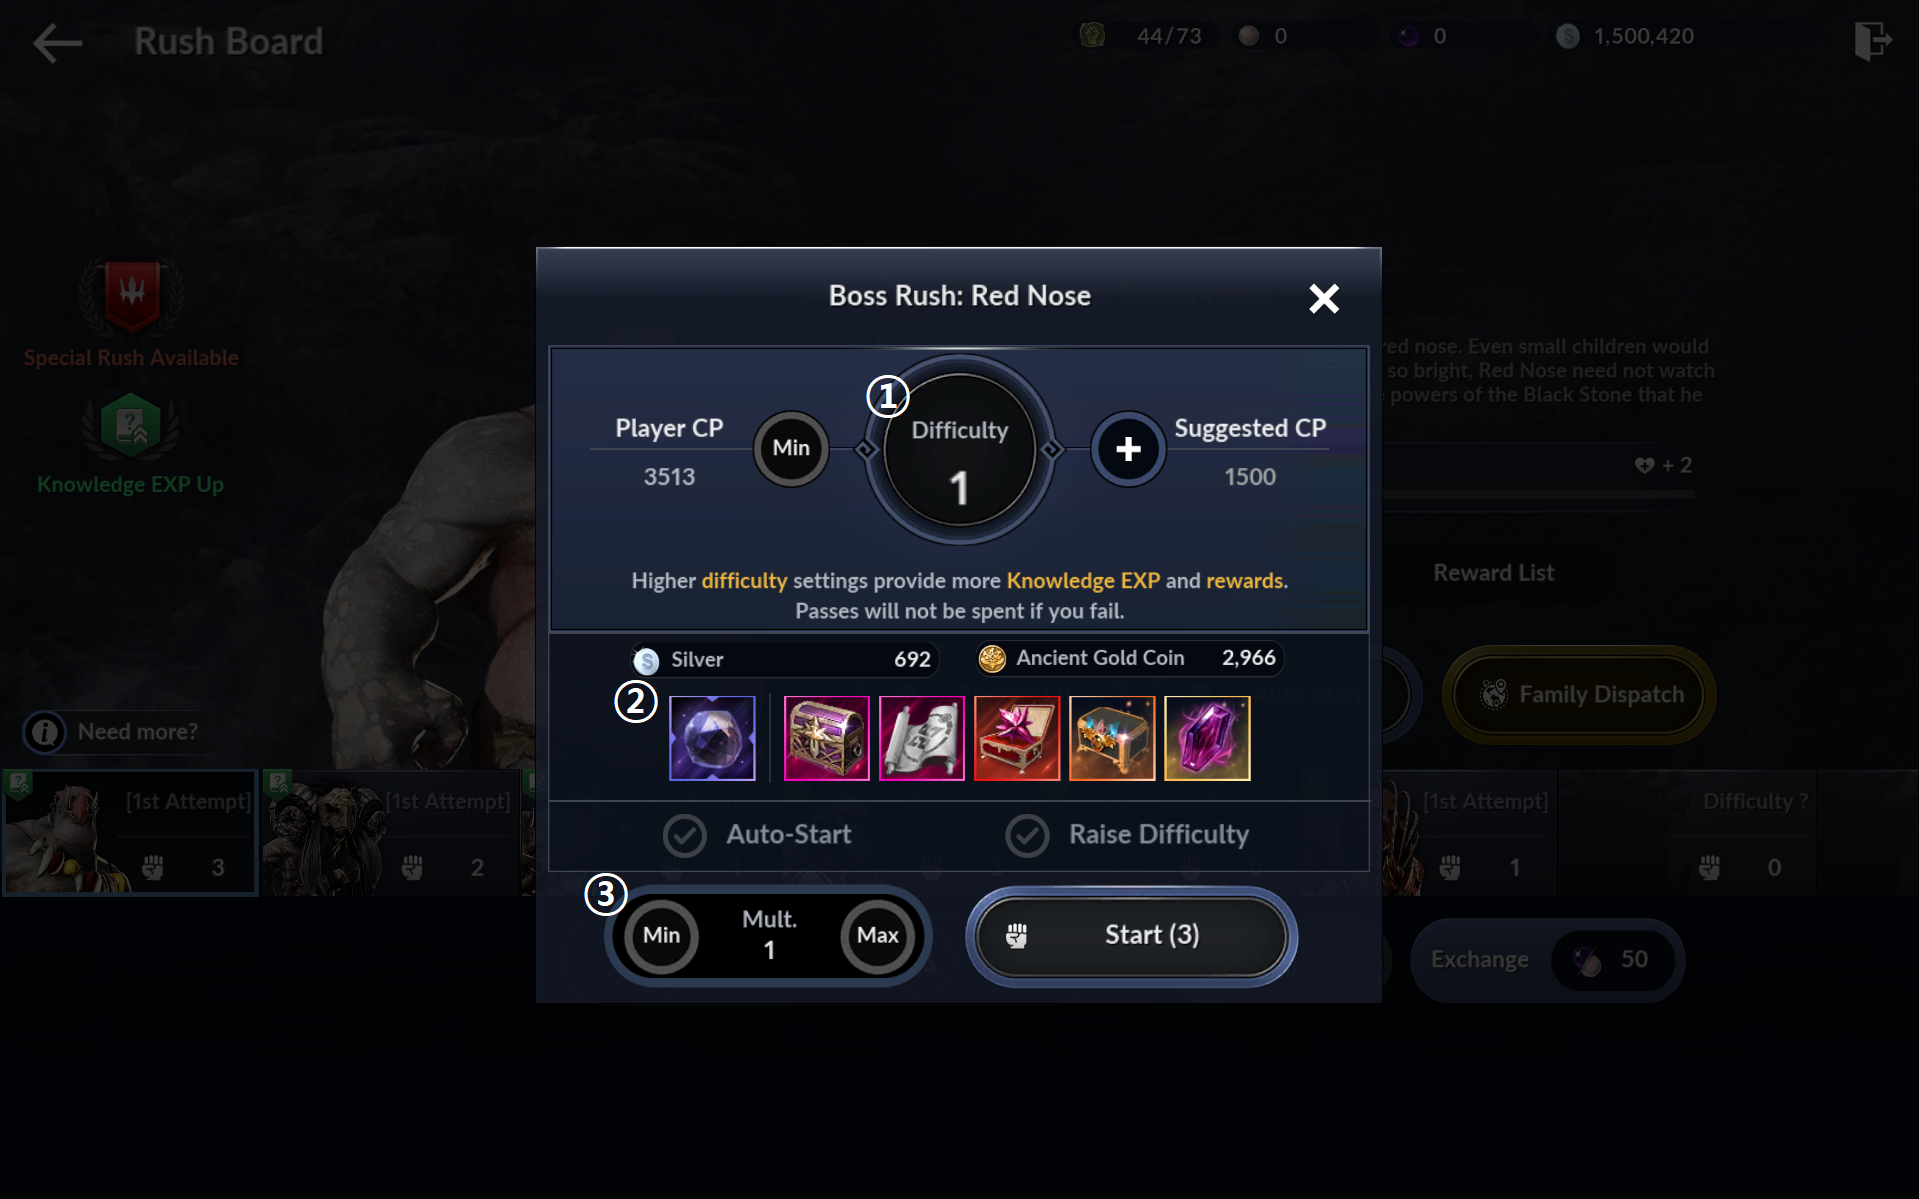
| No. | Item | Description |
|---|---|---|
| 1 | Difficulty | You can enter at a difficulty matching your current Combat Power. Higher difficulty grants better rewards. |
| 2 | Obtainable Rewards | Rewards obtainable upon completing Boss Rush at the current difficulty. |
| 3 | Multiplier | Use more Boss Rush entry attempts to gain more rewards, based on the set multiplier. Example: Setting a multiplier of 2 deducts 2 entry attempts and grants 2x the rewards. |
9) Gate of Expedition, Ancient Ruins I
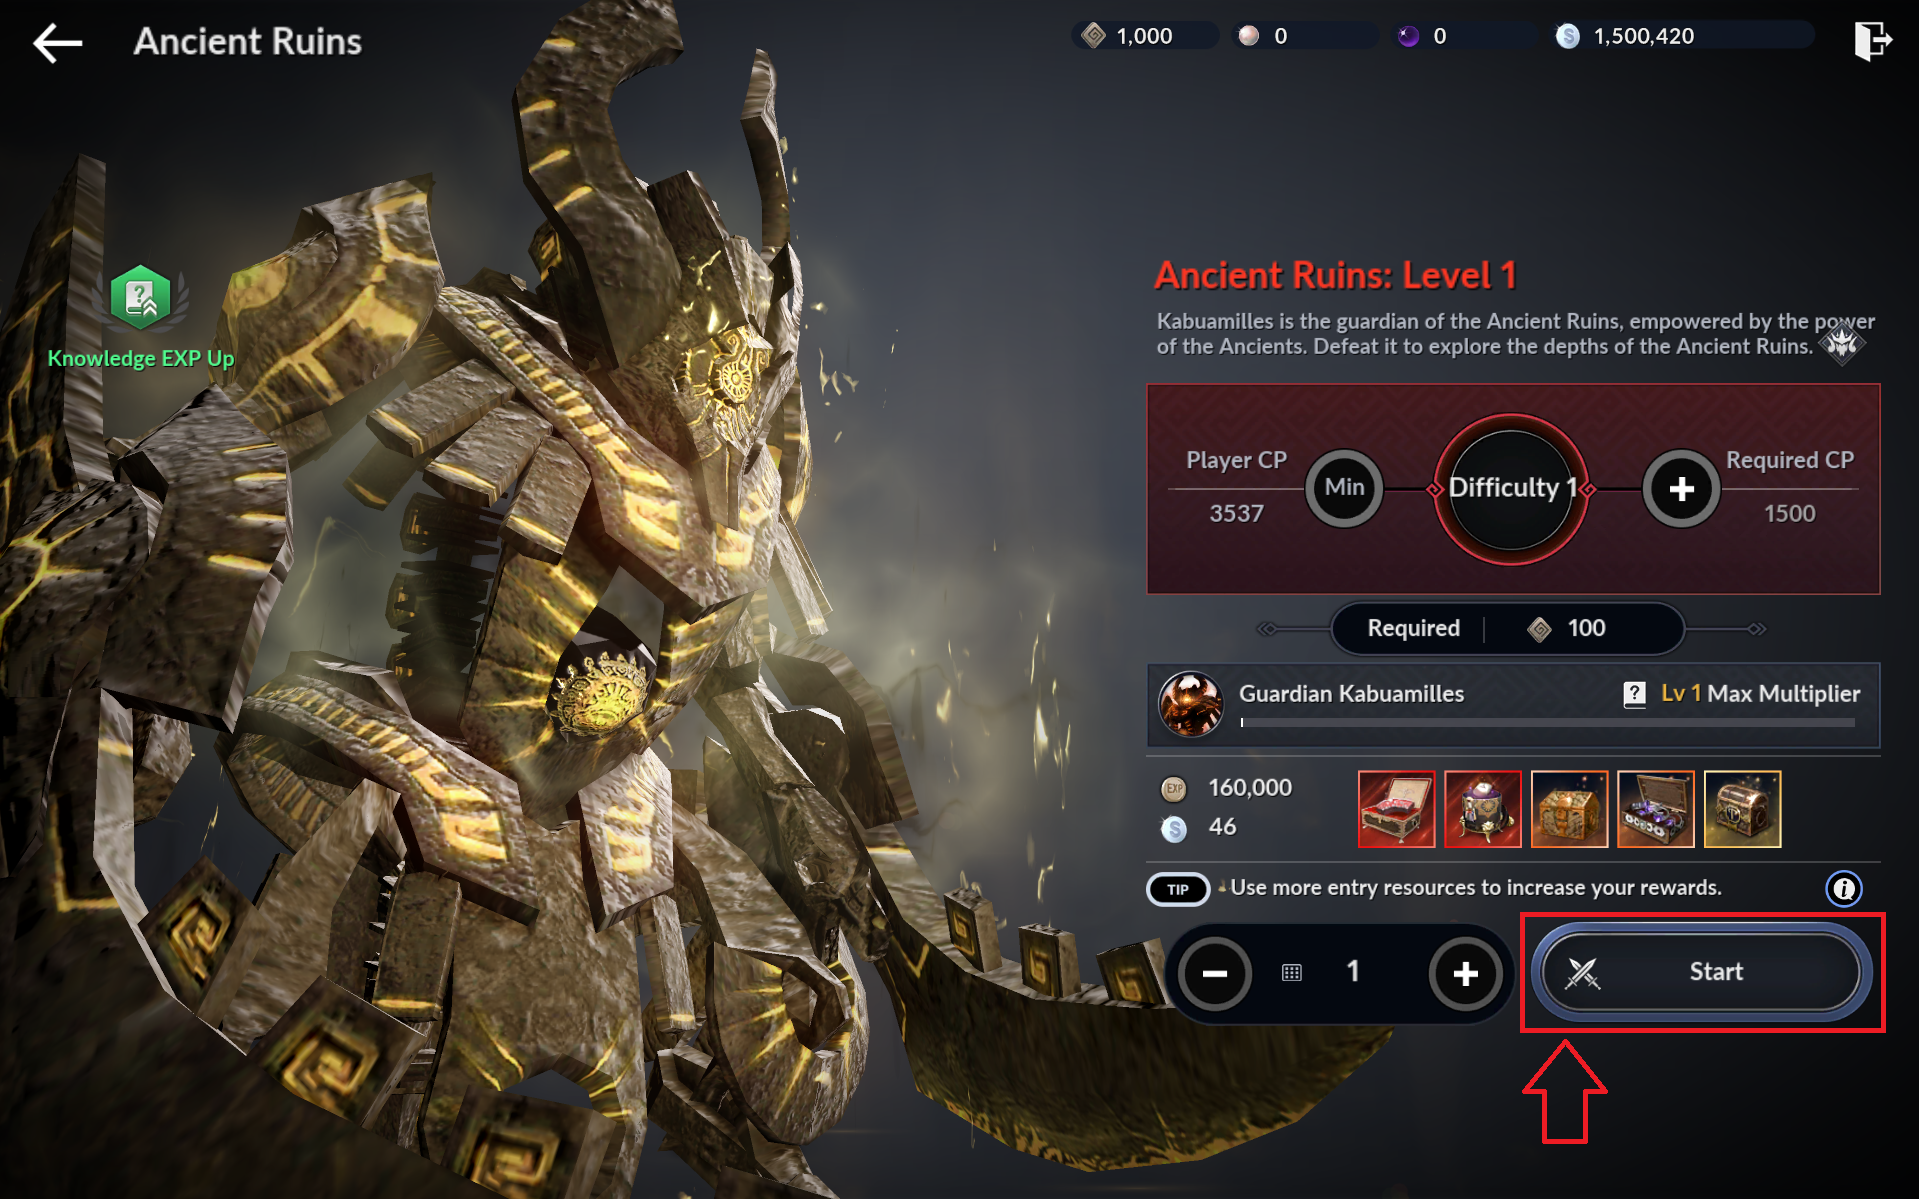
Explore the 'Ancient Ruins' once to grow.
- Enter the Ancient Ruins menu via the Season Pass's shortcut or [Menu] > [Ancient Ruins].
- Use the 'Start Combat' button to explore the Ancient Ruins.
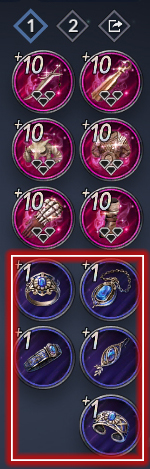
10) Accessory Potential Enhancement I
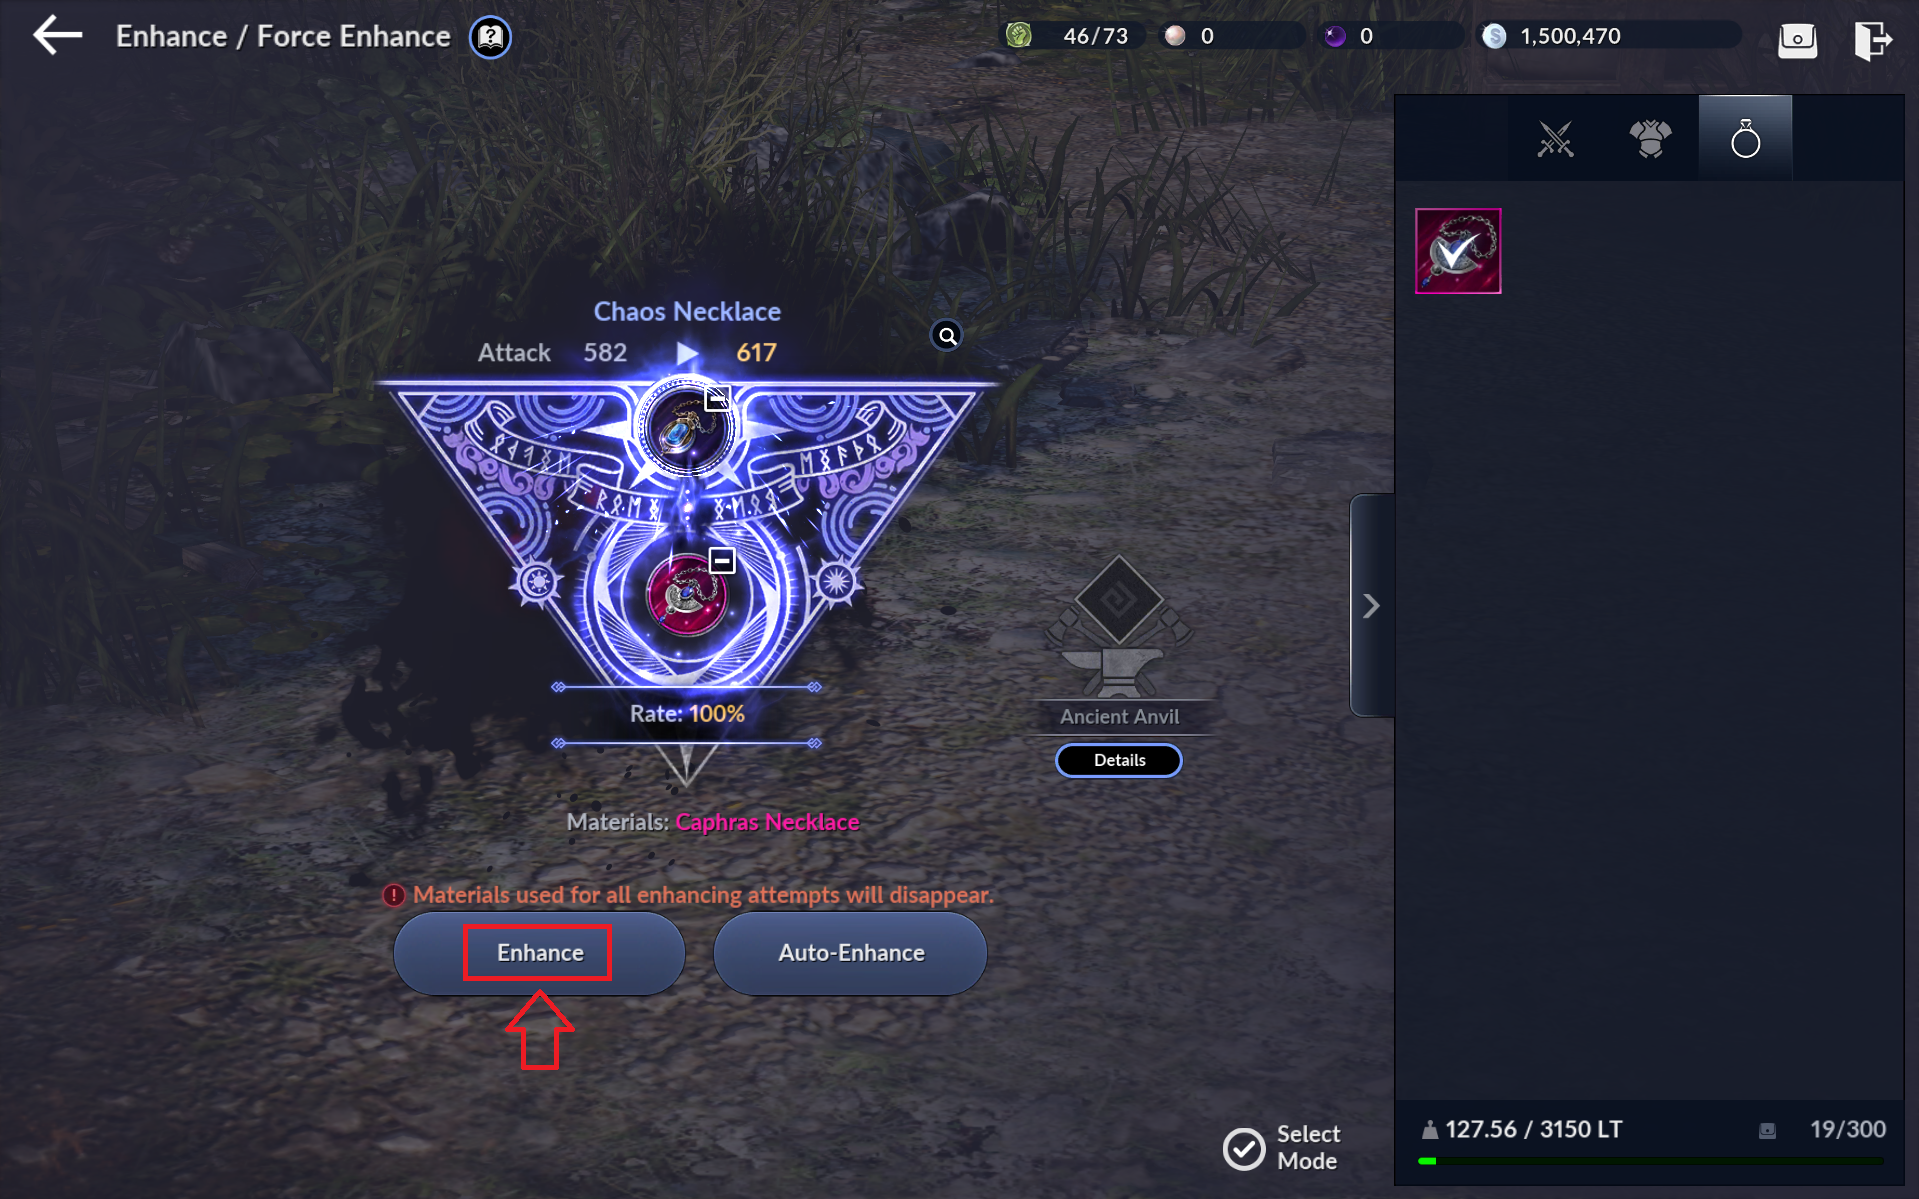
Enhance a Chaos grade or higher Necklace to +1 Potential or higher, or equip one.
- Enhance the accessory obtained as a Season Pass reward via the Season Pass's shortcut, or [Black Spirit] > [Potential Enhancement/Forced Enhancement].
- Use the Attempt Enhancement button to try enhancing the accessory's Potential.
- In the same way, enhance the Ring, Belt, Earring, and Bracelet obtained as Season Pass rewards to +1 Potential.
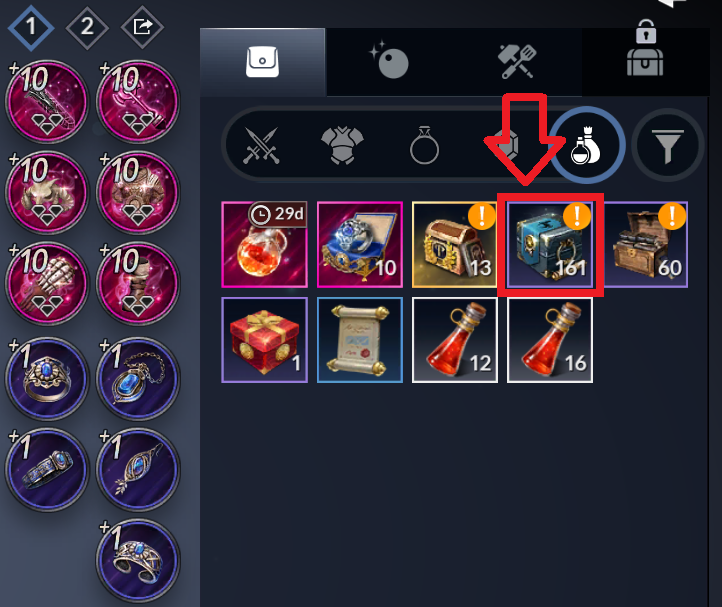
11) Monster Knowledge I
Use a 'Balenos Knowledge Chest' to grow.
- Check your inventory via the Season Pass's shortcut or the inventory icon.
- Using a 'Balenos Knowledge Chest' from your inventory grants Knowledge of monsters in the Balenos territory.
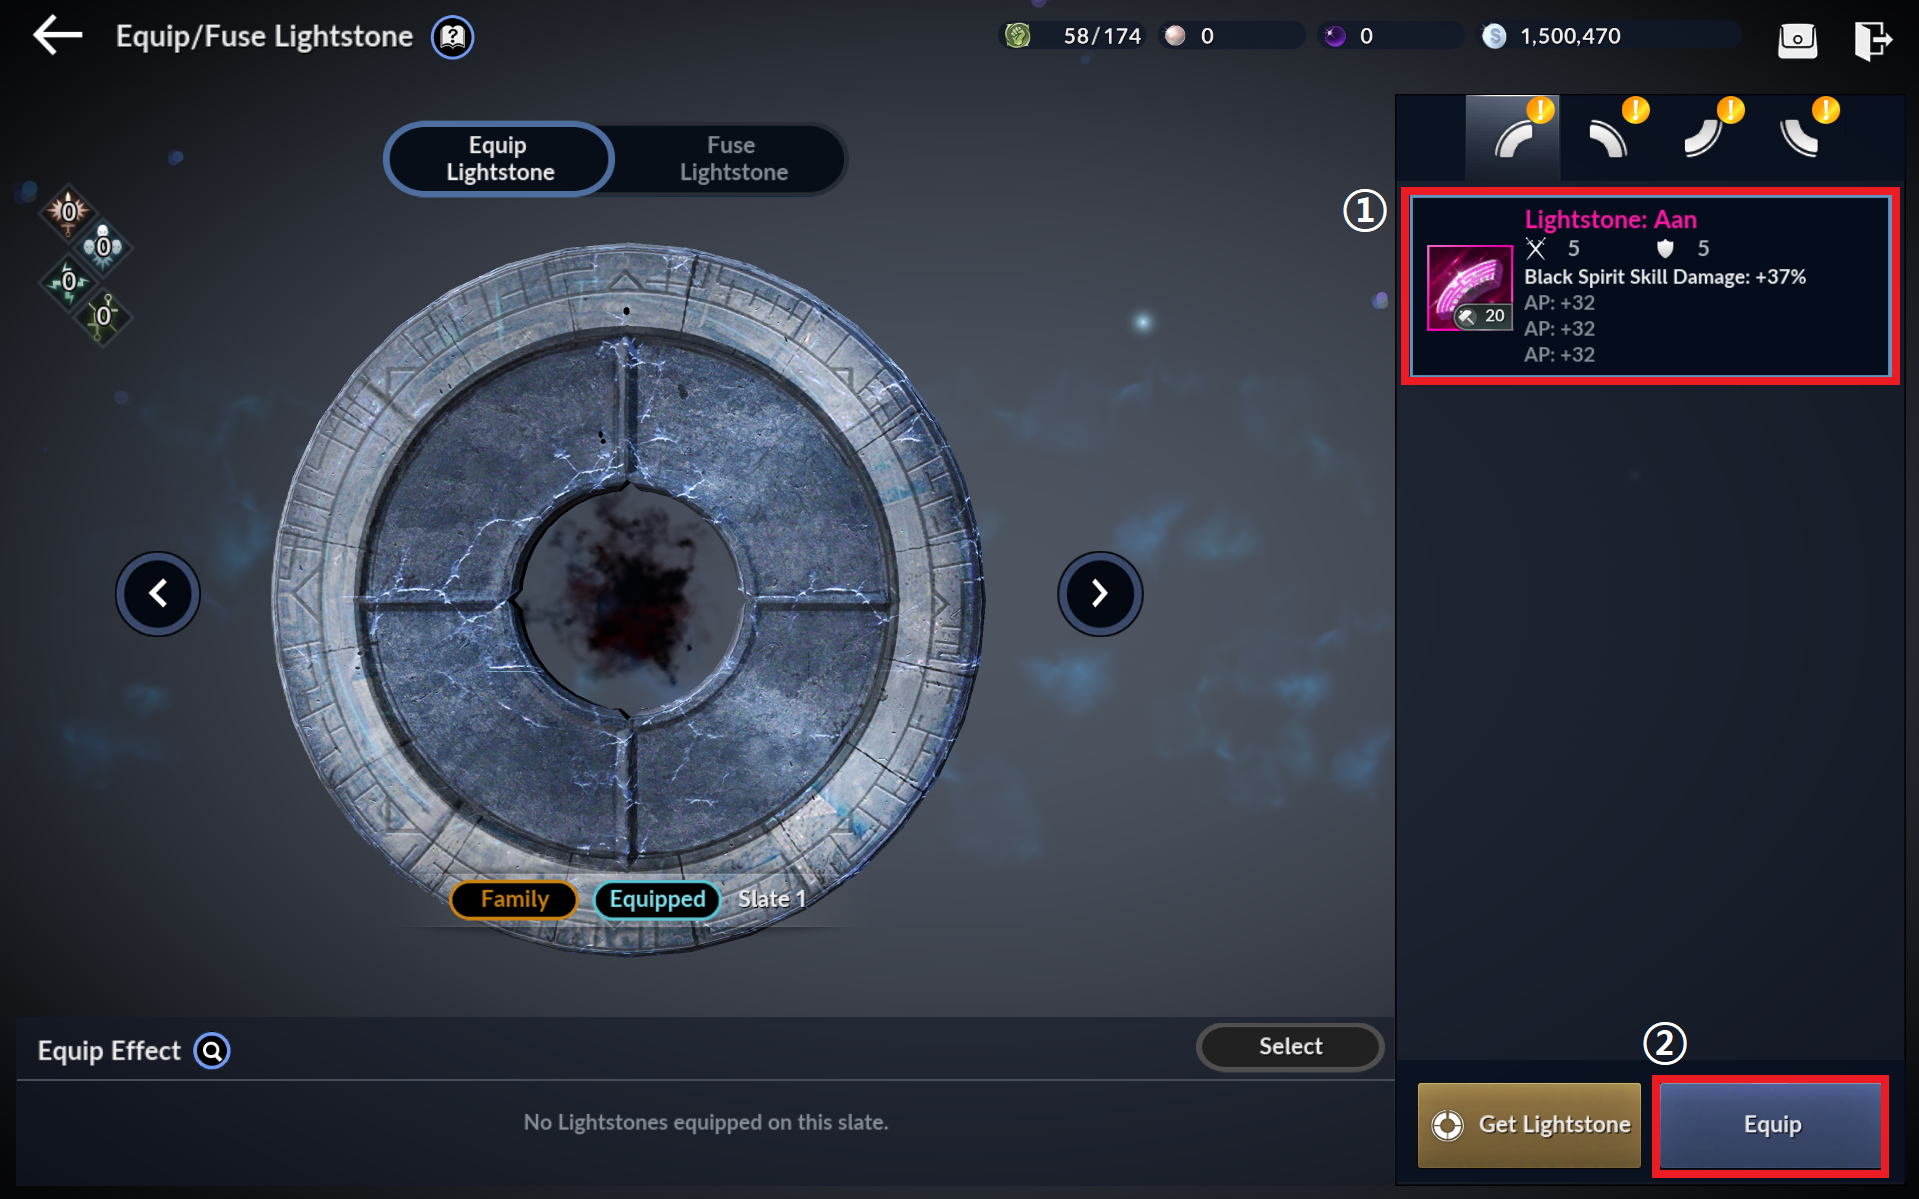
12) Equip a Lightstone
Equip a 'Primal grade or higher Lightstone.'
- Via the Season Pass's shortcut, or [Black Spirit] - [Equip/Combine Lightstone] menu.
1. Tap the Lightstone you want to equip.
2. Use the 'Equip' button to equip that Lightstone.
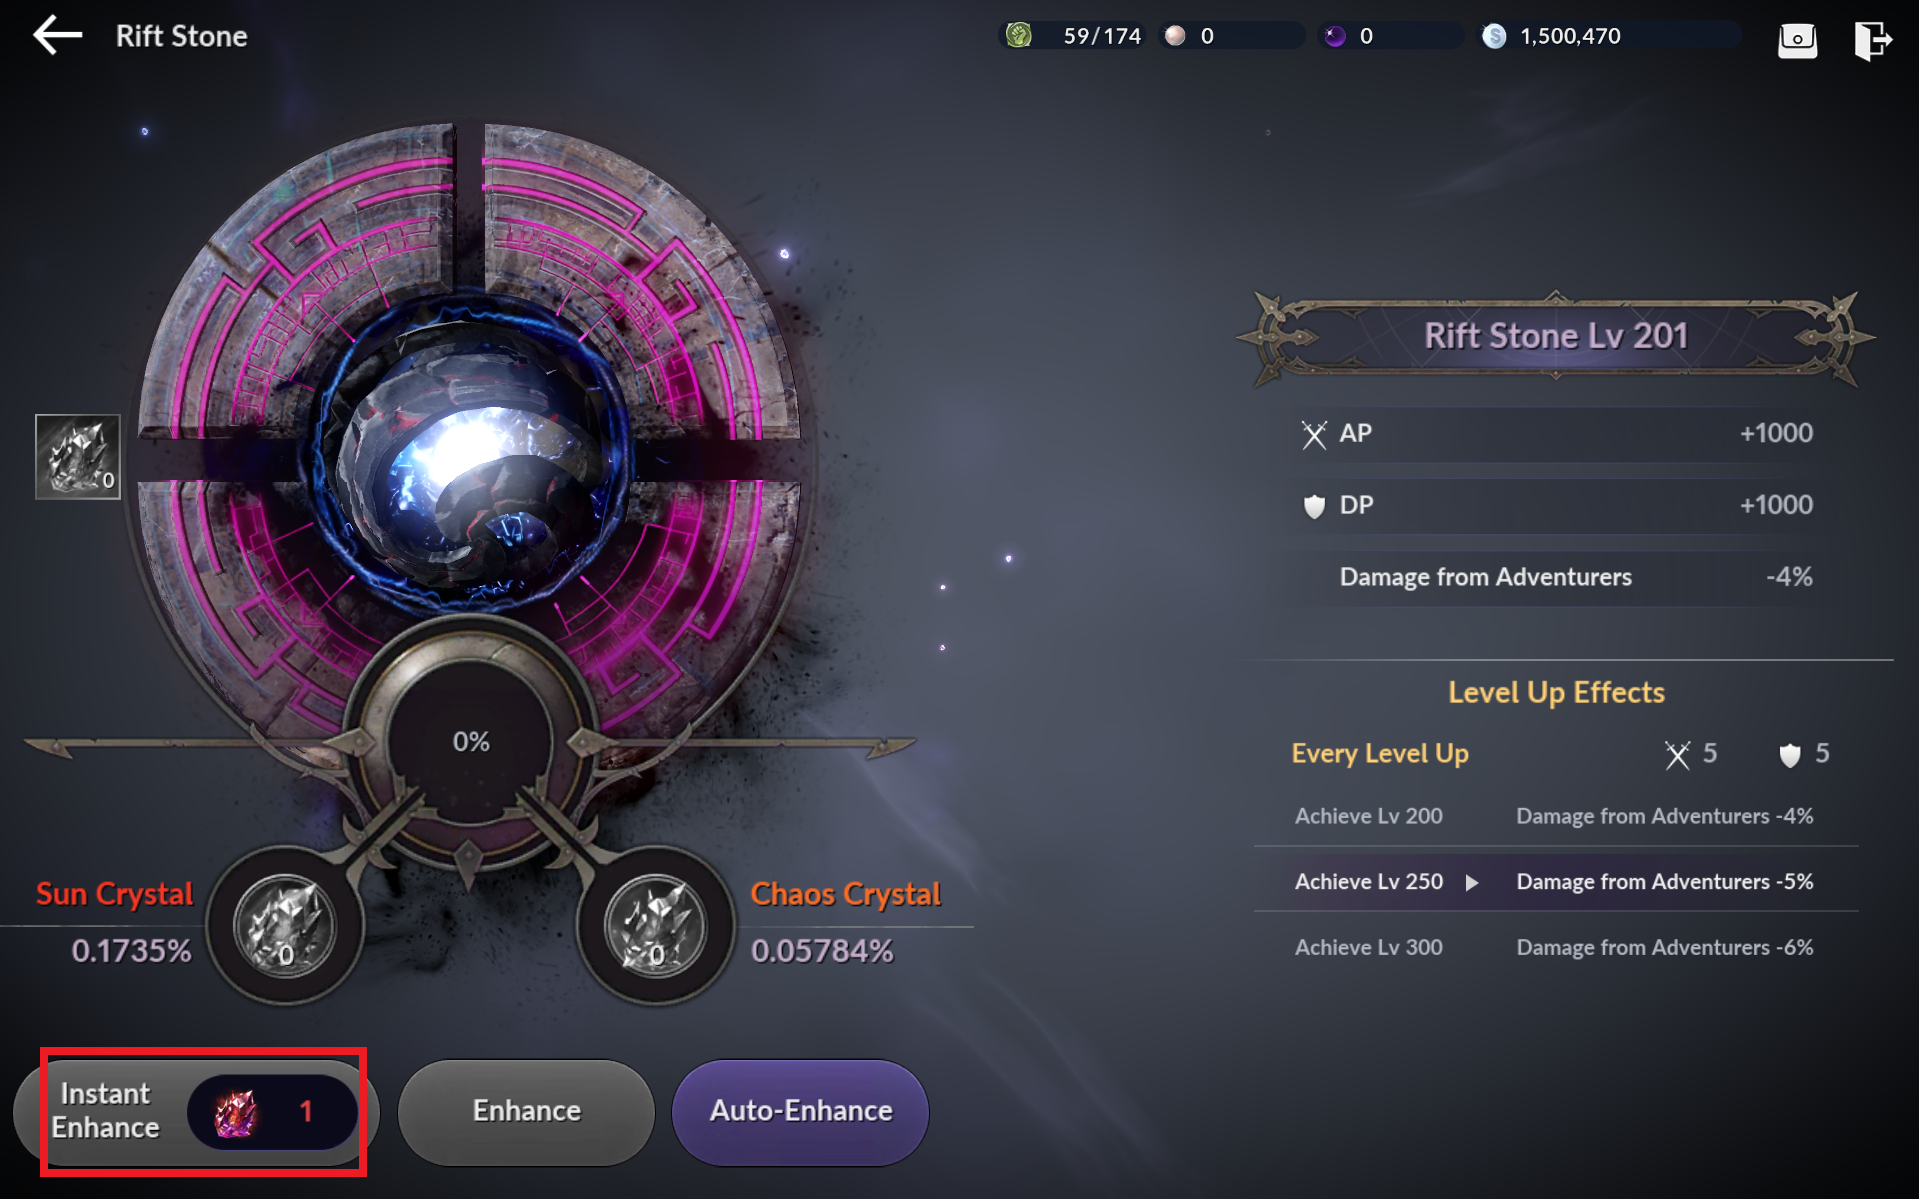
13) Rift Stone
Reach 'Rift Stone Level 200' to grow.
- Use the 'Blazing Chaos Crystal x20 Chest' obtained as a Season Pass reward from your inventory.
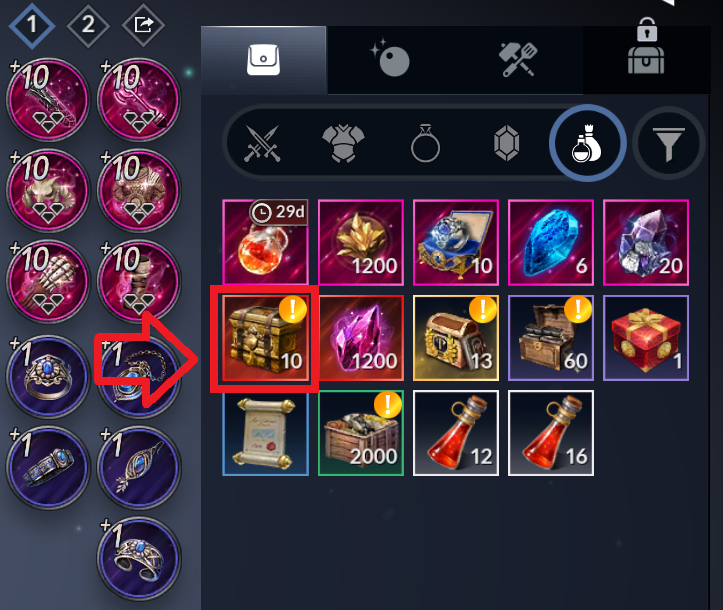
- After tapping the Blazing Chaos Crystal, use the Rift Stone button to move to the [Rift Stone] menu.
- Use the Instant Enhance button in the bottom left to reach Rift Stone Level 200.
14) Camp I
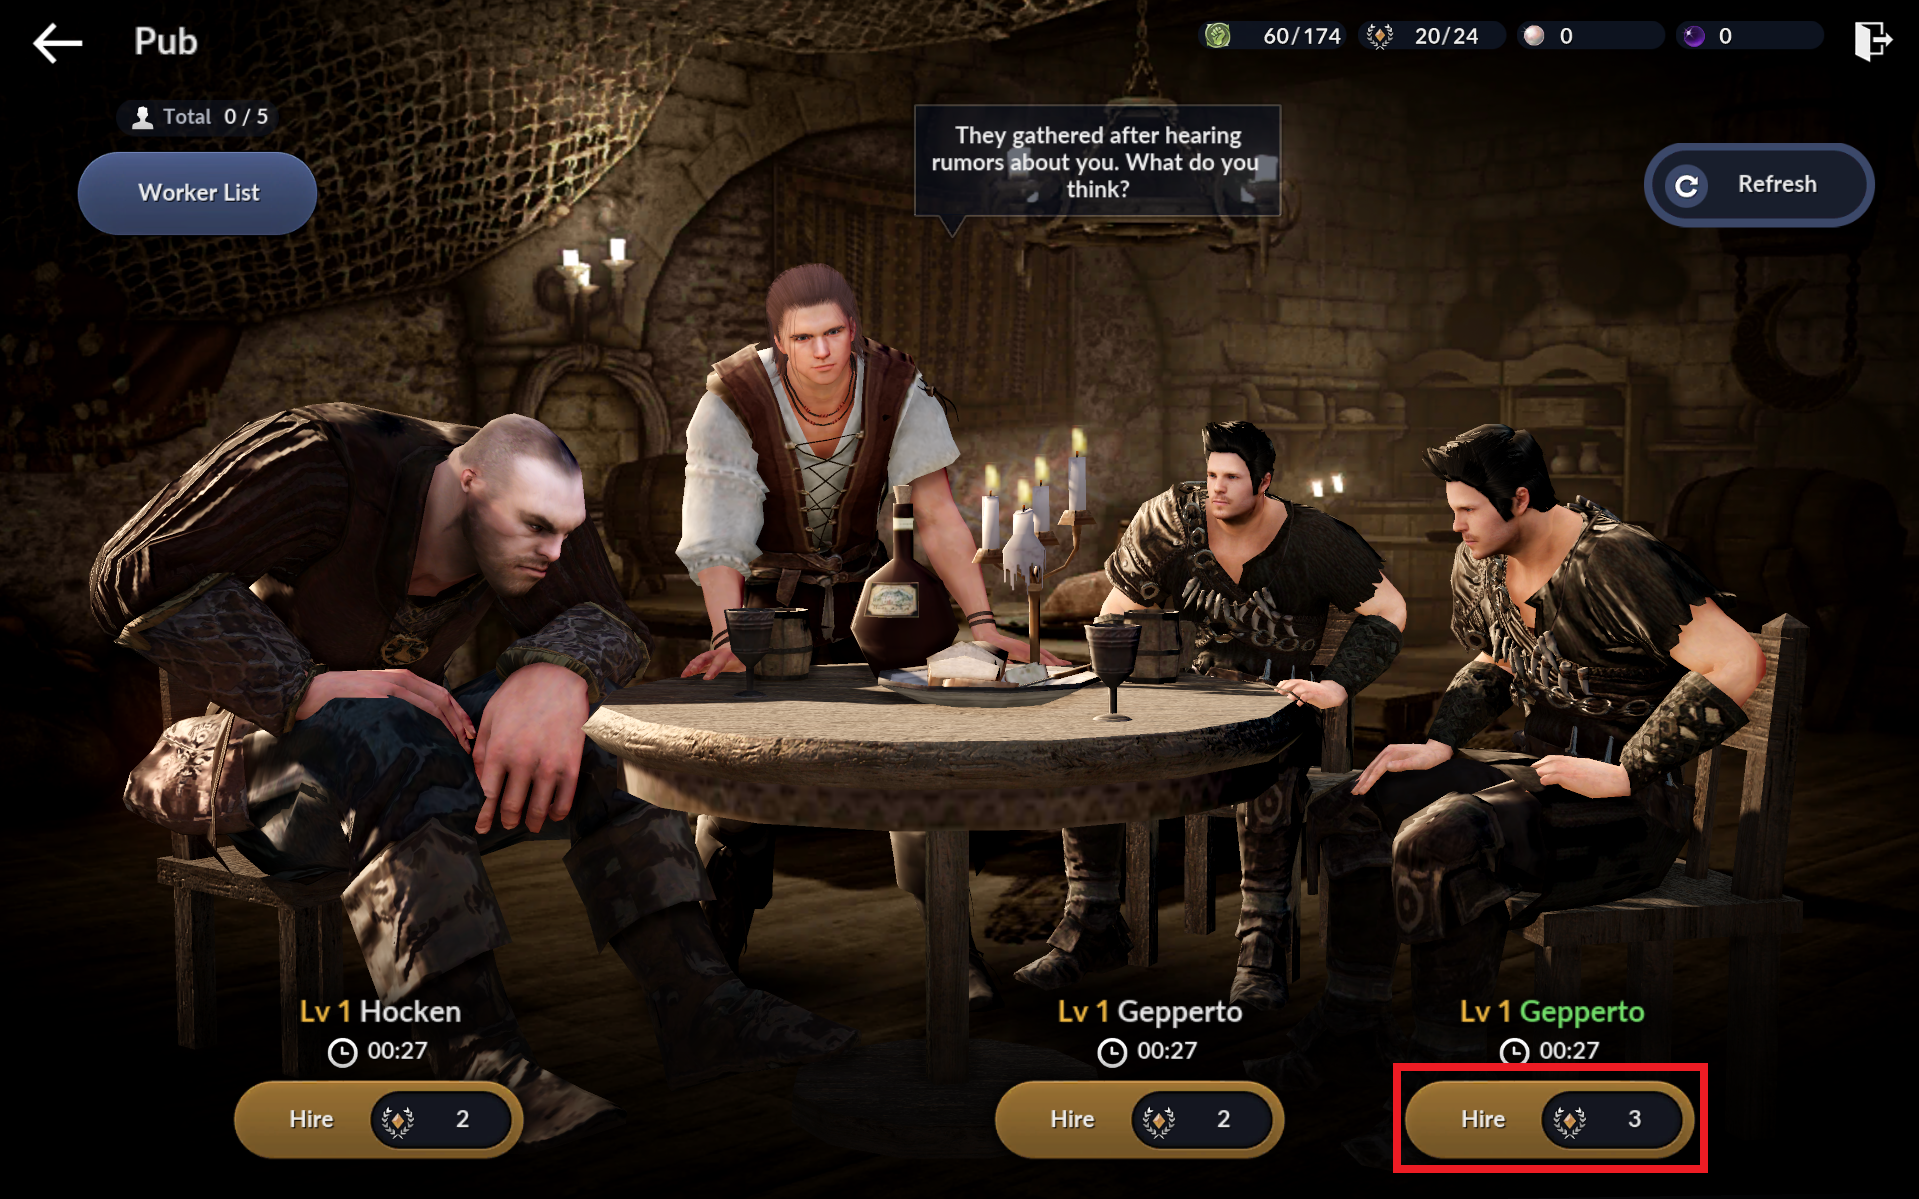
Hire or have '1 Camp Worker' at your Camp's tavern.
- Move to your Camp via [Menu] - [Camp], then go to the tavern's Worker Hiring menu.
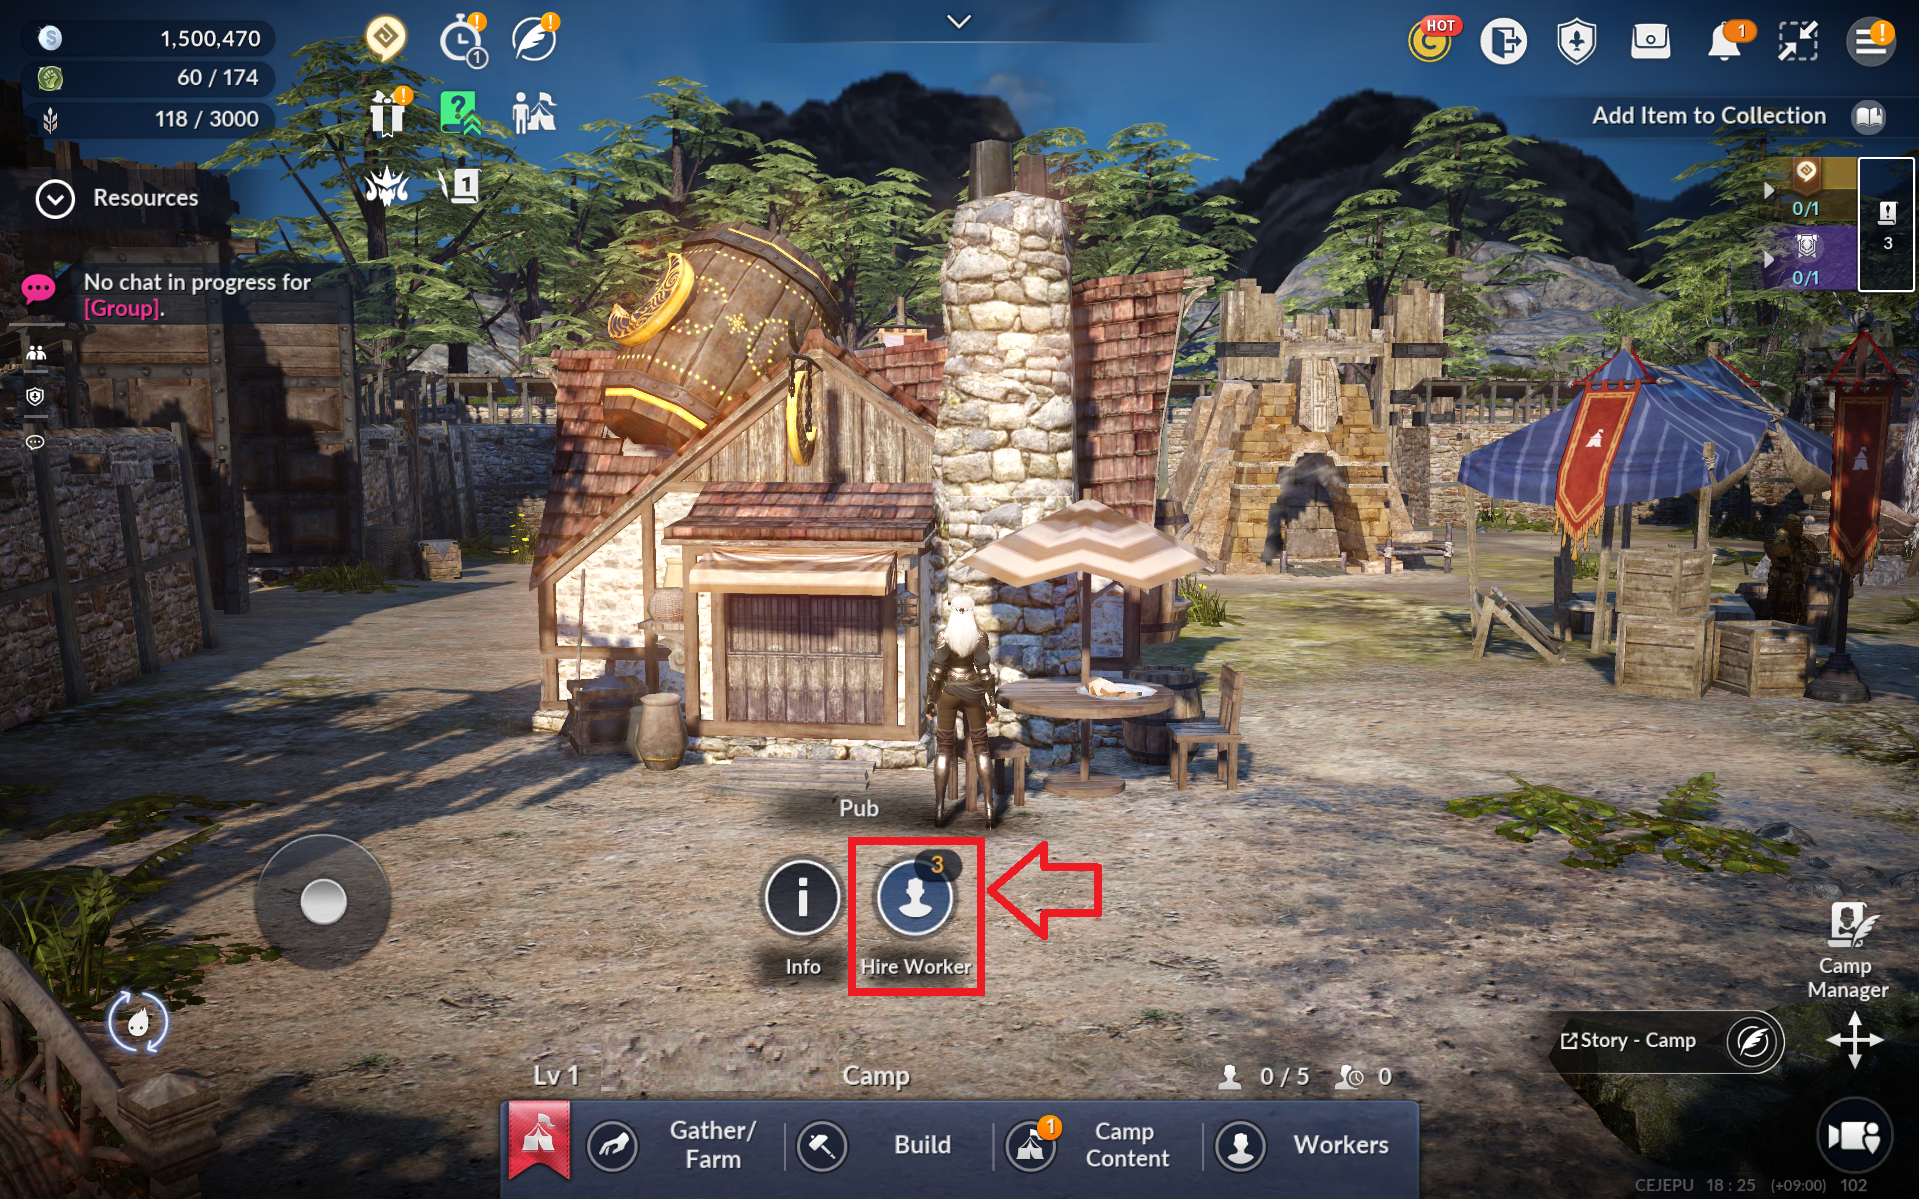
- Use the Hire button to hire the Worker you want.
15) Camp II
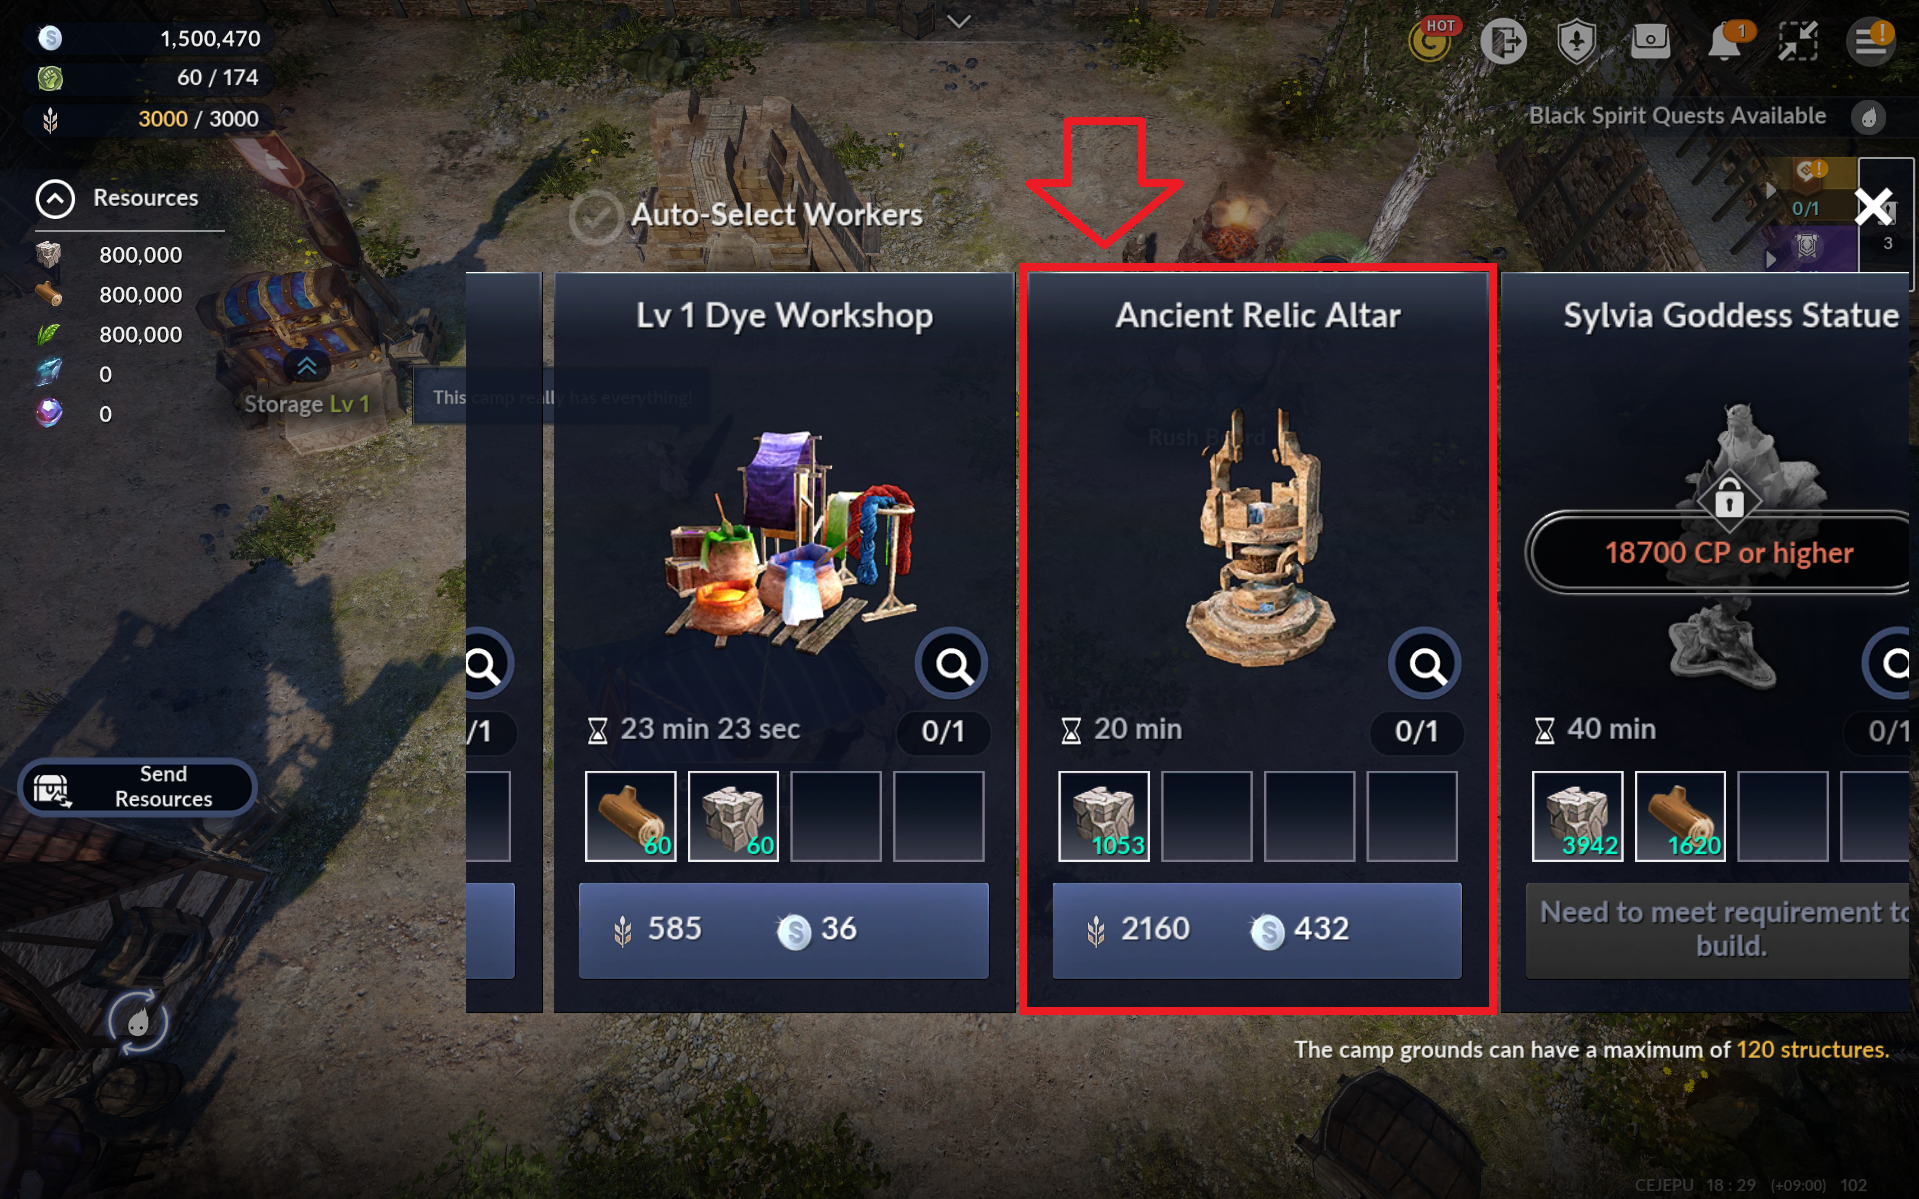
Build an 'Ancient Relic Altar' from the Camp's construction tab.
- Constructing a building at your Camp requires resources and food.
- Use the 'Camp Growth Chest' and 'Hearty Jungle King Hamburg Steak' from your inventory to replenish resources and food.
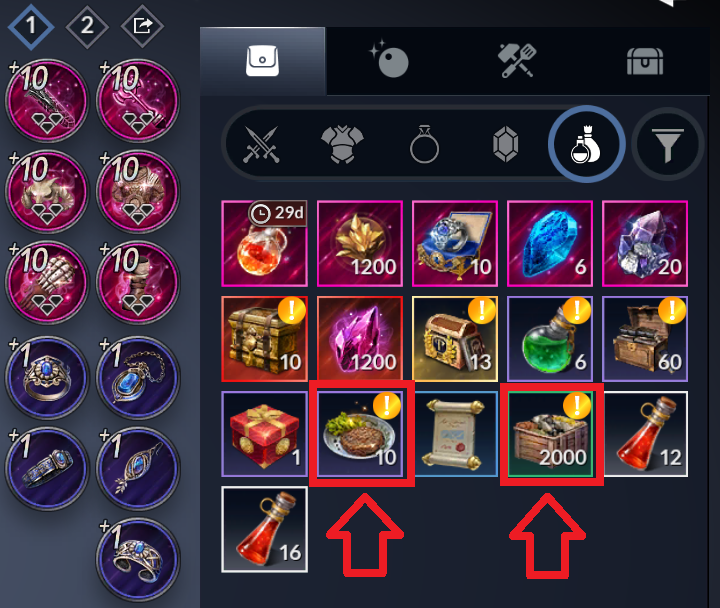
- Once you have enough resources and food, select and build the 'Ancient Relic Altar' from your Camp's construction menu.
 * You can tap the hammer icon on an in-progress building to spend Action Points and complete construction instantly.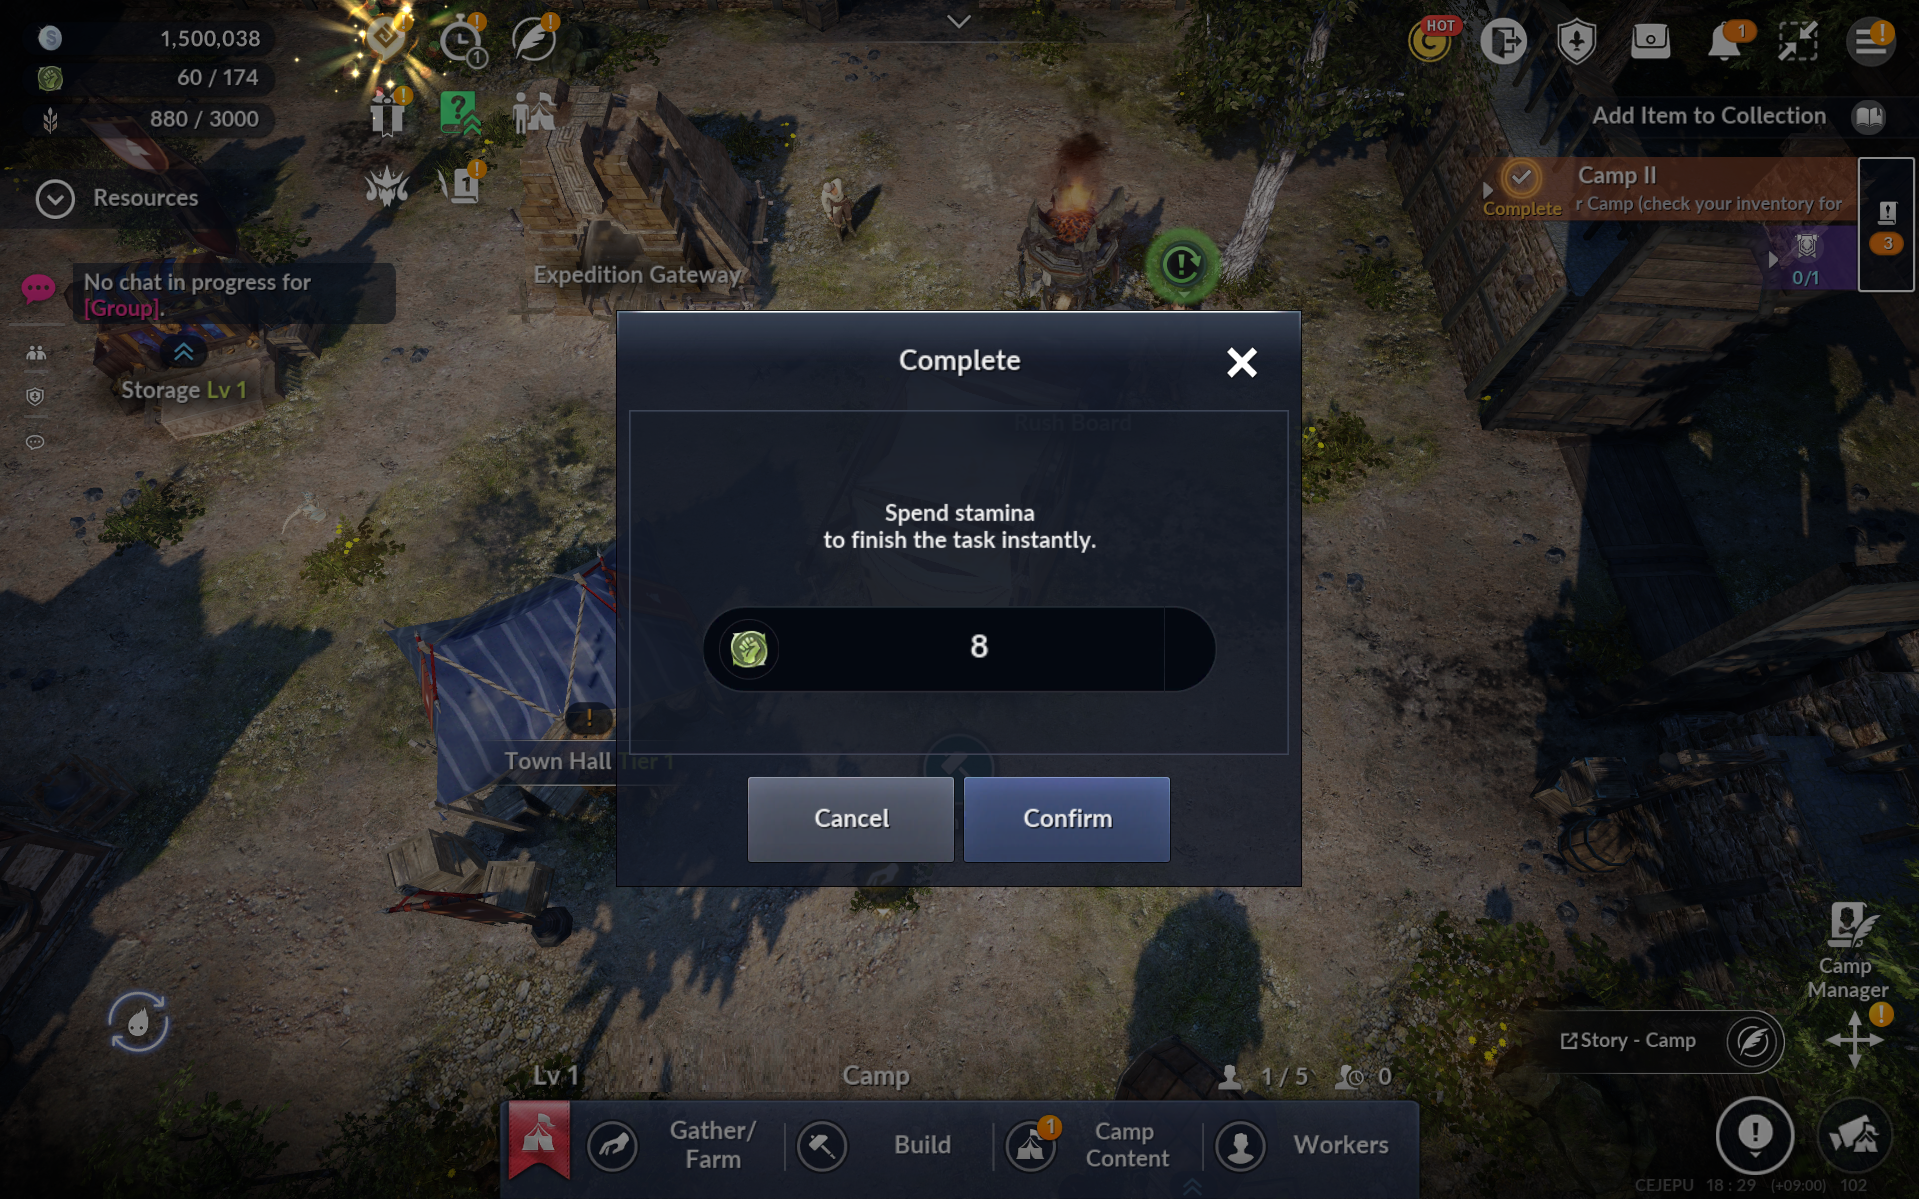
16) Equip a Relic
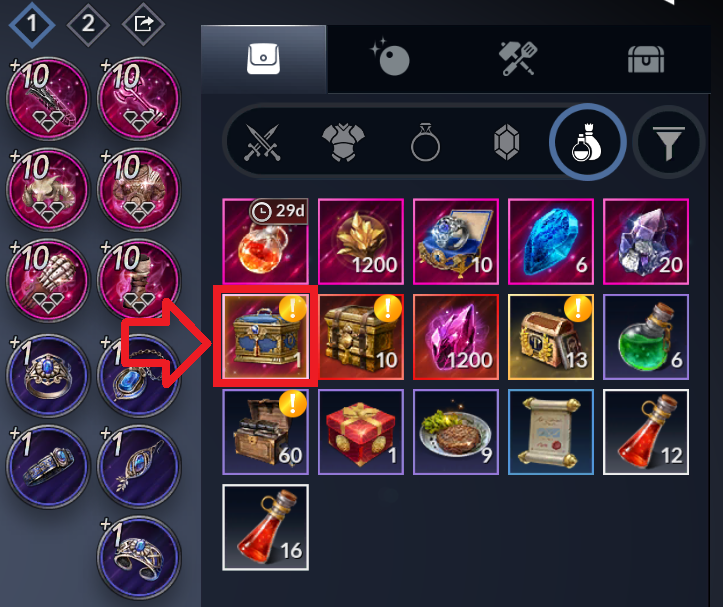
Use the Remastered Relic Chest in your inventory, then equip '2 Primal grade or higher Relics.'
- Move to the Season Pass's shortcut or your inventory and use the 'Remastered Relic Chest.'
17) Alchemy Stone Amplification
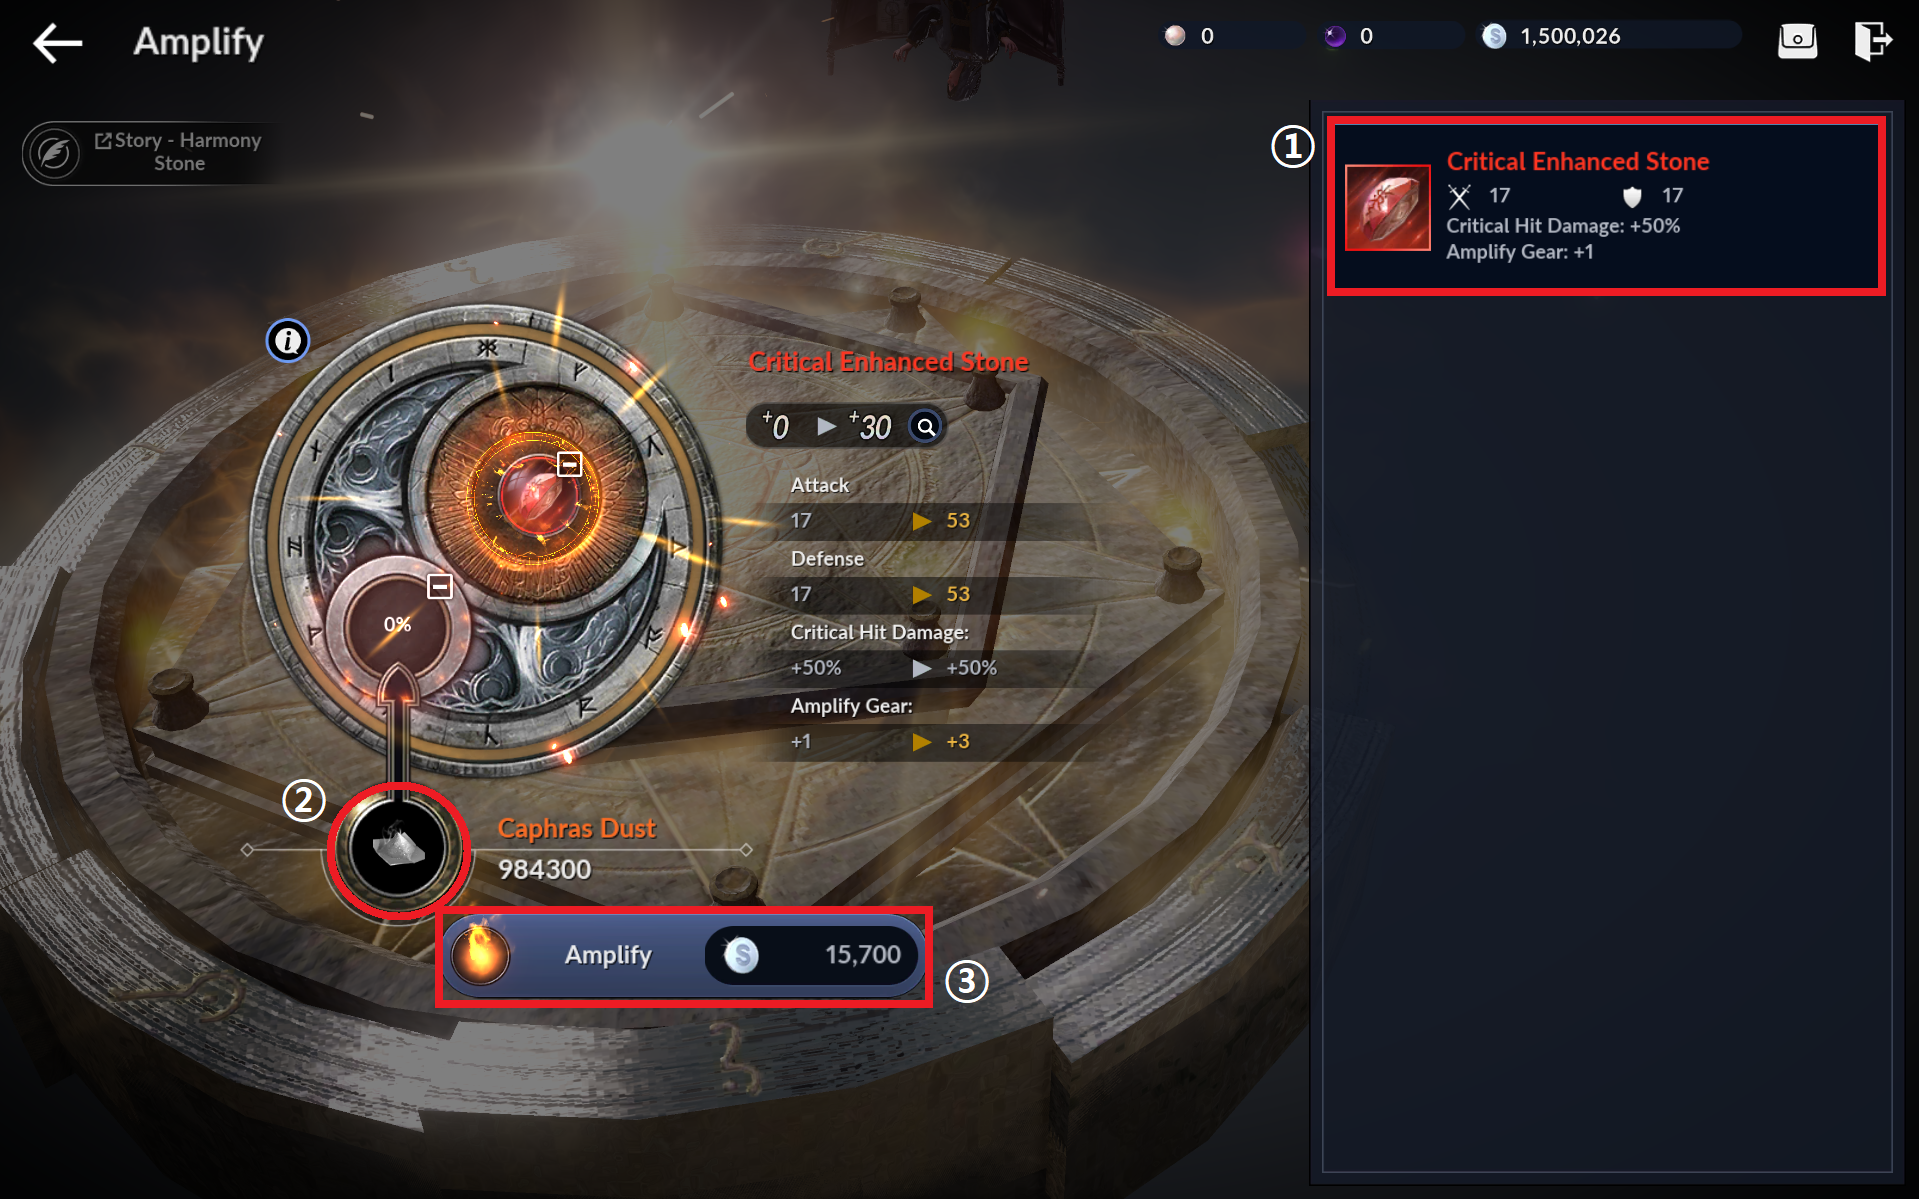
Amplify an Alchemy Stone of Critical Enhancement to level 30, then equip it again.
- Via the Season Pass's shortcut or the Alchemy Lab, move to the Alchemy Stone menu, then the Alchemy Stone Amplification menu.
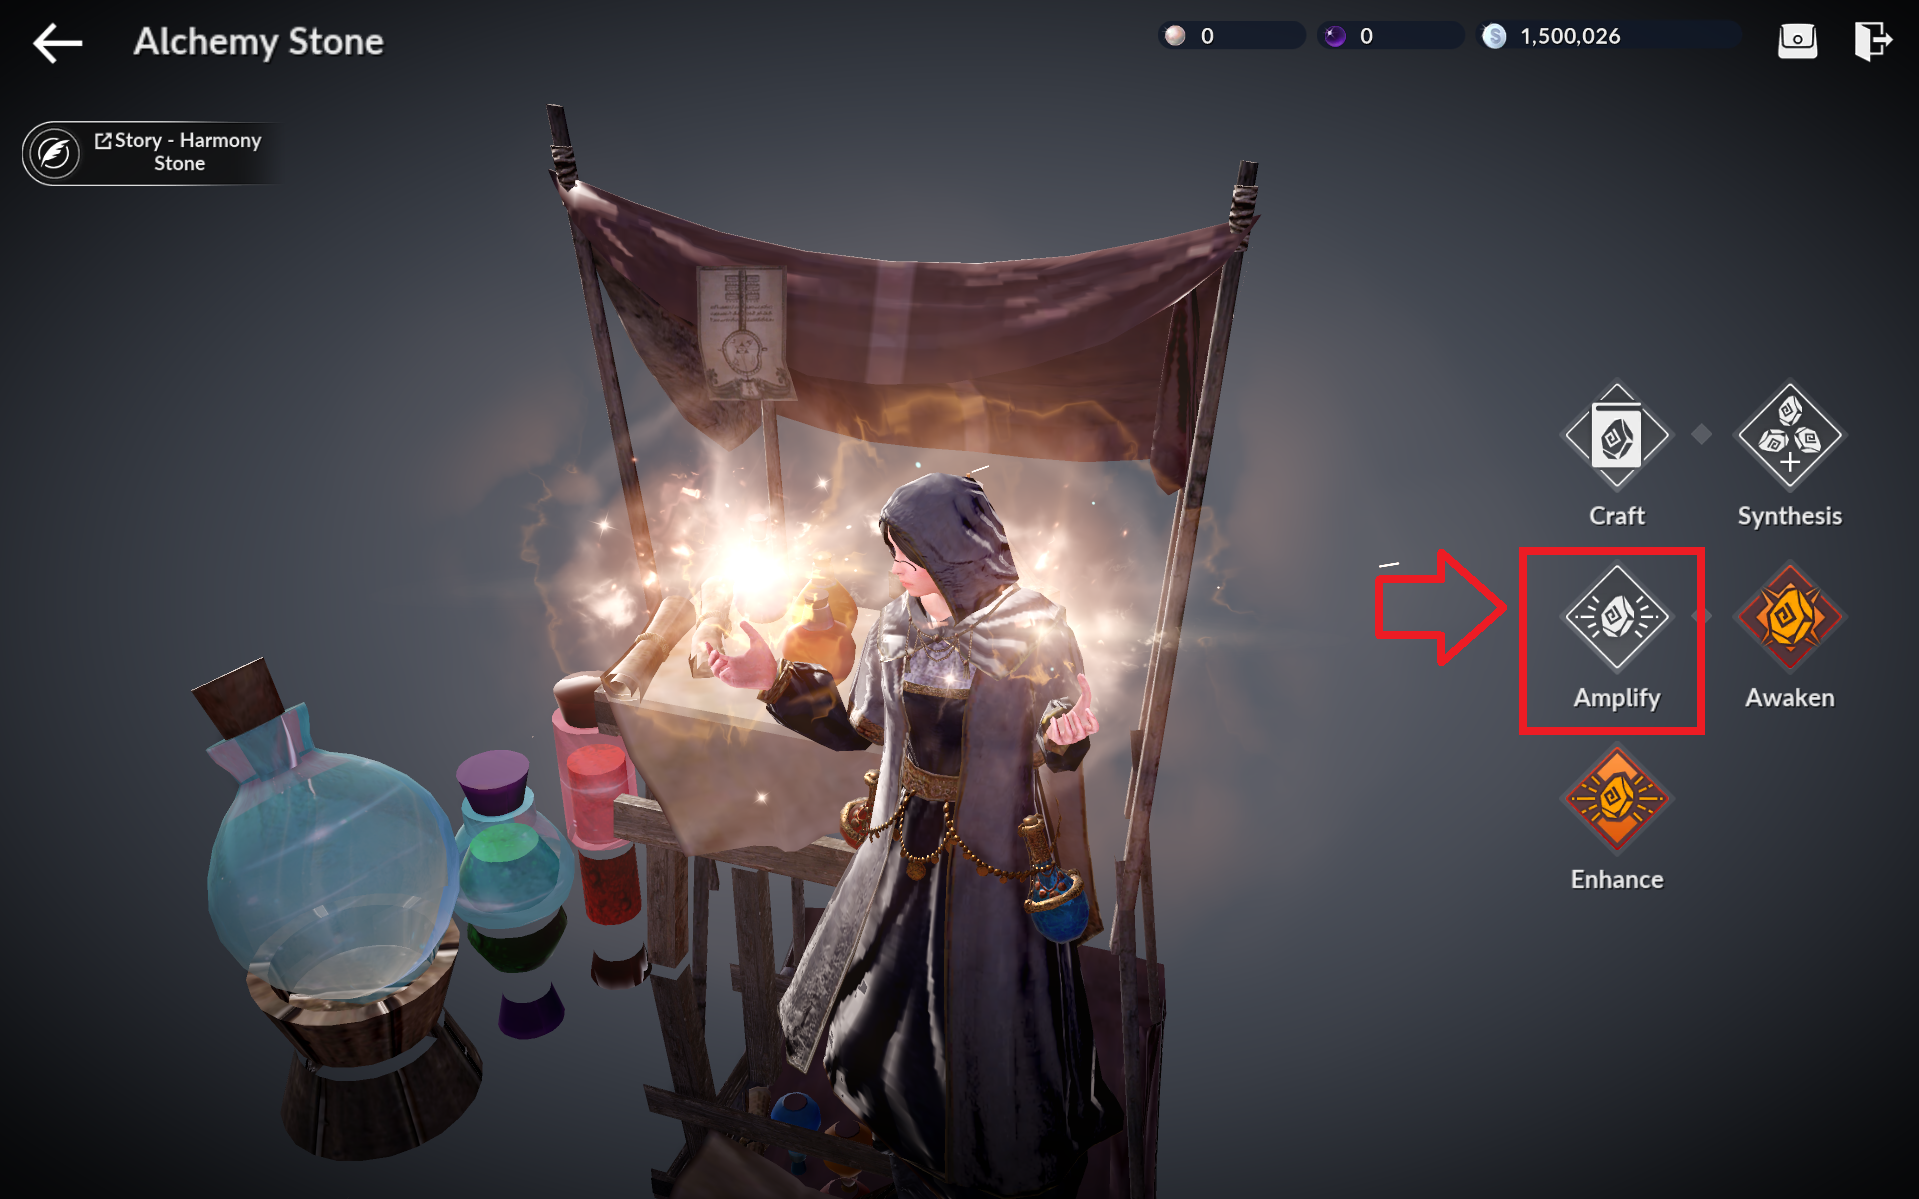 1. Select the Alchemy Stone you want to amplify from the menu on the right,
2. Keep tapping the Caphras' Vestige button until the amplification level reaches 30,
3. Use the Amplify Alchemy Stone button to carry out the amplification.
18) Alchemy Stone Awakening and Enhancement
Awaken an Alchemy Stone of Critical Enhancement and enhance it once, then equip it.
- Via the Season Pass's shortcut or the Alchemy Lab, move to the Alchemy Stone menu, then the Alchemy Stone Awakening menu.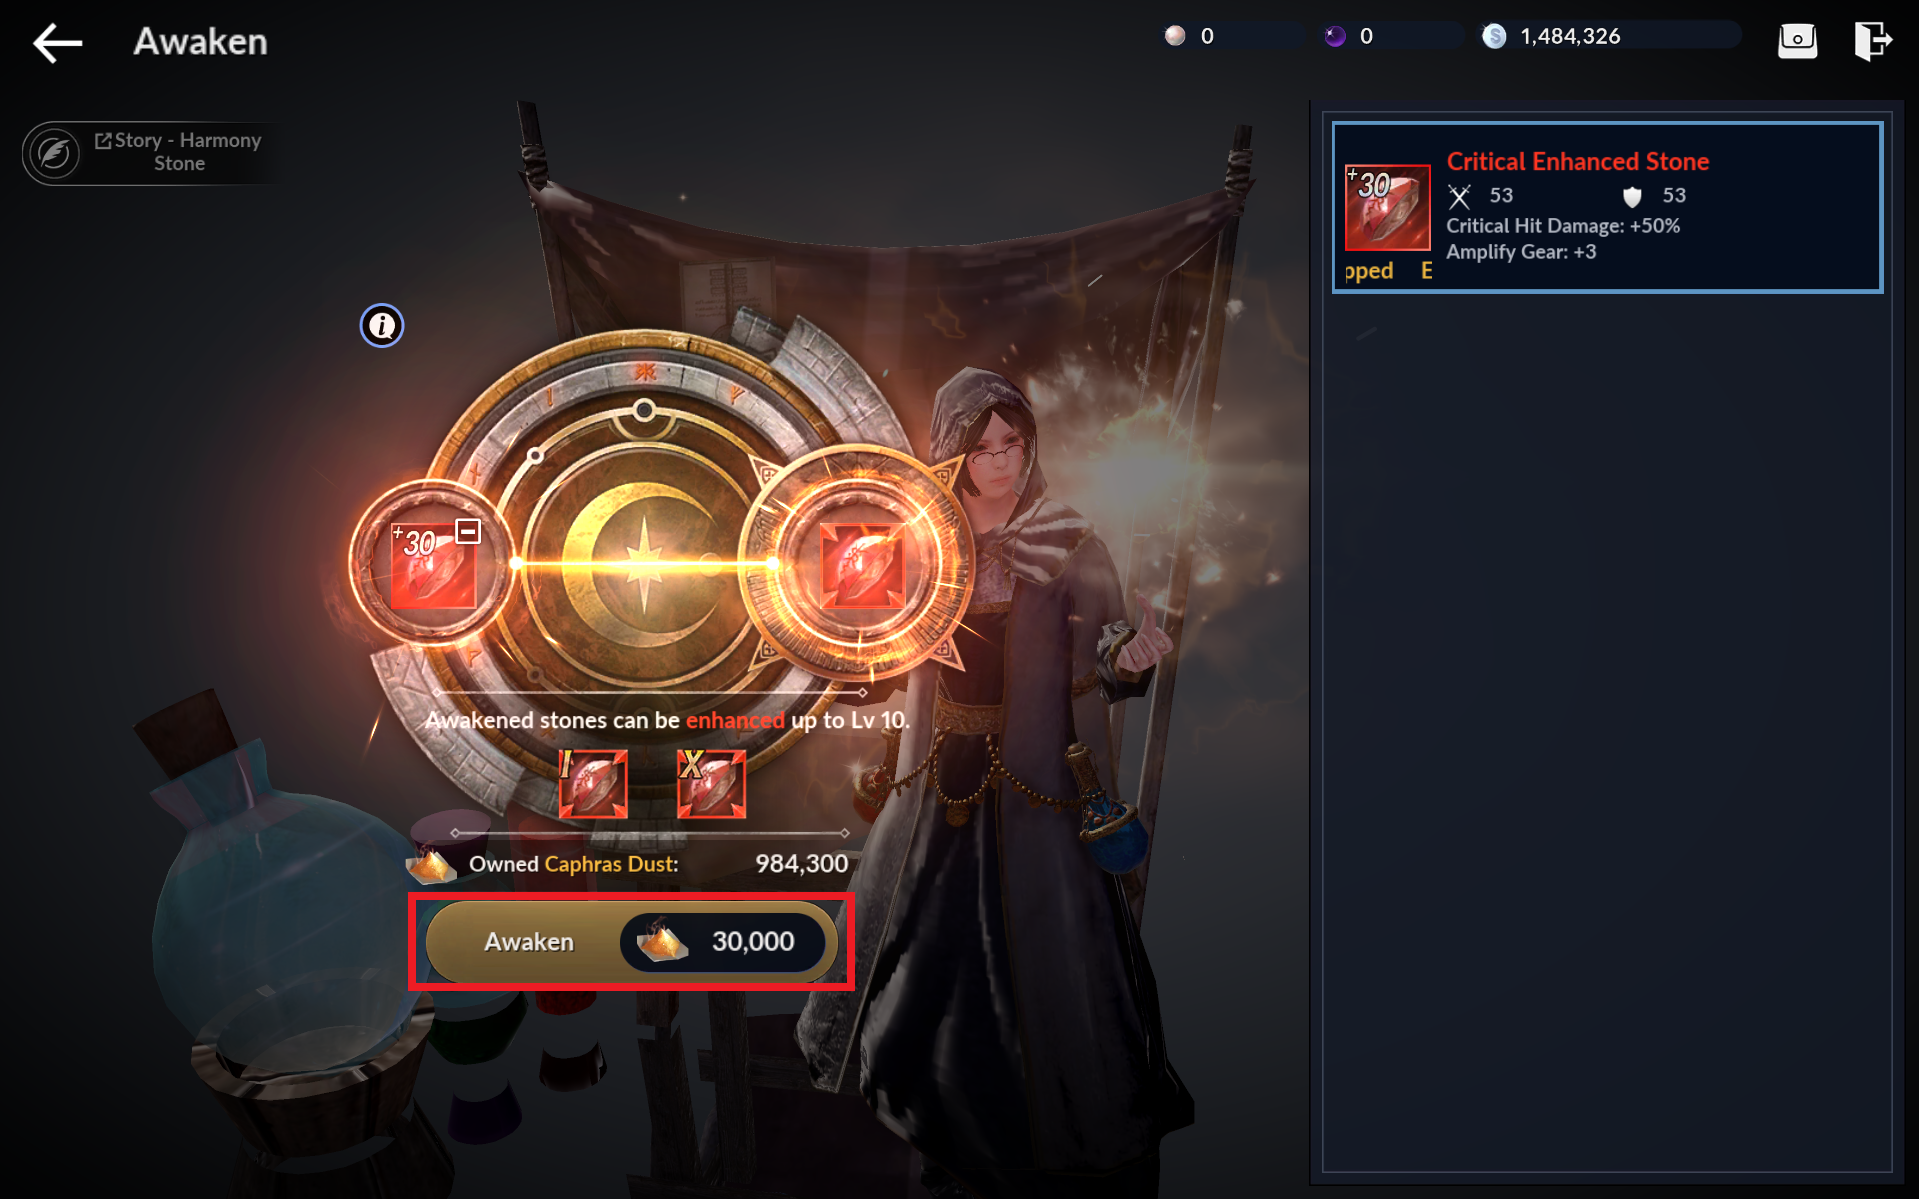
- Select the Alchemy Stone you wish to awaken, then use the Awaken Alchemy Stone button to proceed.
- After awakening the Alchemy Stone, go back to the Alchemy Stone menu and move to the Alchemy Stone Enhancement menu.- Select the Alchemy Stone you want to enhance and the materials to use for enhancement, then attempt enhancement via the Enhance Alchemy Stone button.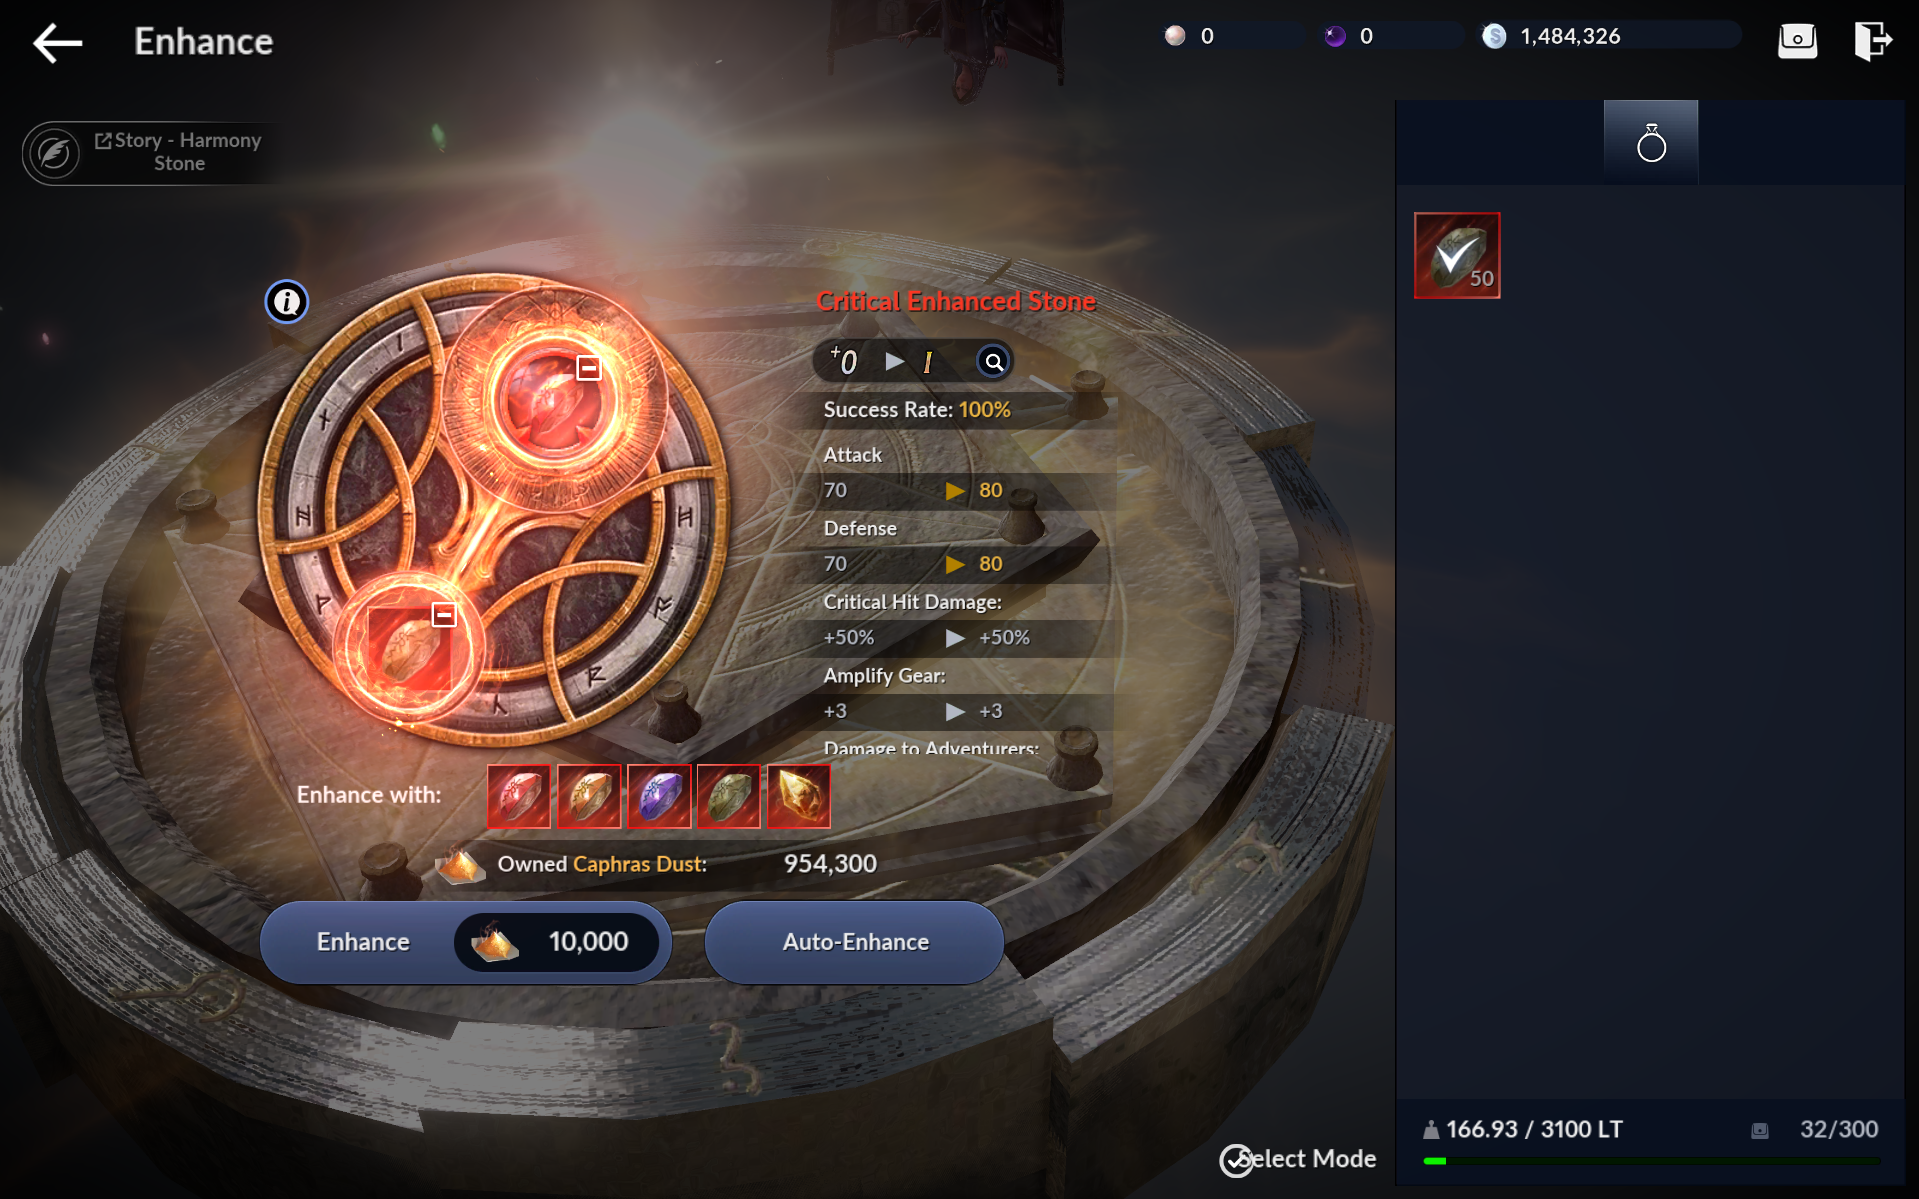
19) Primal Alchemy Stone
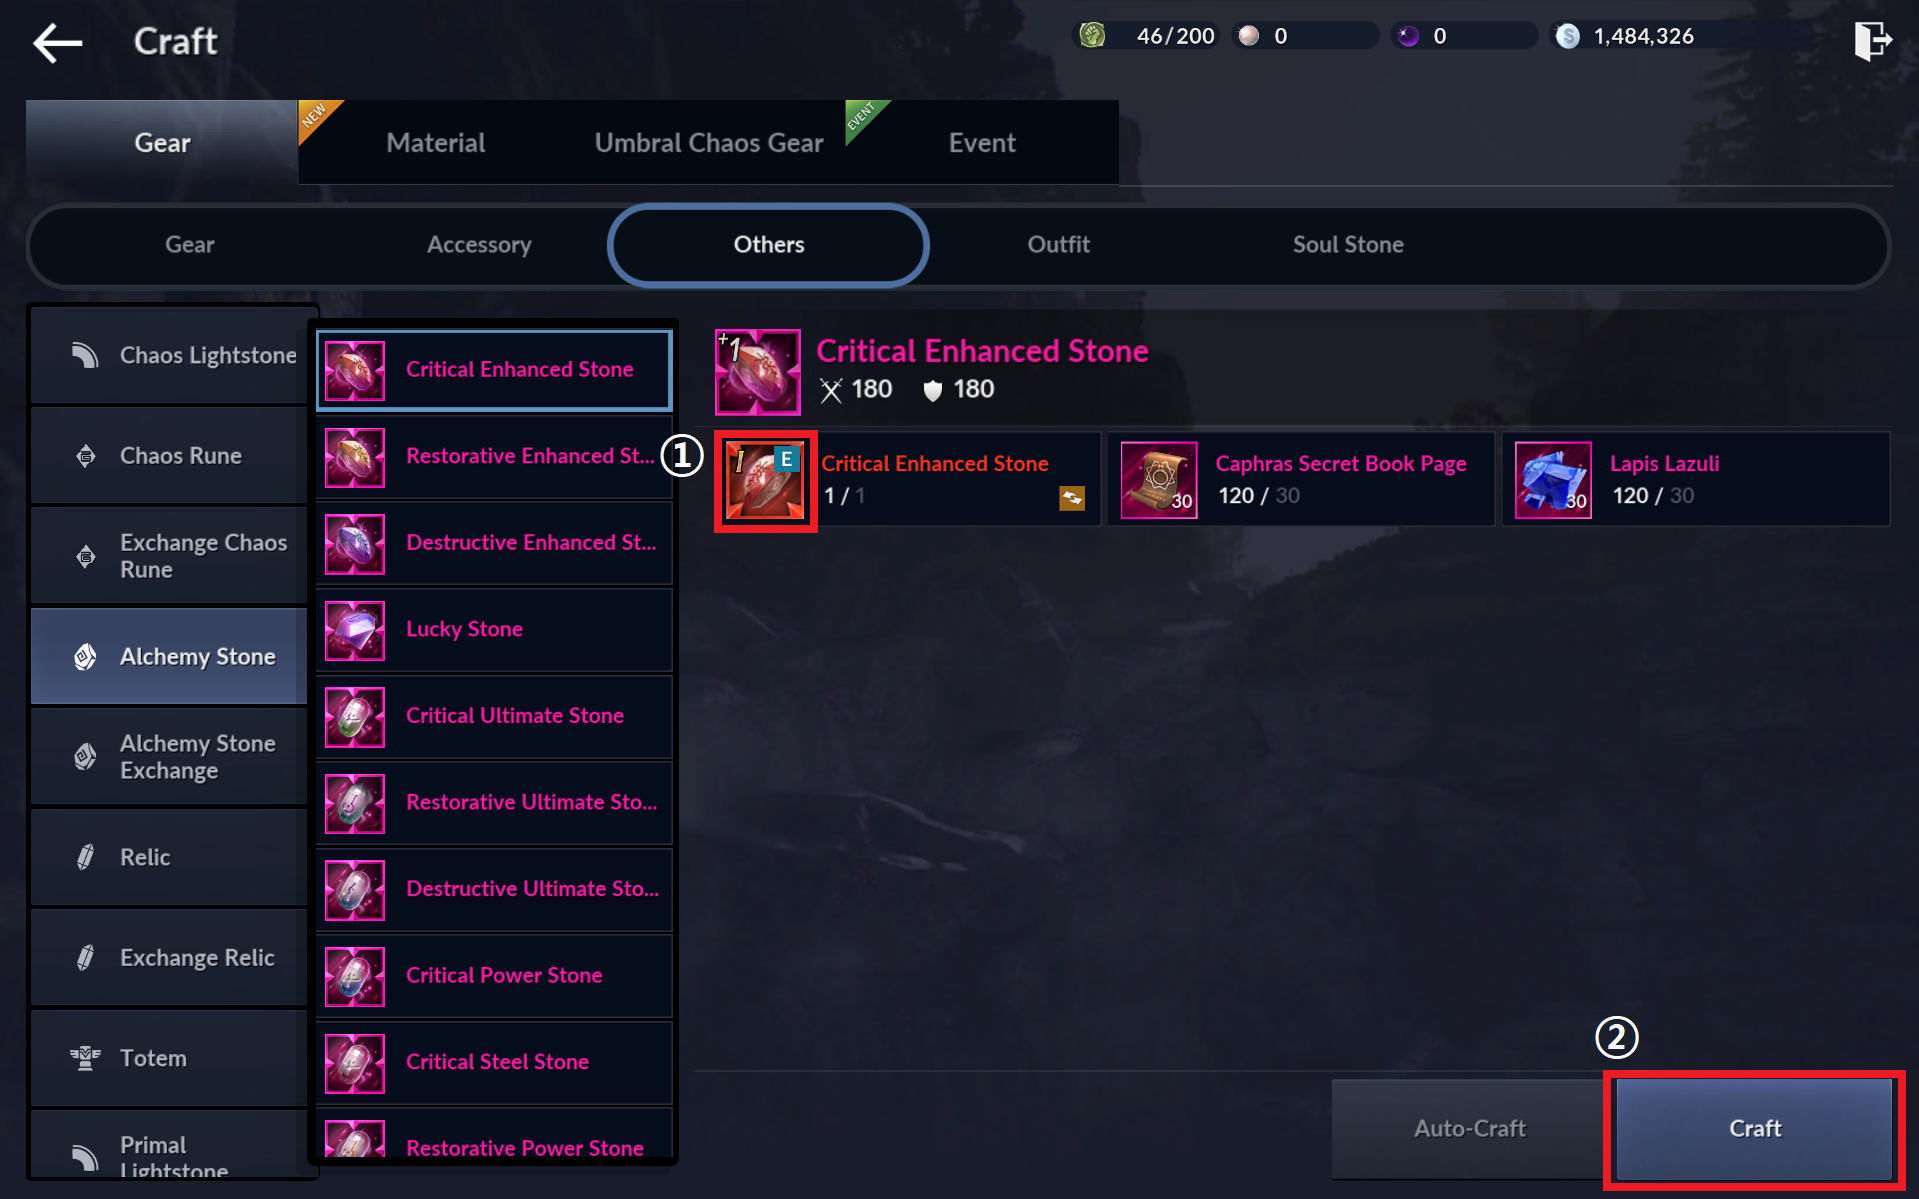
Craft or equip a 'Primal grade or higher Alchemy Stone.'
- Via the Season Pass's shortcut, or [Craft] - [Equipment] - [Other Equipment] - [Alchemy Stone] menu, craft a Primal grade Alchemy Stone.
1. Select the Abyssal grade Alchemy Stone you want to use as a material,
2. Use the Auto-Craft button to craft a Primal grade Alchemy Stone.
20) Outfit I
Wear a 'Legendary grade or higher' Outfit.
- Move to your inventory via the Season Pass's shortcut, and use the 'Legendary Outfit Set Chest' item.
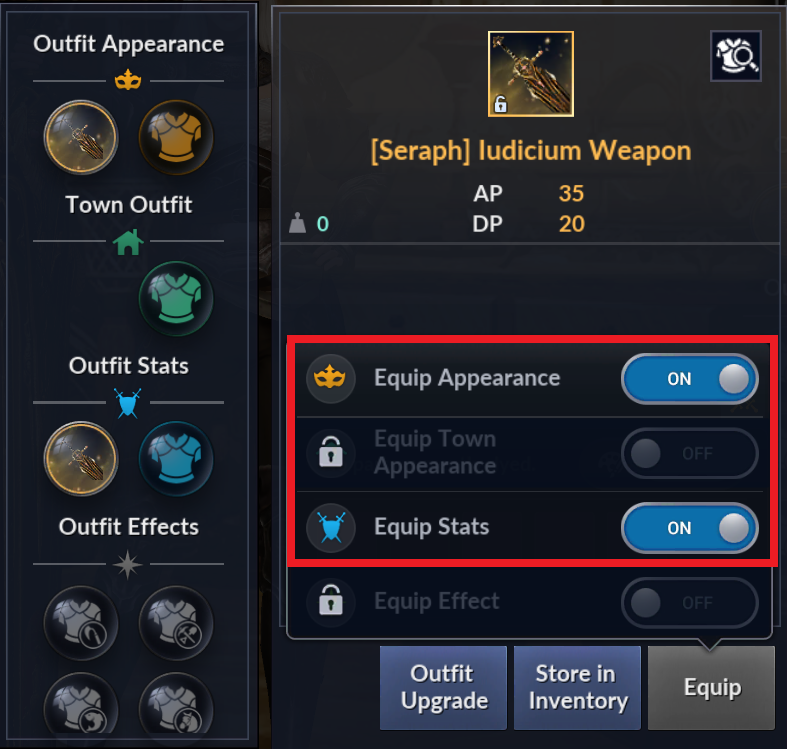
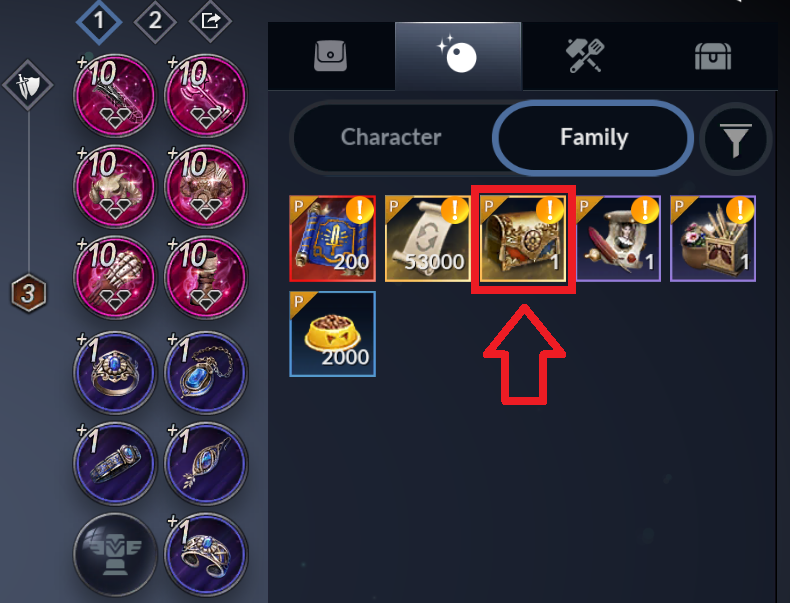 - Tap the Legendary Outfit you obtained, then tap 'Wardrobe (Equip).'
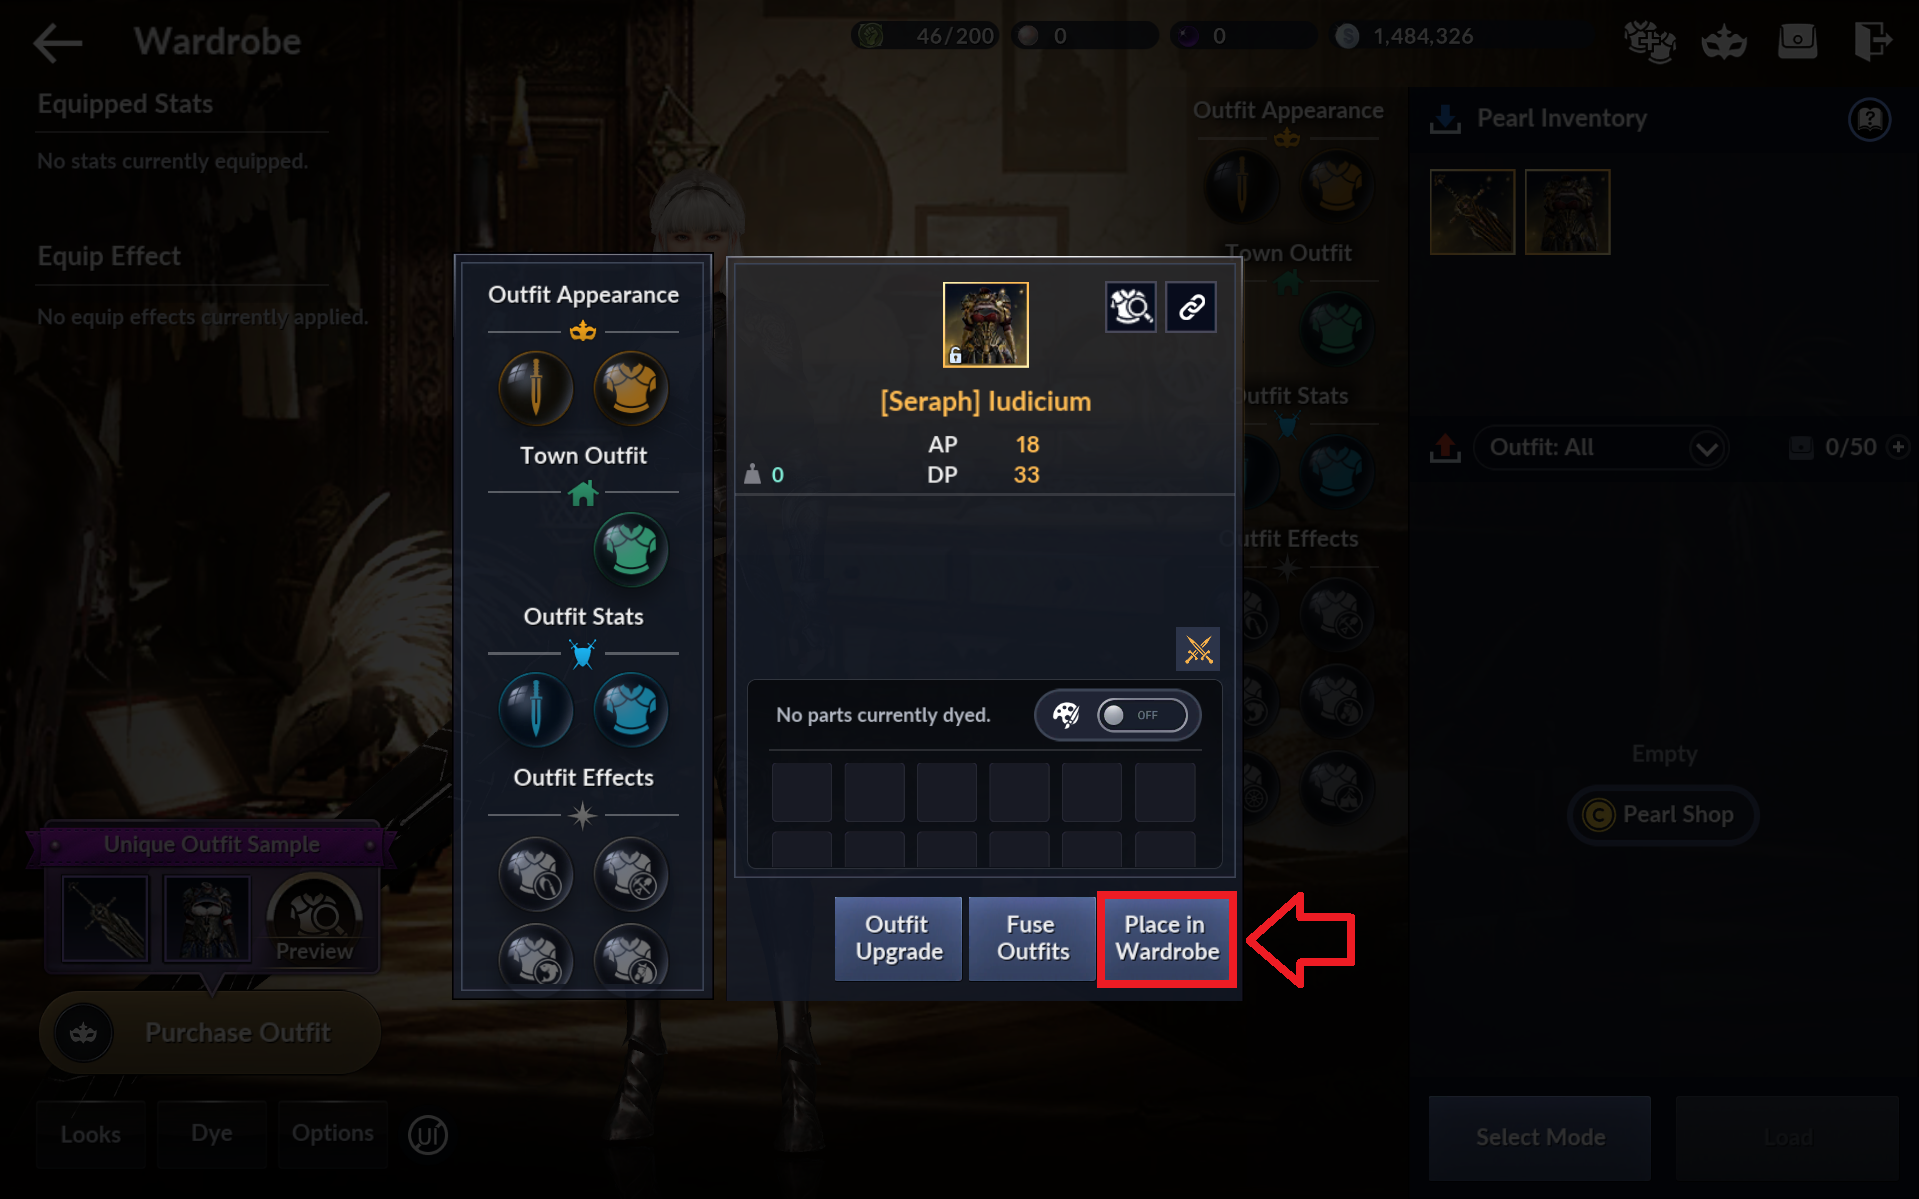
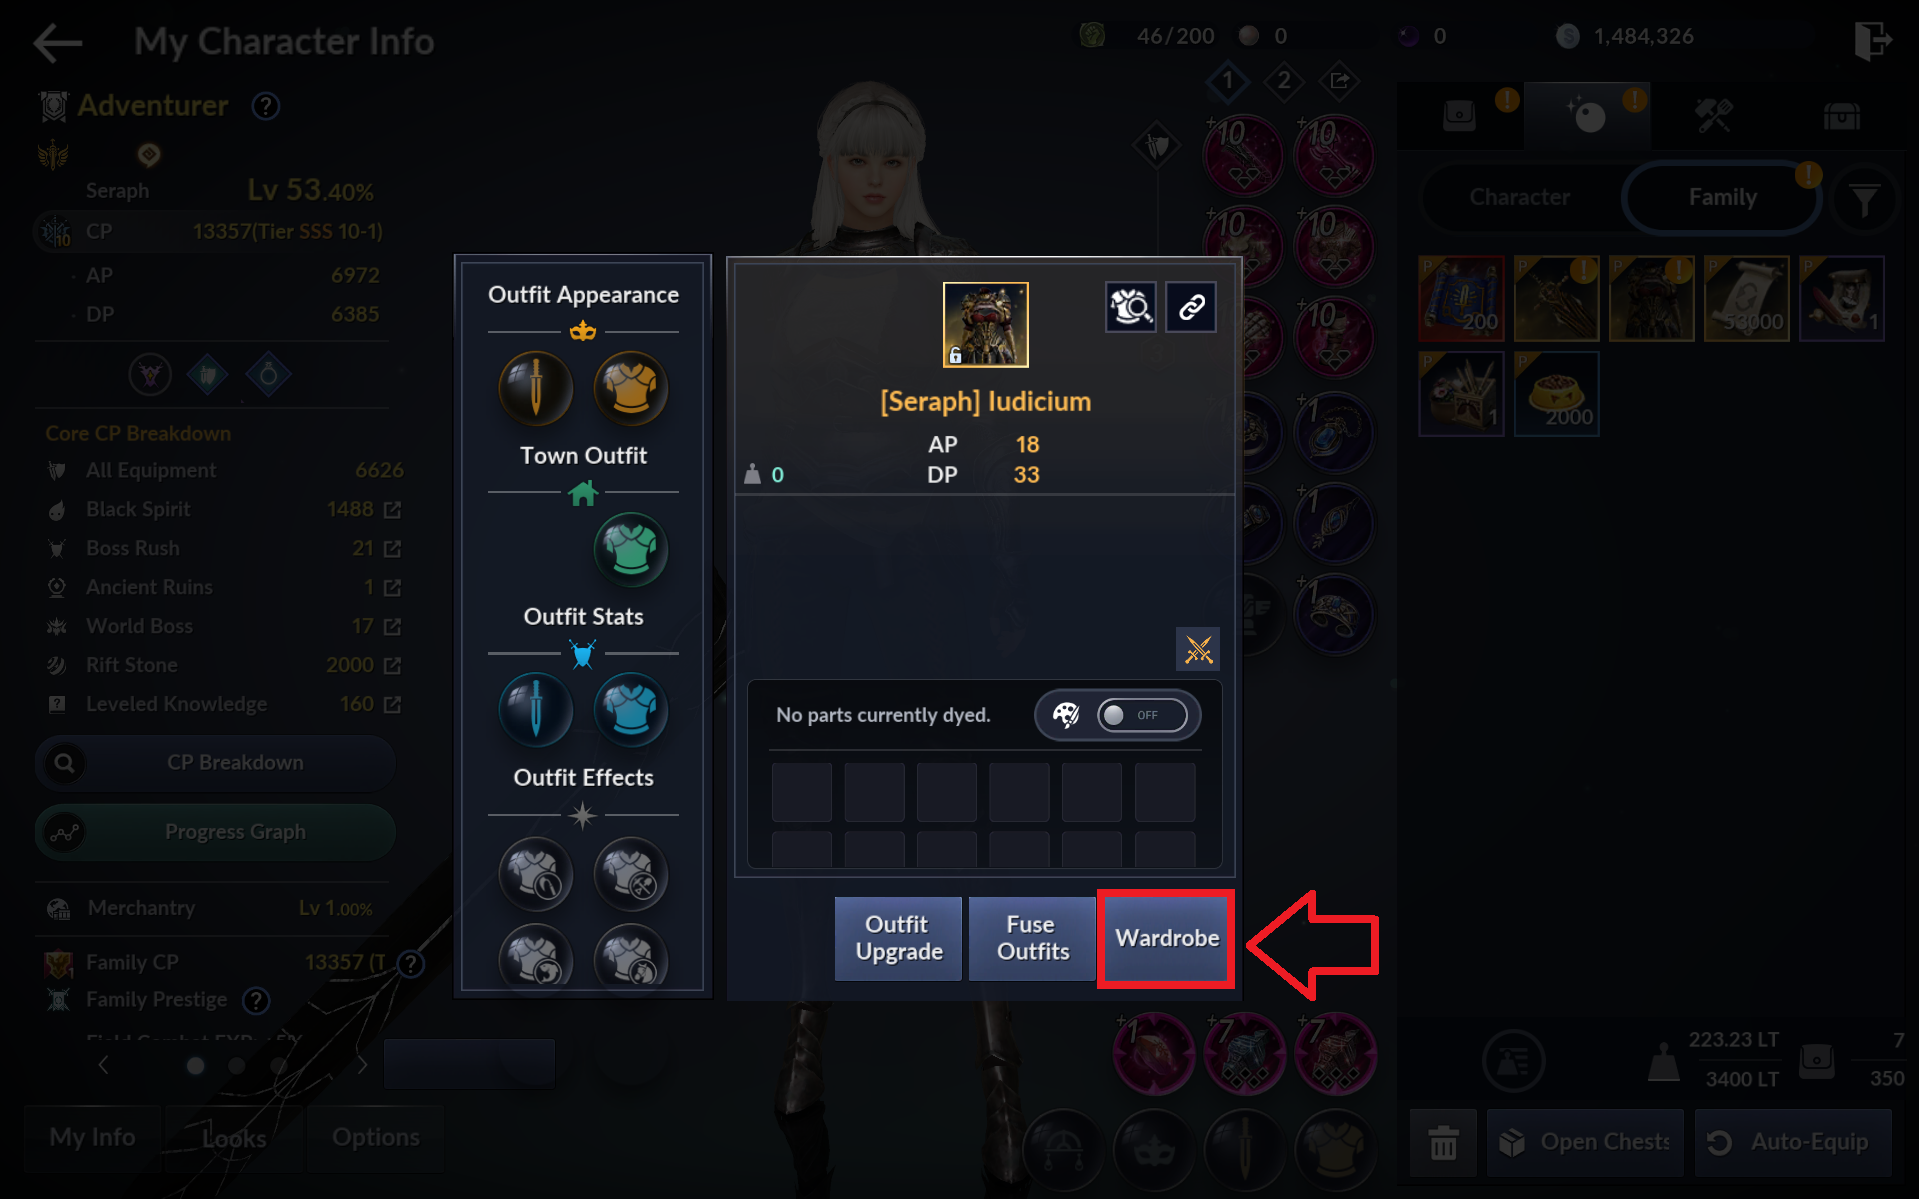 - On the Wardrobe screen, select the Outfit from your Pearl Inventory, then select 'Put in Wardrobe.'
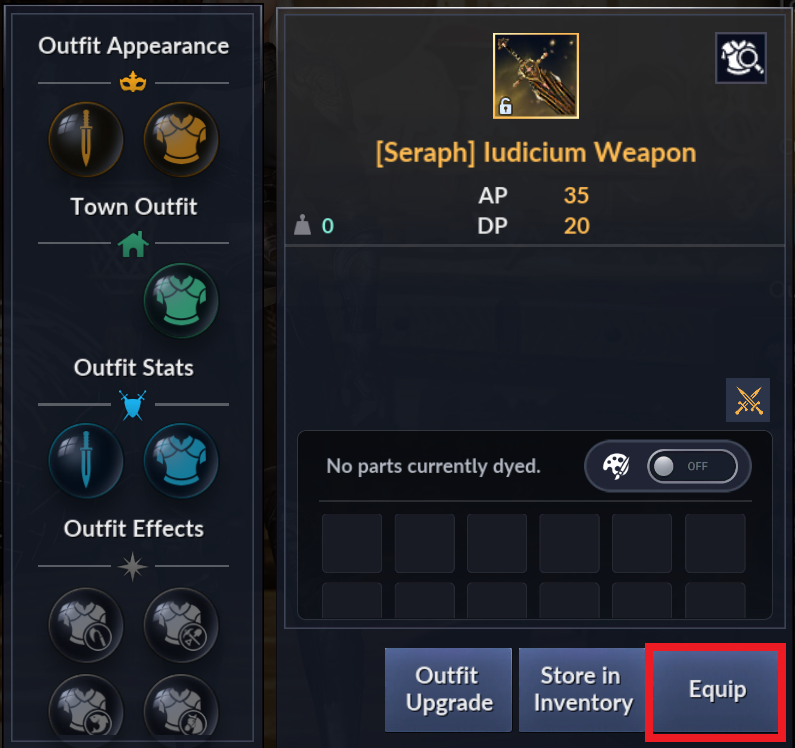
 - Select the Outfit in your Wardrobe, then set both Appearance Equip and Stat Equip to On.
21) Story, Outfit
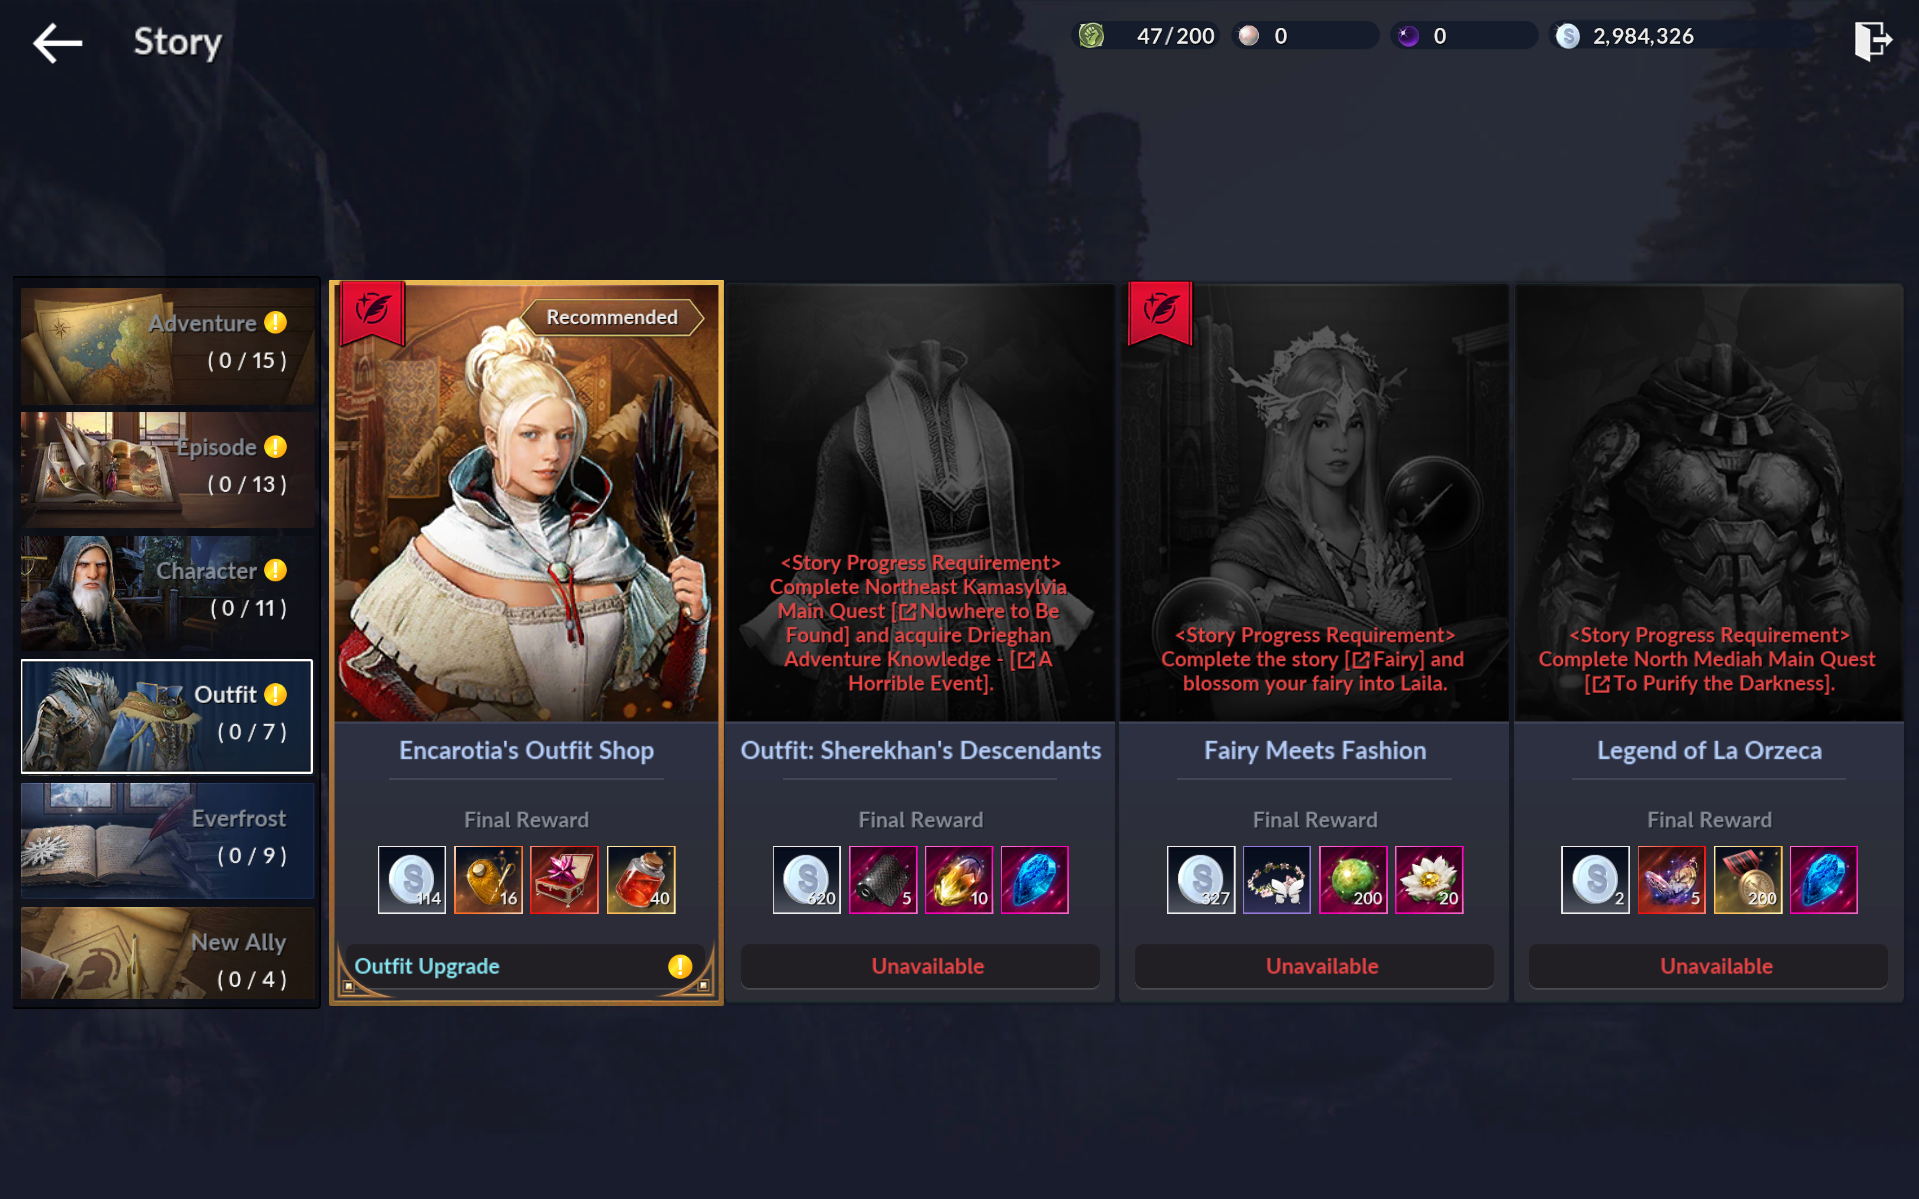
Complete all quests in the 'Encarotia's Outfit Shop' story.
- Via the Season Pass's shortcut, or the [Story] > [Outfit] tab of the menu, tap the 'Encarotia's Outfit Shop' story to accept the quest.
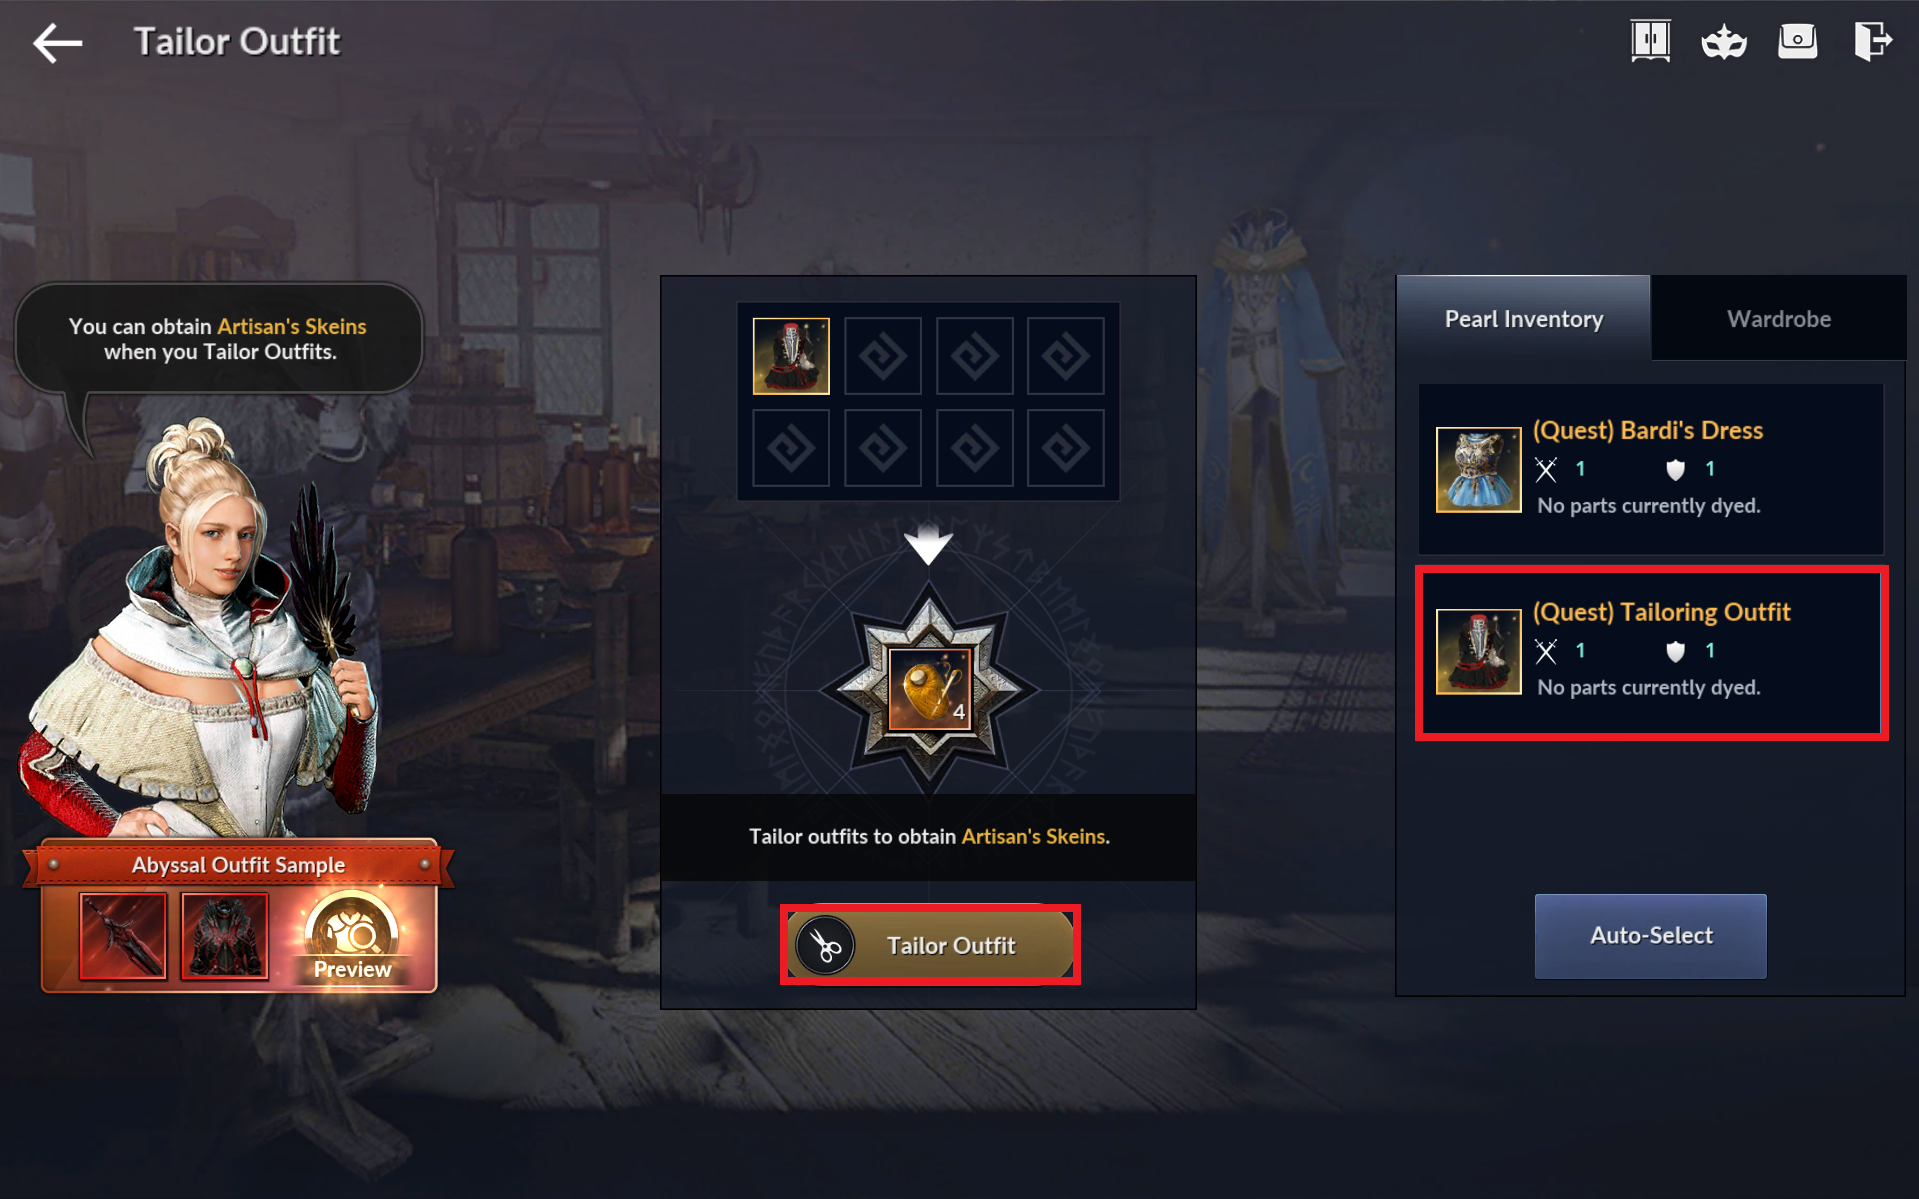
 - Progress the Encarotia's Outfit Shop quest from the Quest Widget.
 - If an Outfit Upgrade screen appears while progressing the quest, select the Grade Upgrade tab in your Pearl Inventory, select the '(Quest/Cannot Equip) Bardi Family's Dress,' then tap Upgrade Outfit.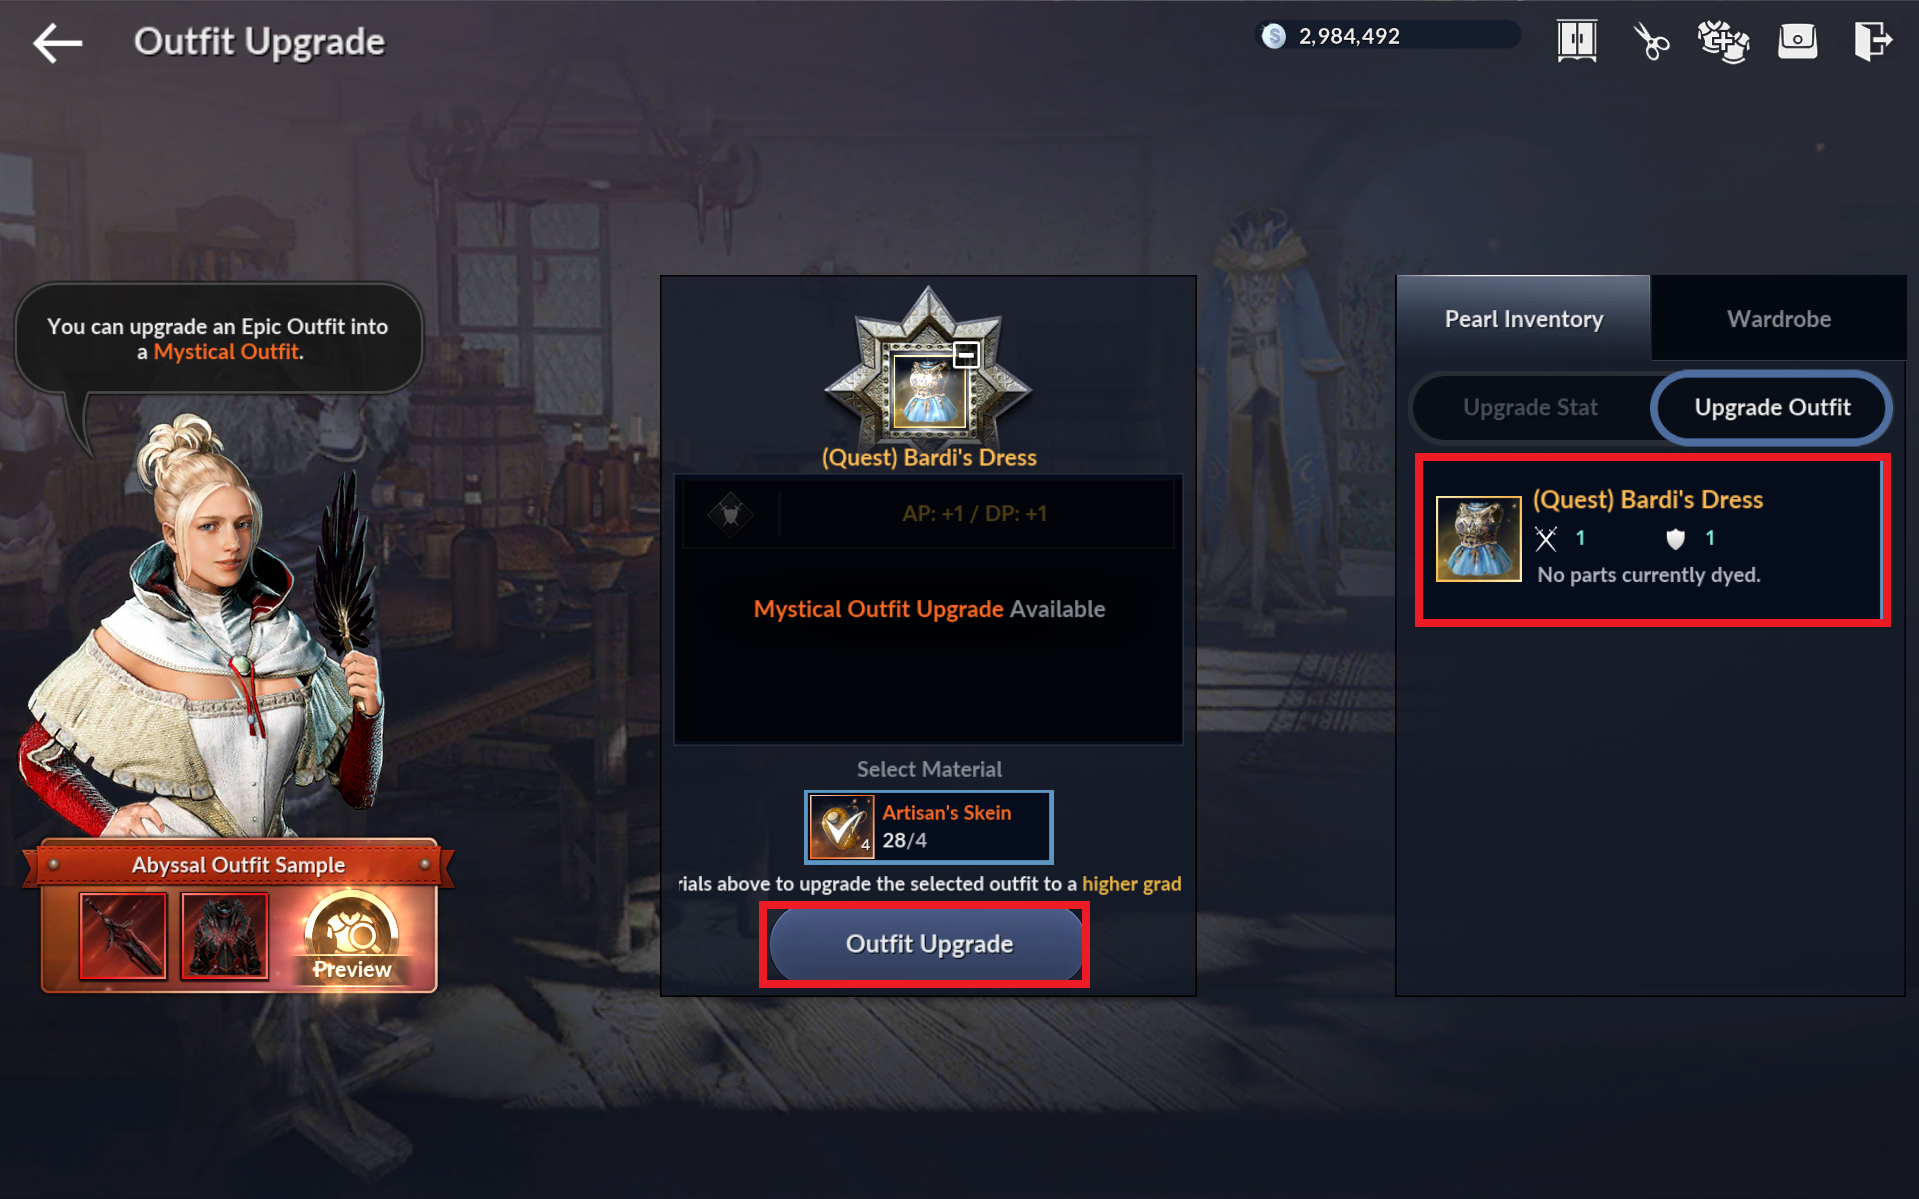
22) Outfit II
Upgrade a 'Mythical grade or higher' Outfit, then wear it.
- Find NPC Isobelle Encarotia and tap the 'Outfit Upgrade' button.
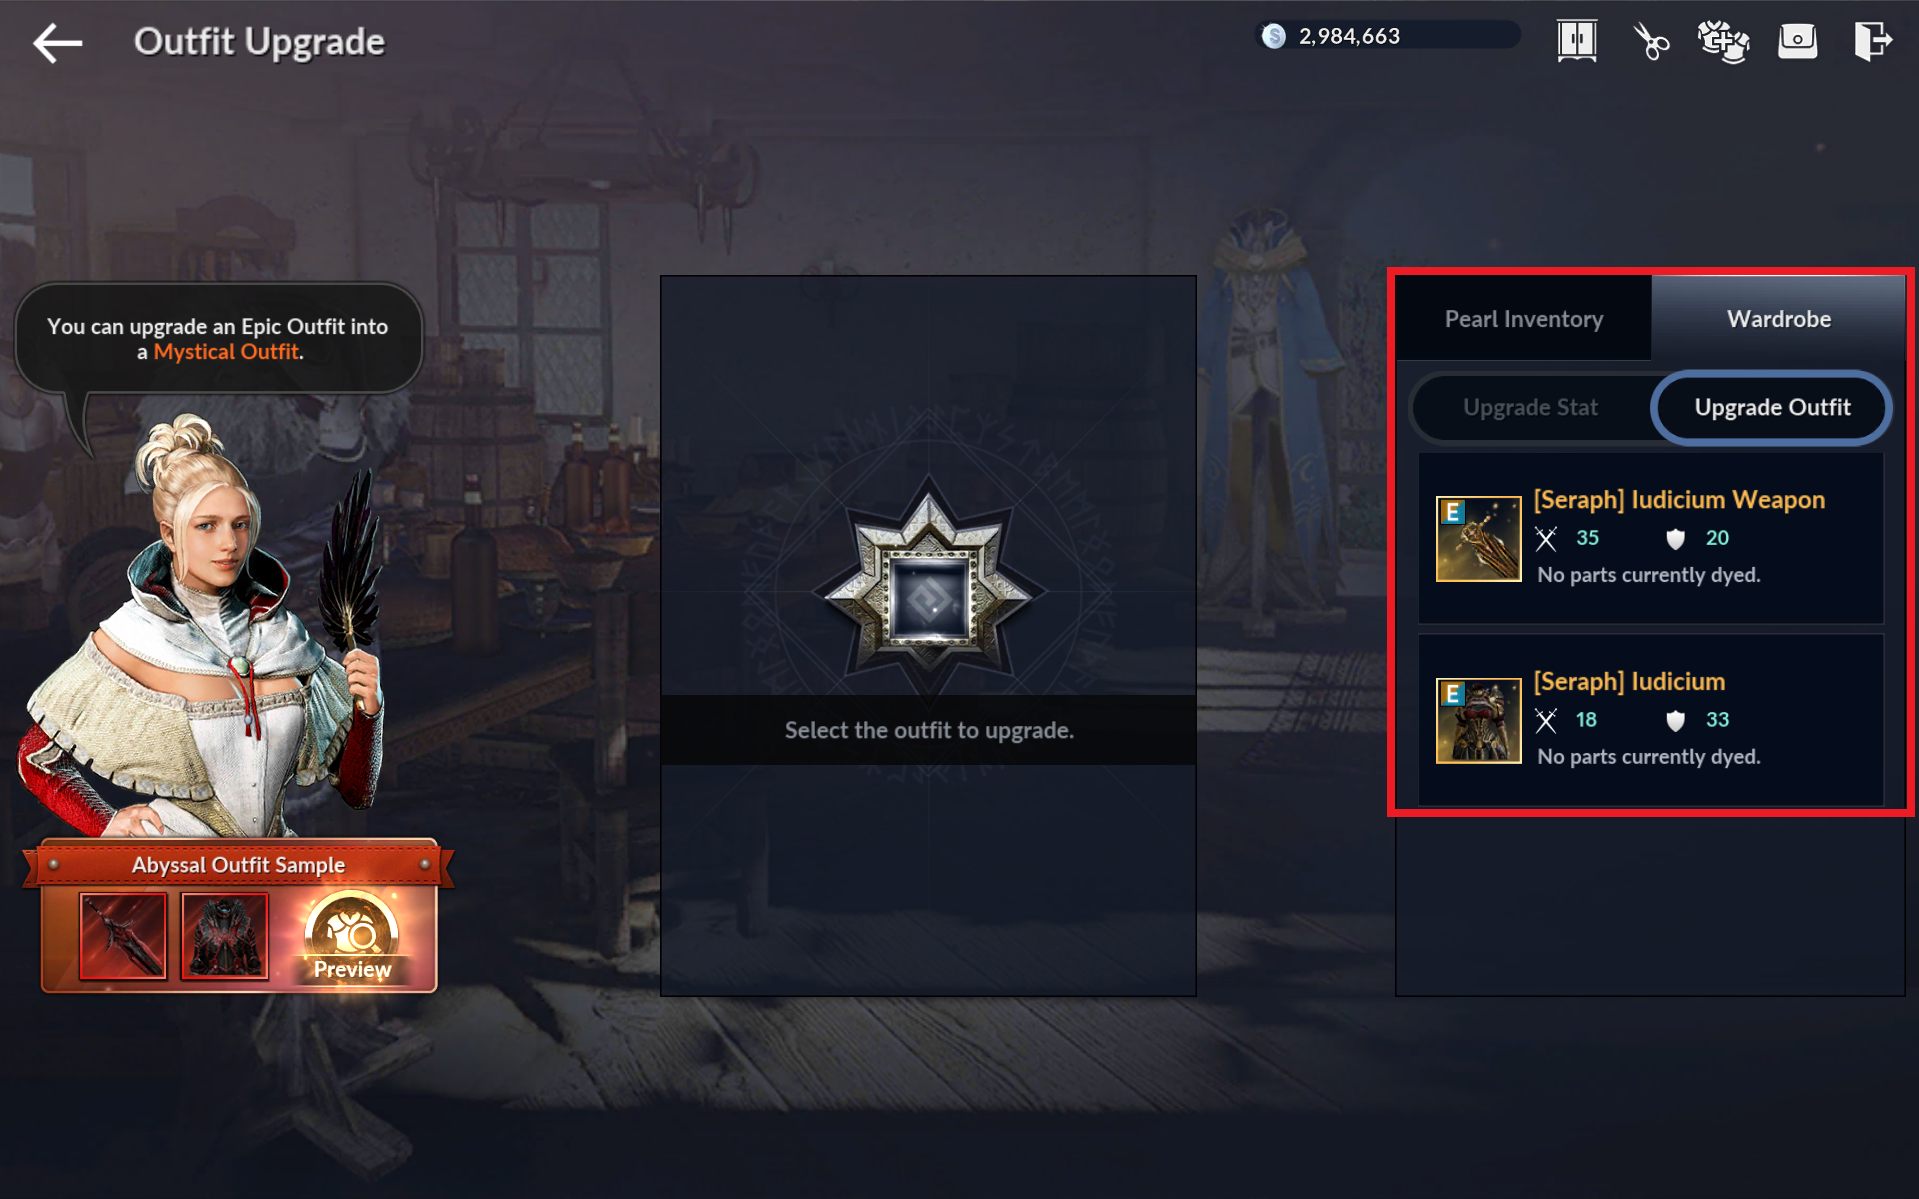
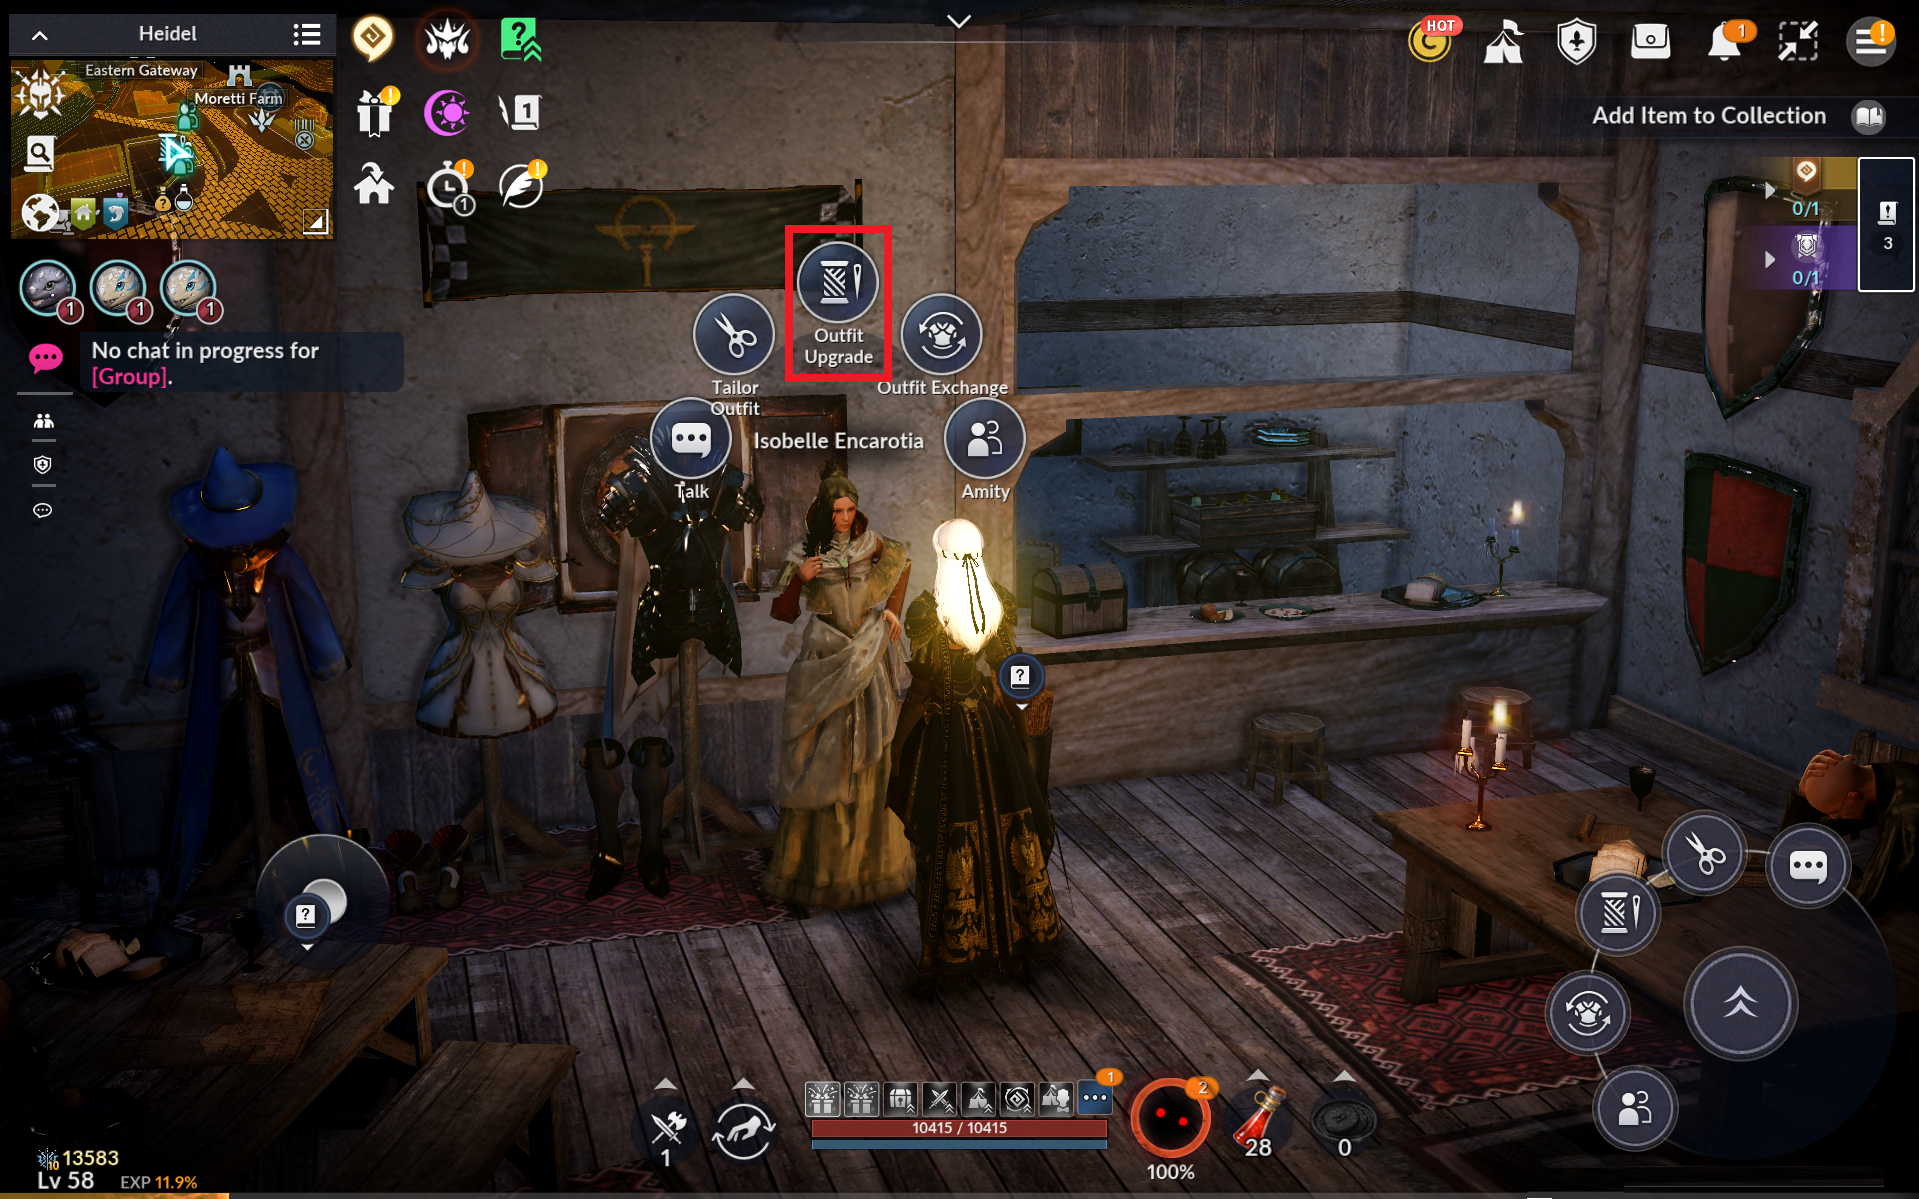 - Select 'Grade Upgrade' in your Wardrobe, then tap the outfit you have equipped.
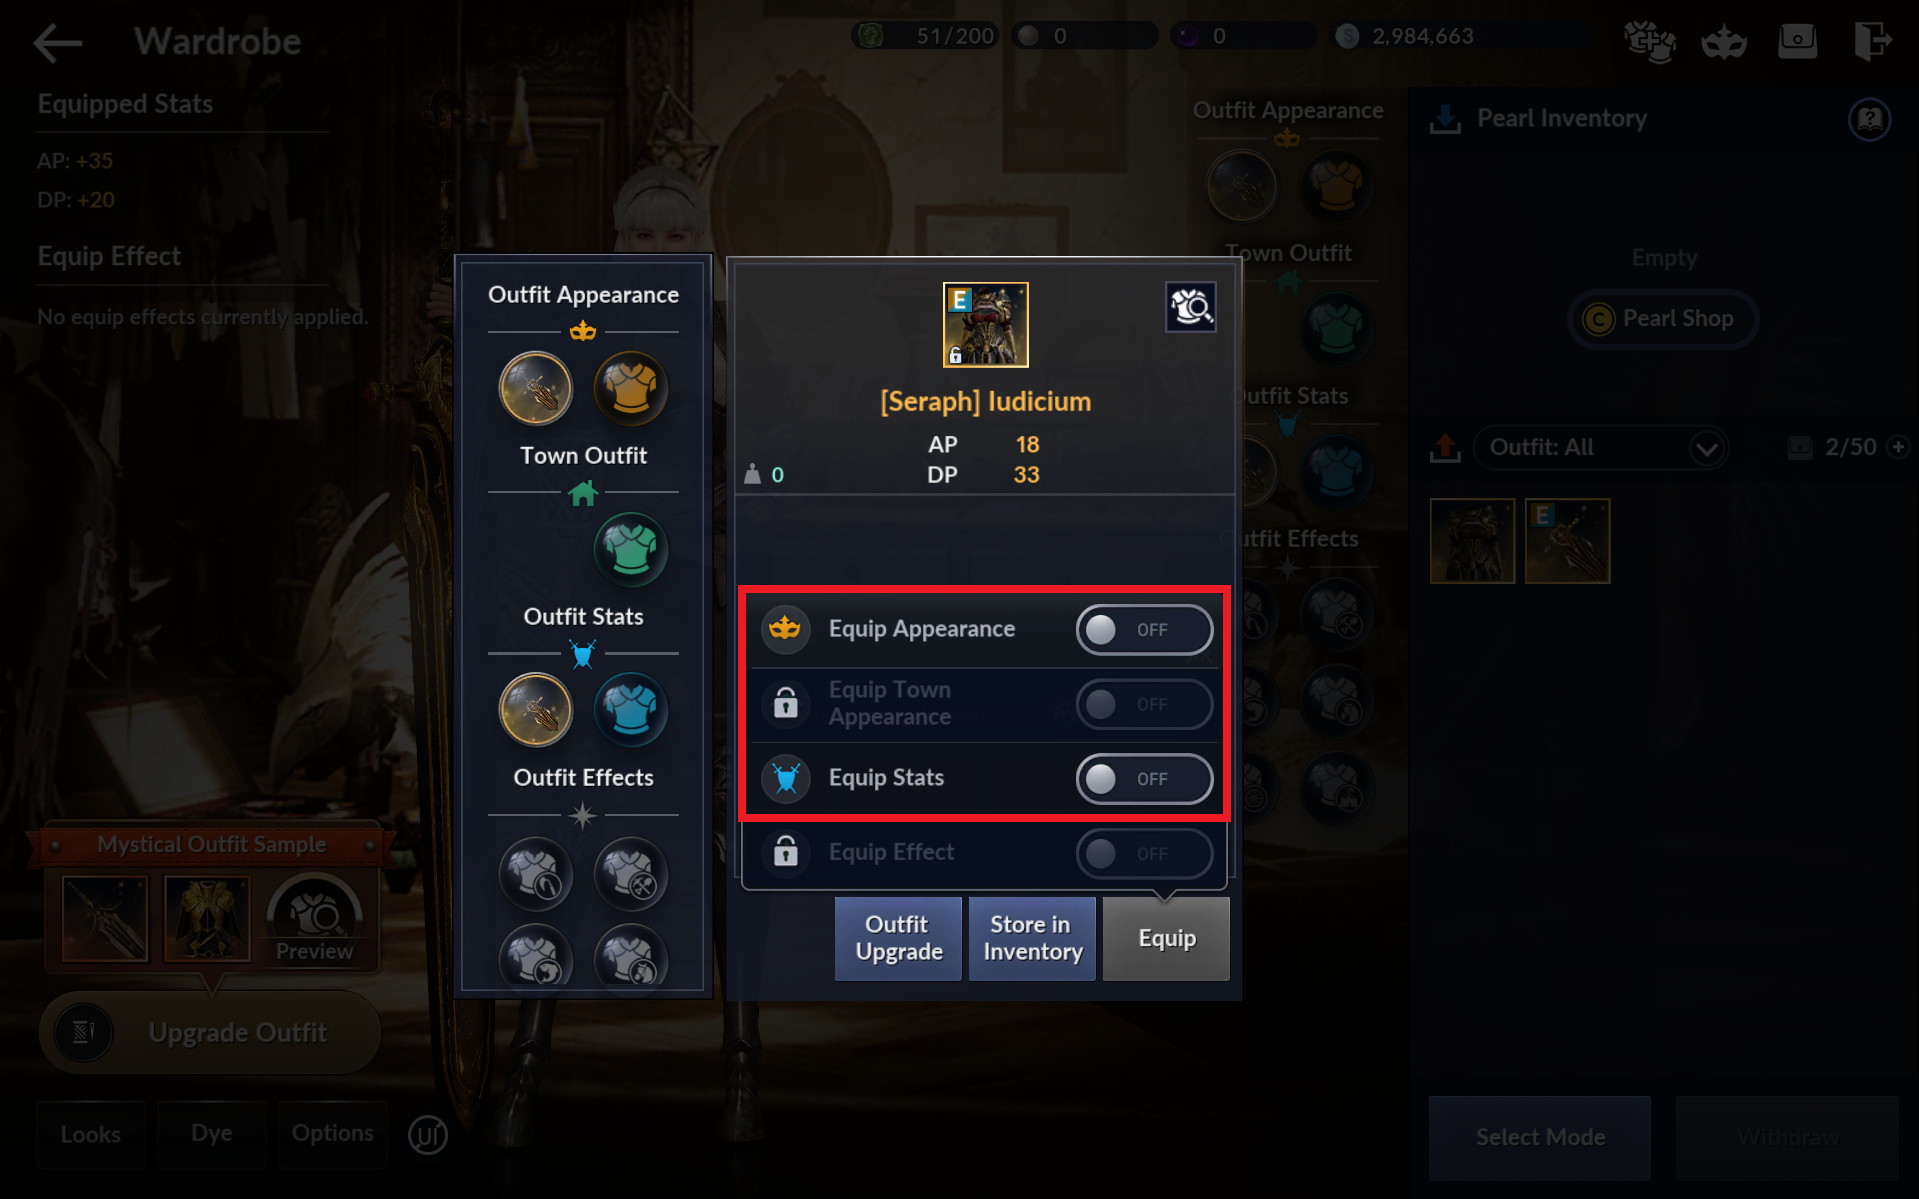
 - Go to the Wardrobe, select your Mythical Outfit, then tap Equip and set both Appearance Equip and Stat Equip to Off.
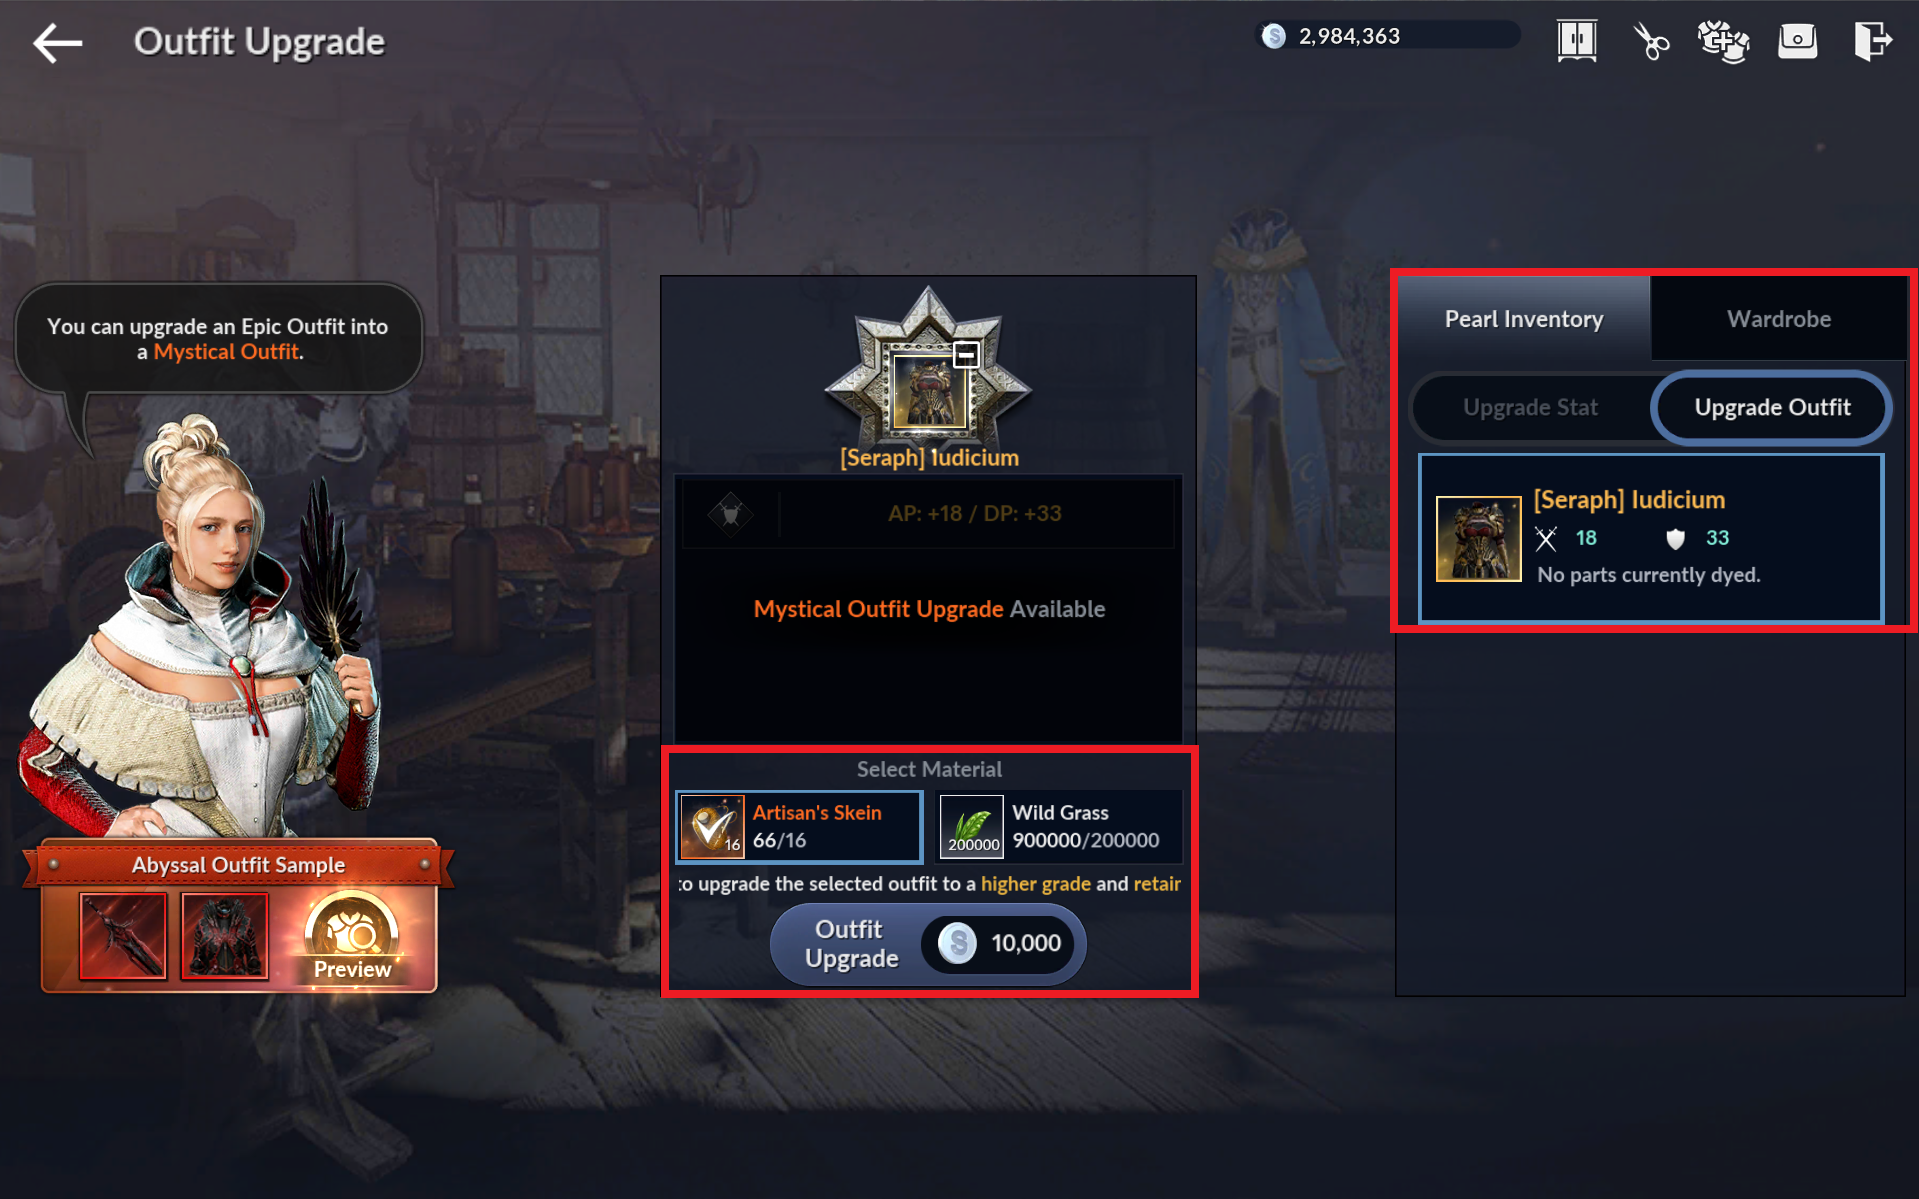
 - Back on Isobelle Encarotia's 'Outfit Upgrade' screen, select the Mythical Outfit under the Grade Upgrade tab in your Pearl Inventory, then tap Upgrade Outfit.
 - Put the upgraded Mythical Outfit back into the Wardrobe from your Pearl Inventory, and set both Appearance Equip and Stat Equip to On.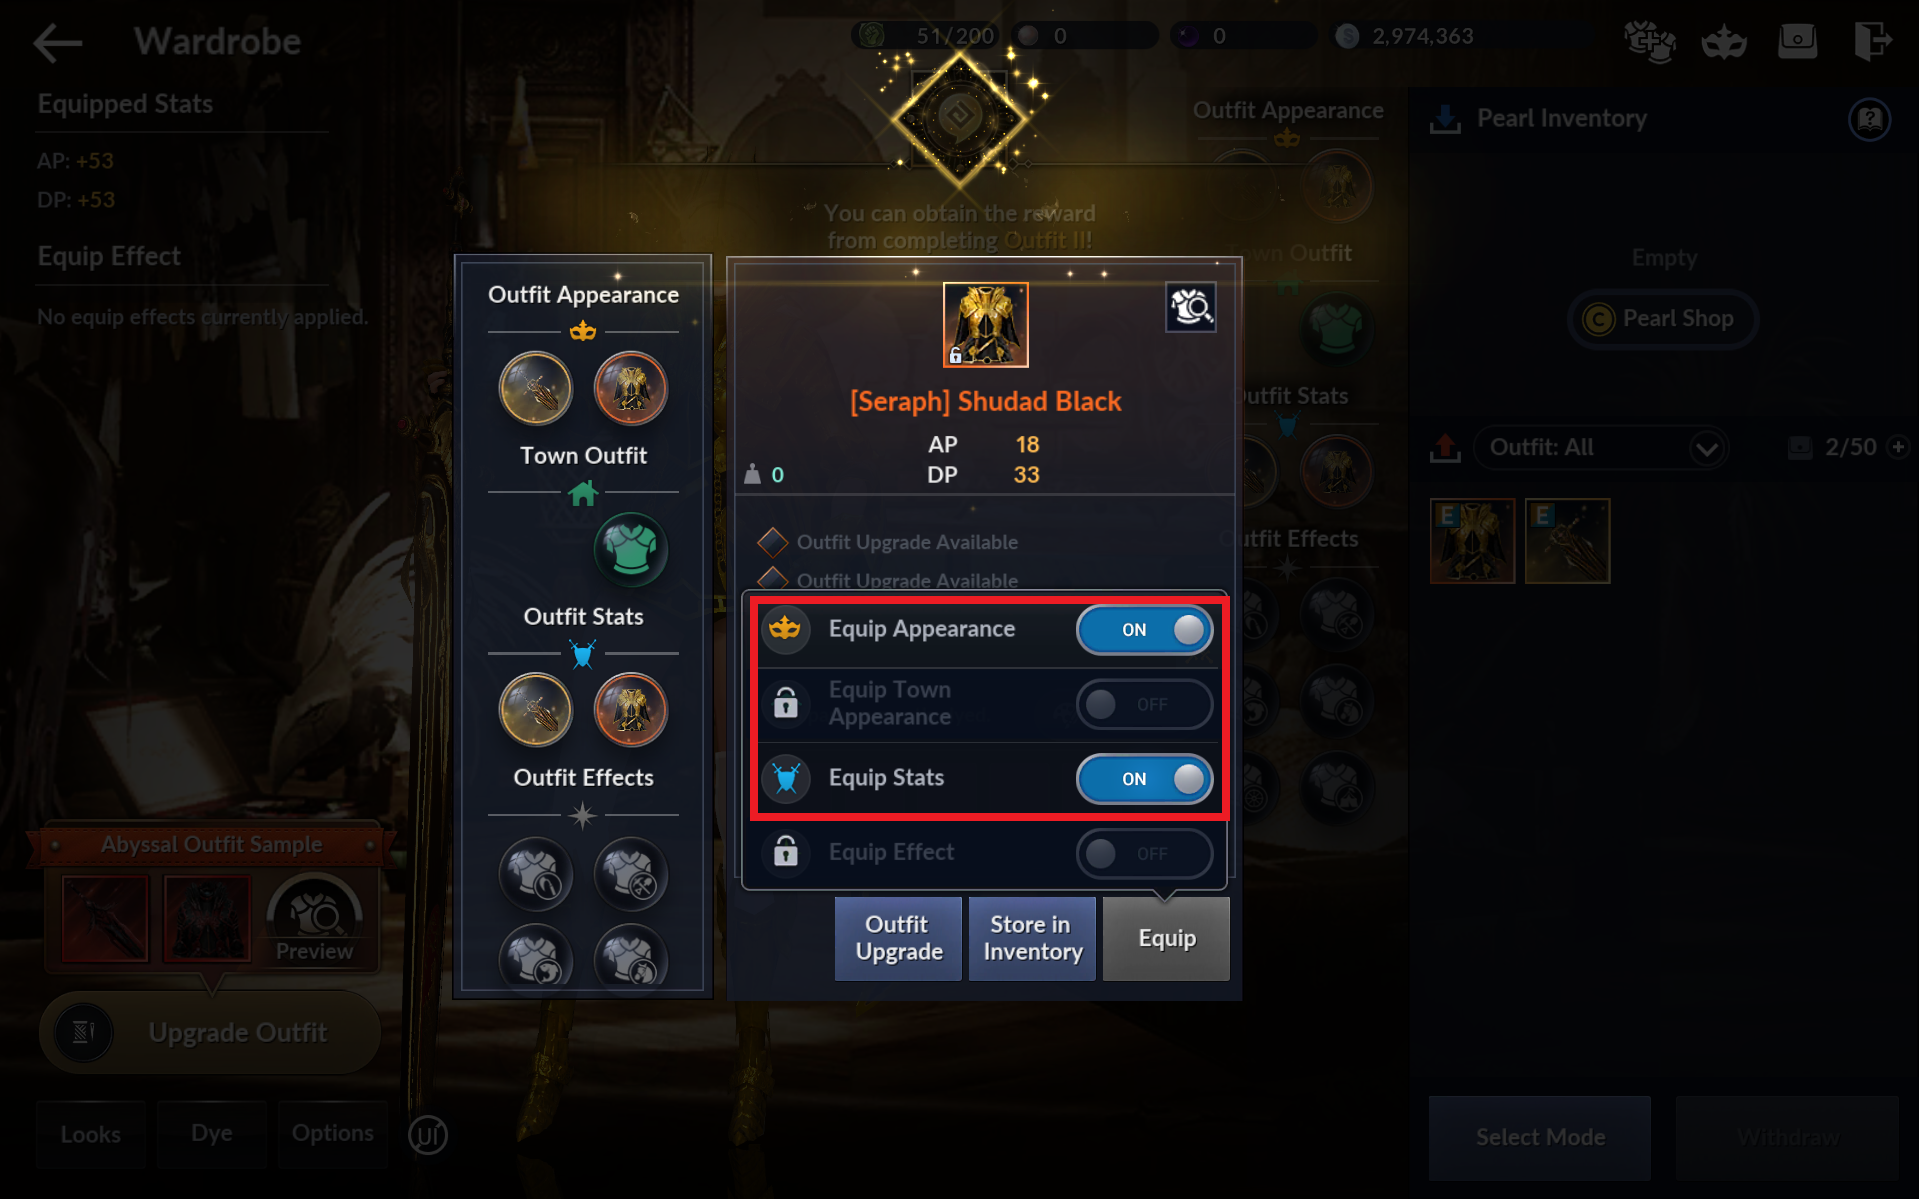
23) Primal Rift Totem
Use the Remastered Totem Chest in your inventory, then equip a 'Primal grade or higher Rift Totem.'
- Move to the Season Pass's shortcut or your inventory and use the 'Remastered Totem Chest' item.
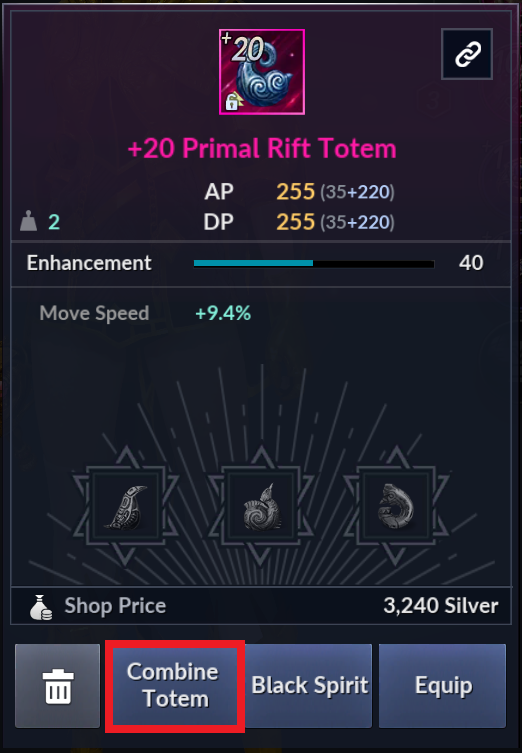
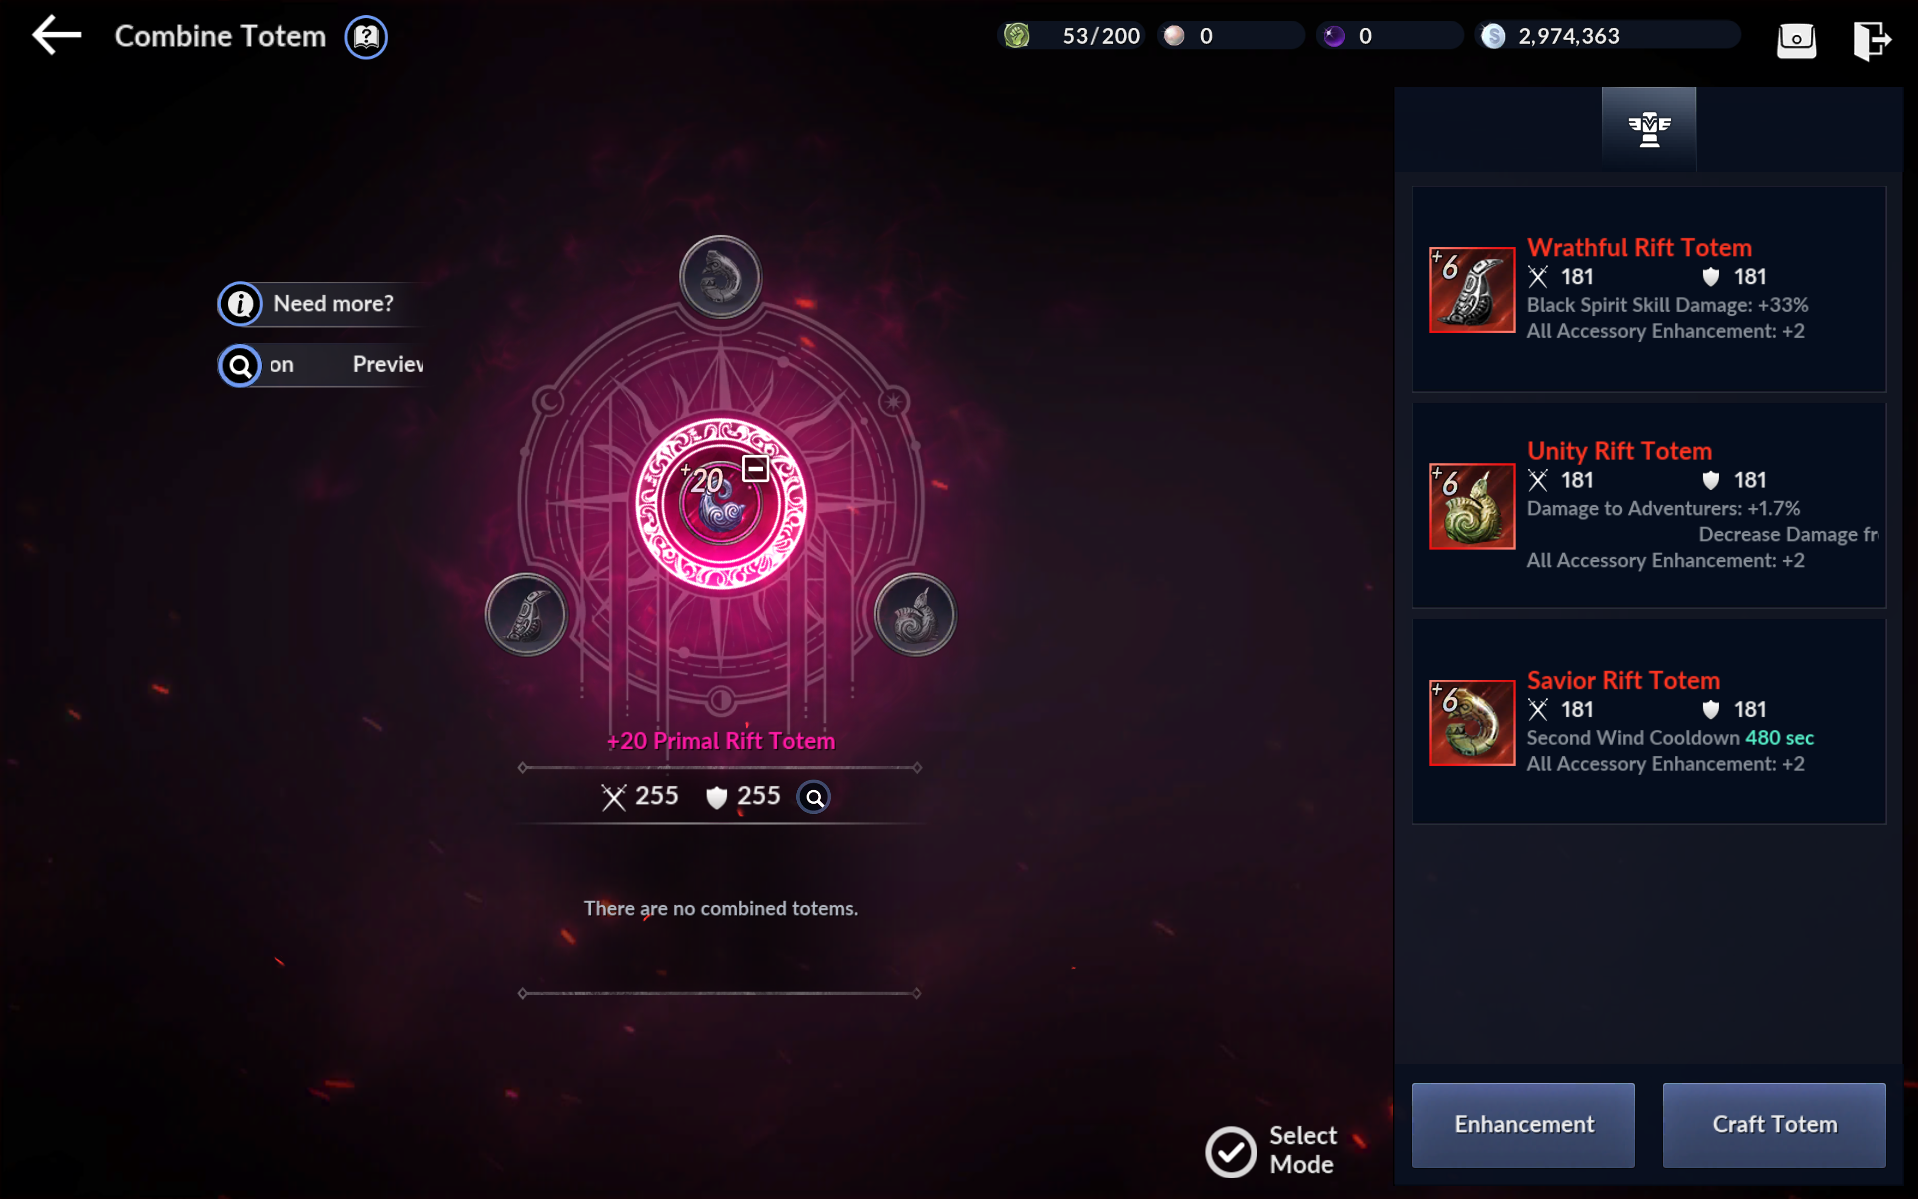
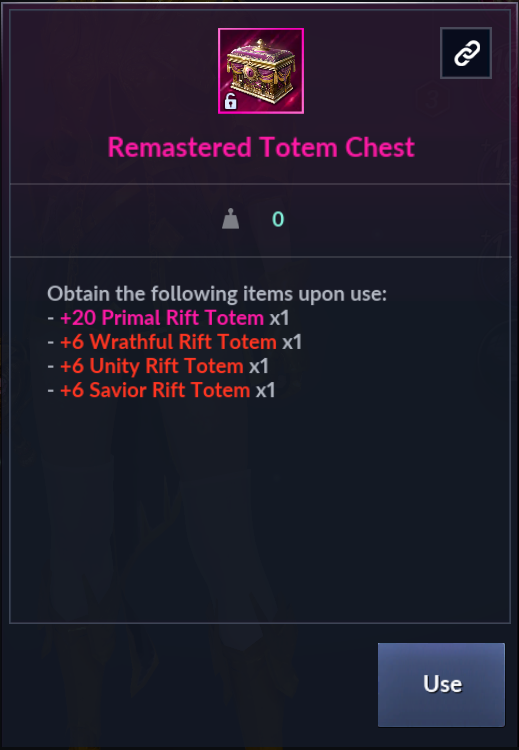 - Use the Auto-Equip button to equip the Primal Rift Totem, and the Combine Totem button to combine the 3 totem types you obtained together from the chest.
24) Family Characters
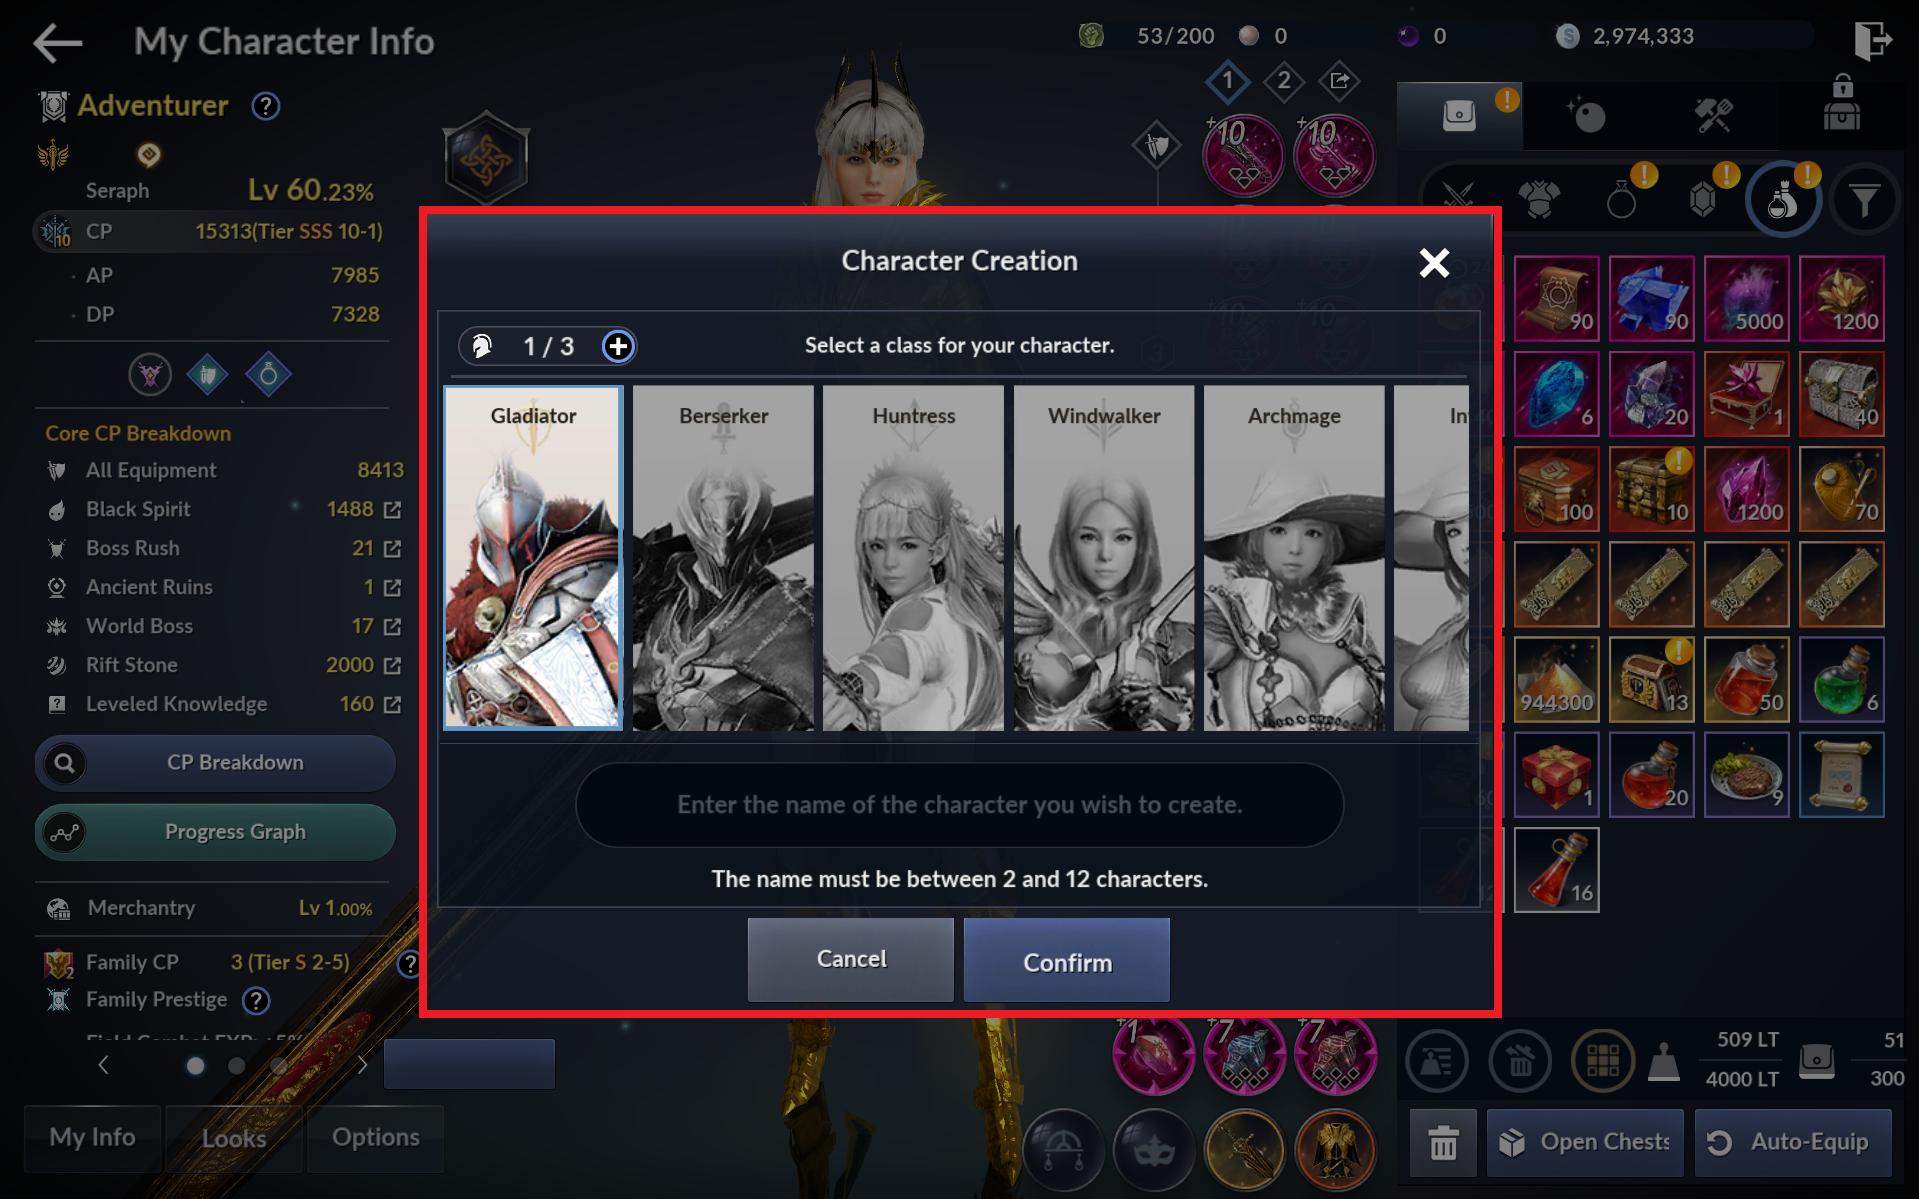
Have 3 or more 'Characters within your Family,' then visit the character select screen.
- Move to your inventory via the Season Pass's shortcut, and use all of your 'Lv 60 Character Creation Vouchers' to create characters.
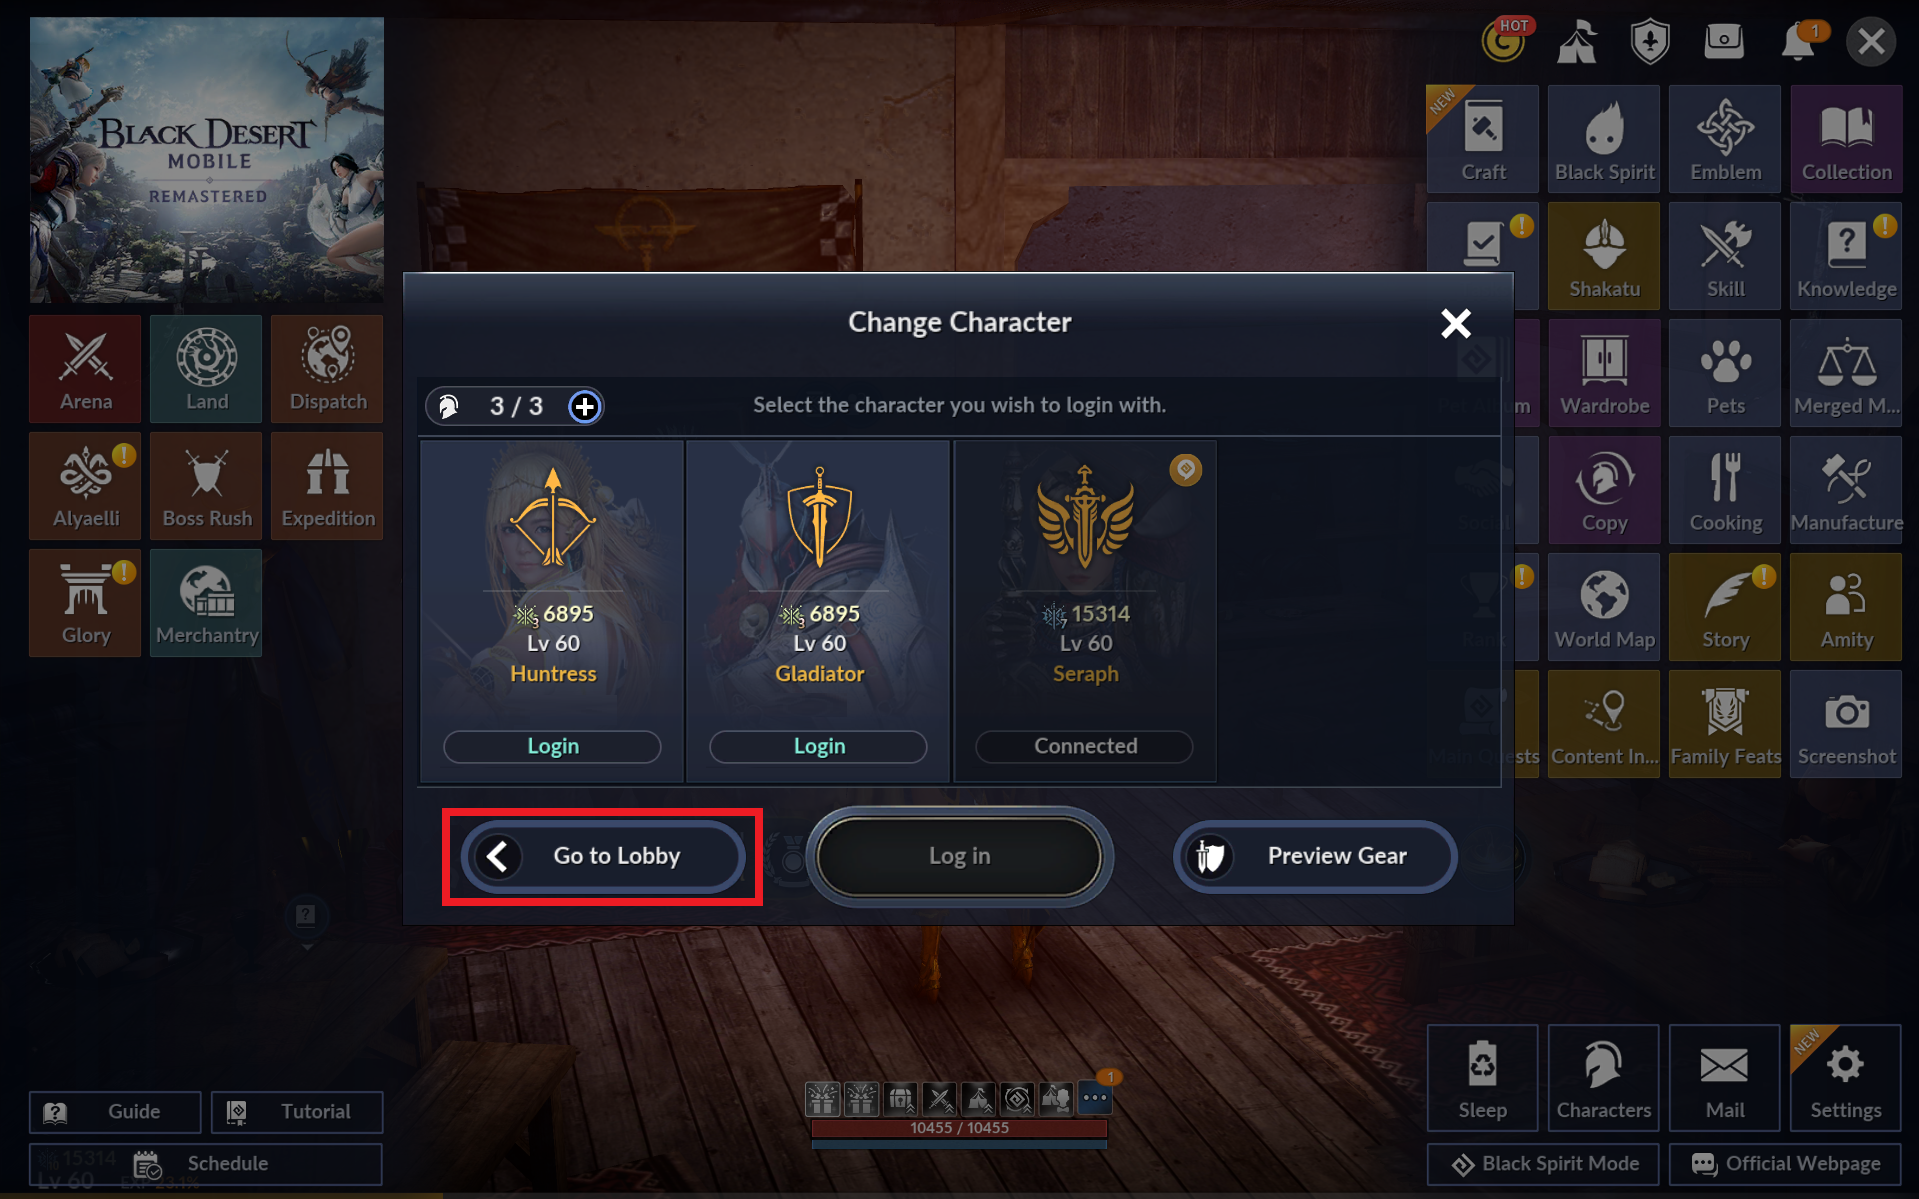
- After creating all your characters, go to [Menu] - [Change Character] to move to the lobby, then log back in with a character.
25) Emblem
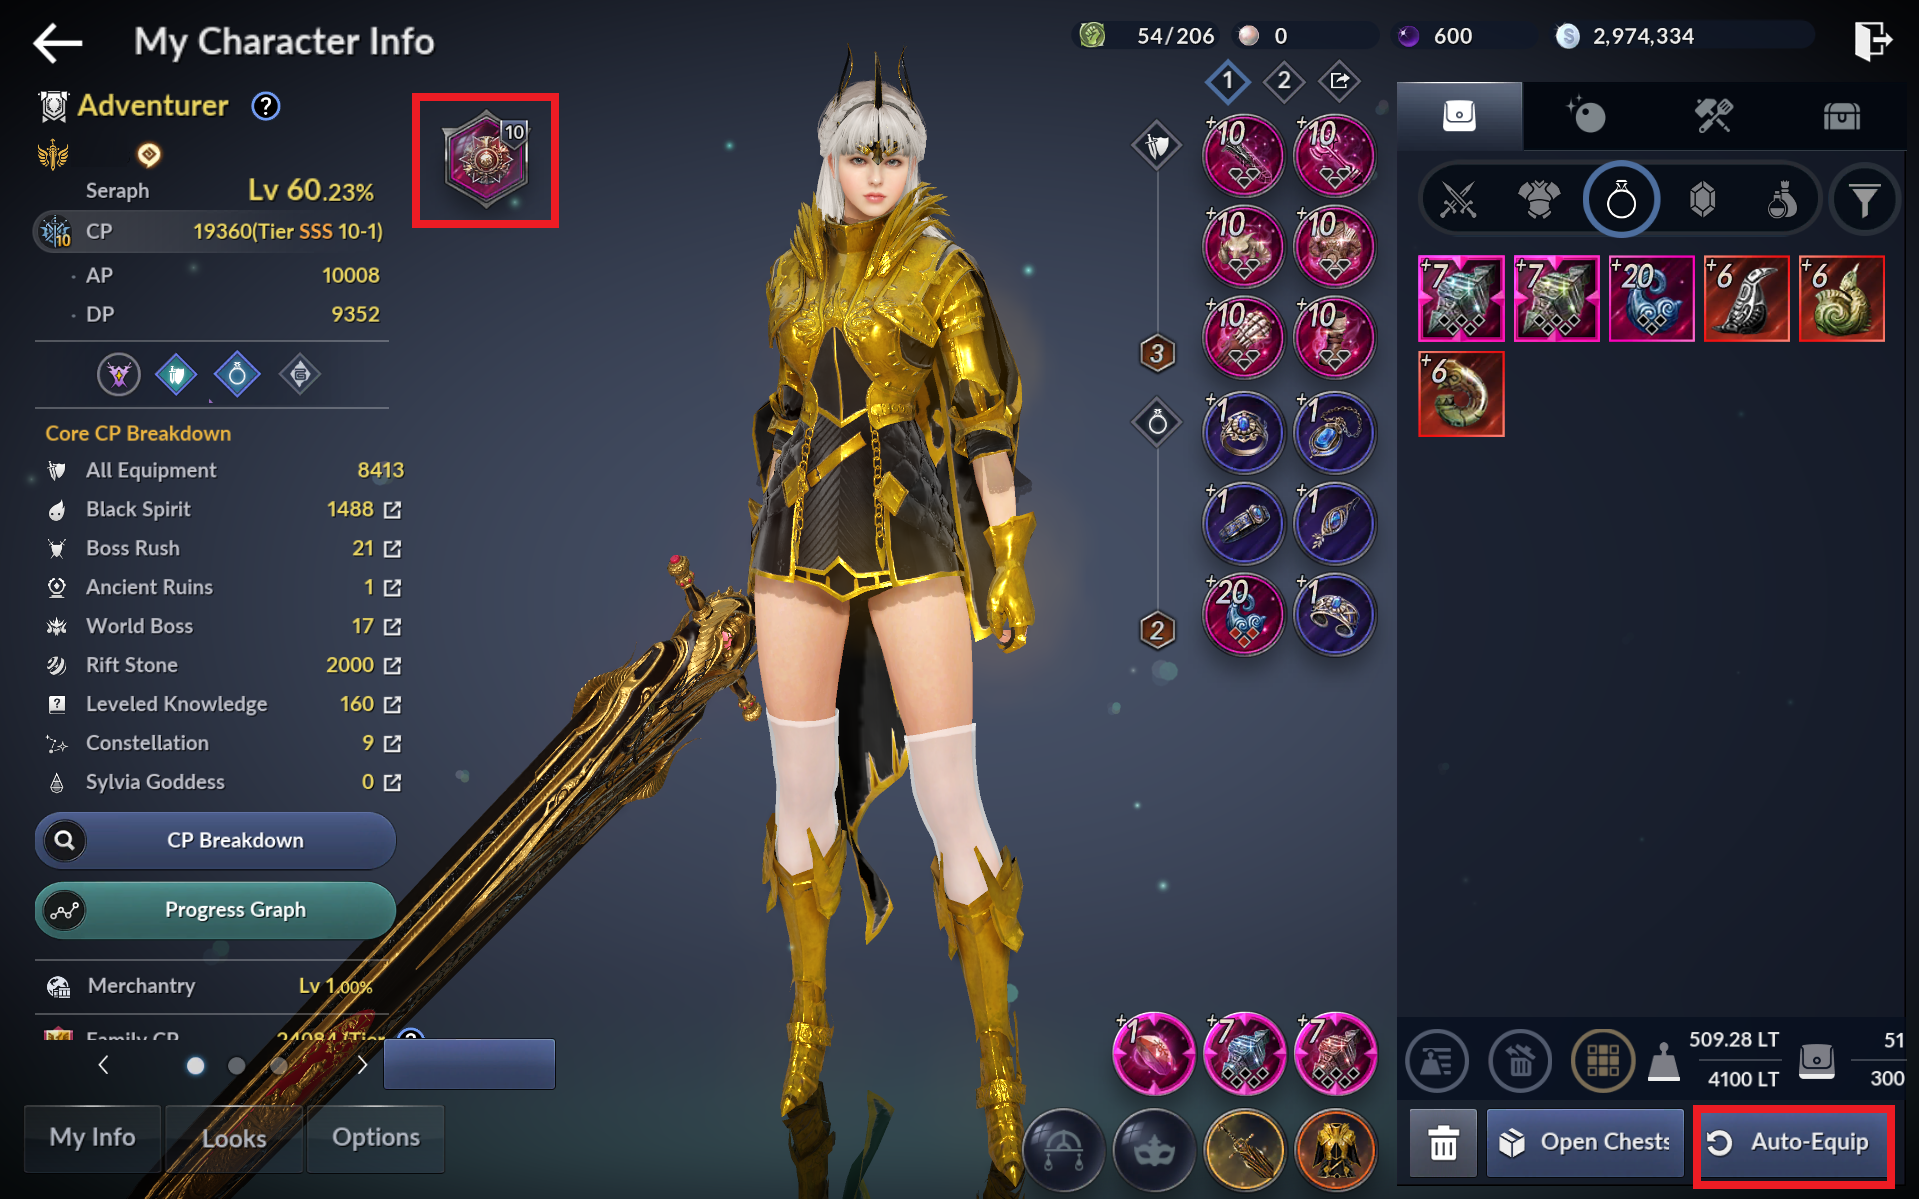
Equip a 'Primal grade or higher Emblem' (Emblem of Glory).
- Equip the 'Emblem of Glory' from your Season Pass reward using the 'Auto-Equip' button in your inventory.
26) Equip Runes
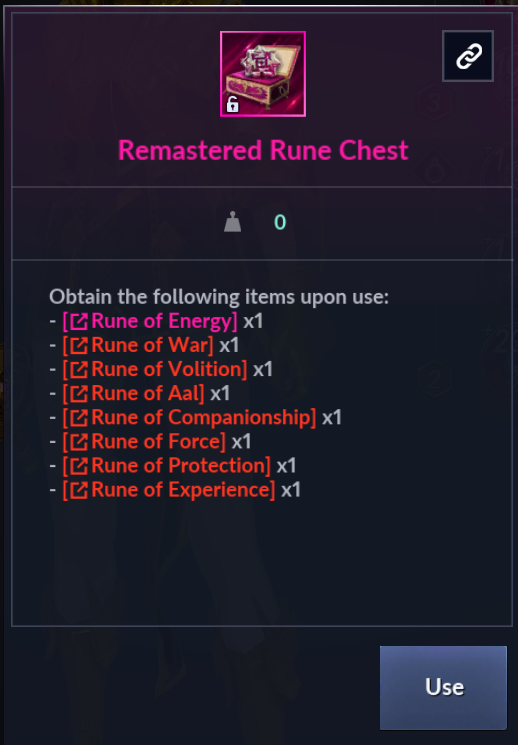
Use the Remastered Rune Chest in your inventory, then equip '8 Runes.'
- Use the 'Remastered Rune Chest' obtained as a Season Pass reward to obtain Primal and Abyssal Runes.
- After obtaining runes, move to the [Black Spirit] - [Equip/Combine Rune] menu.
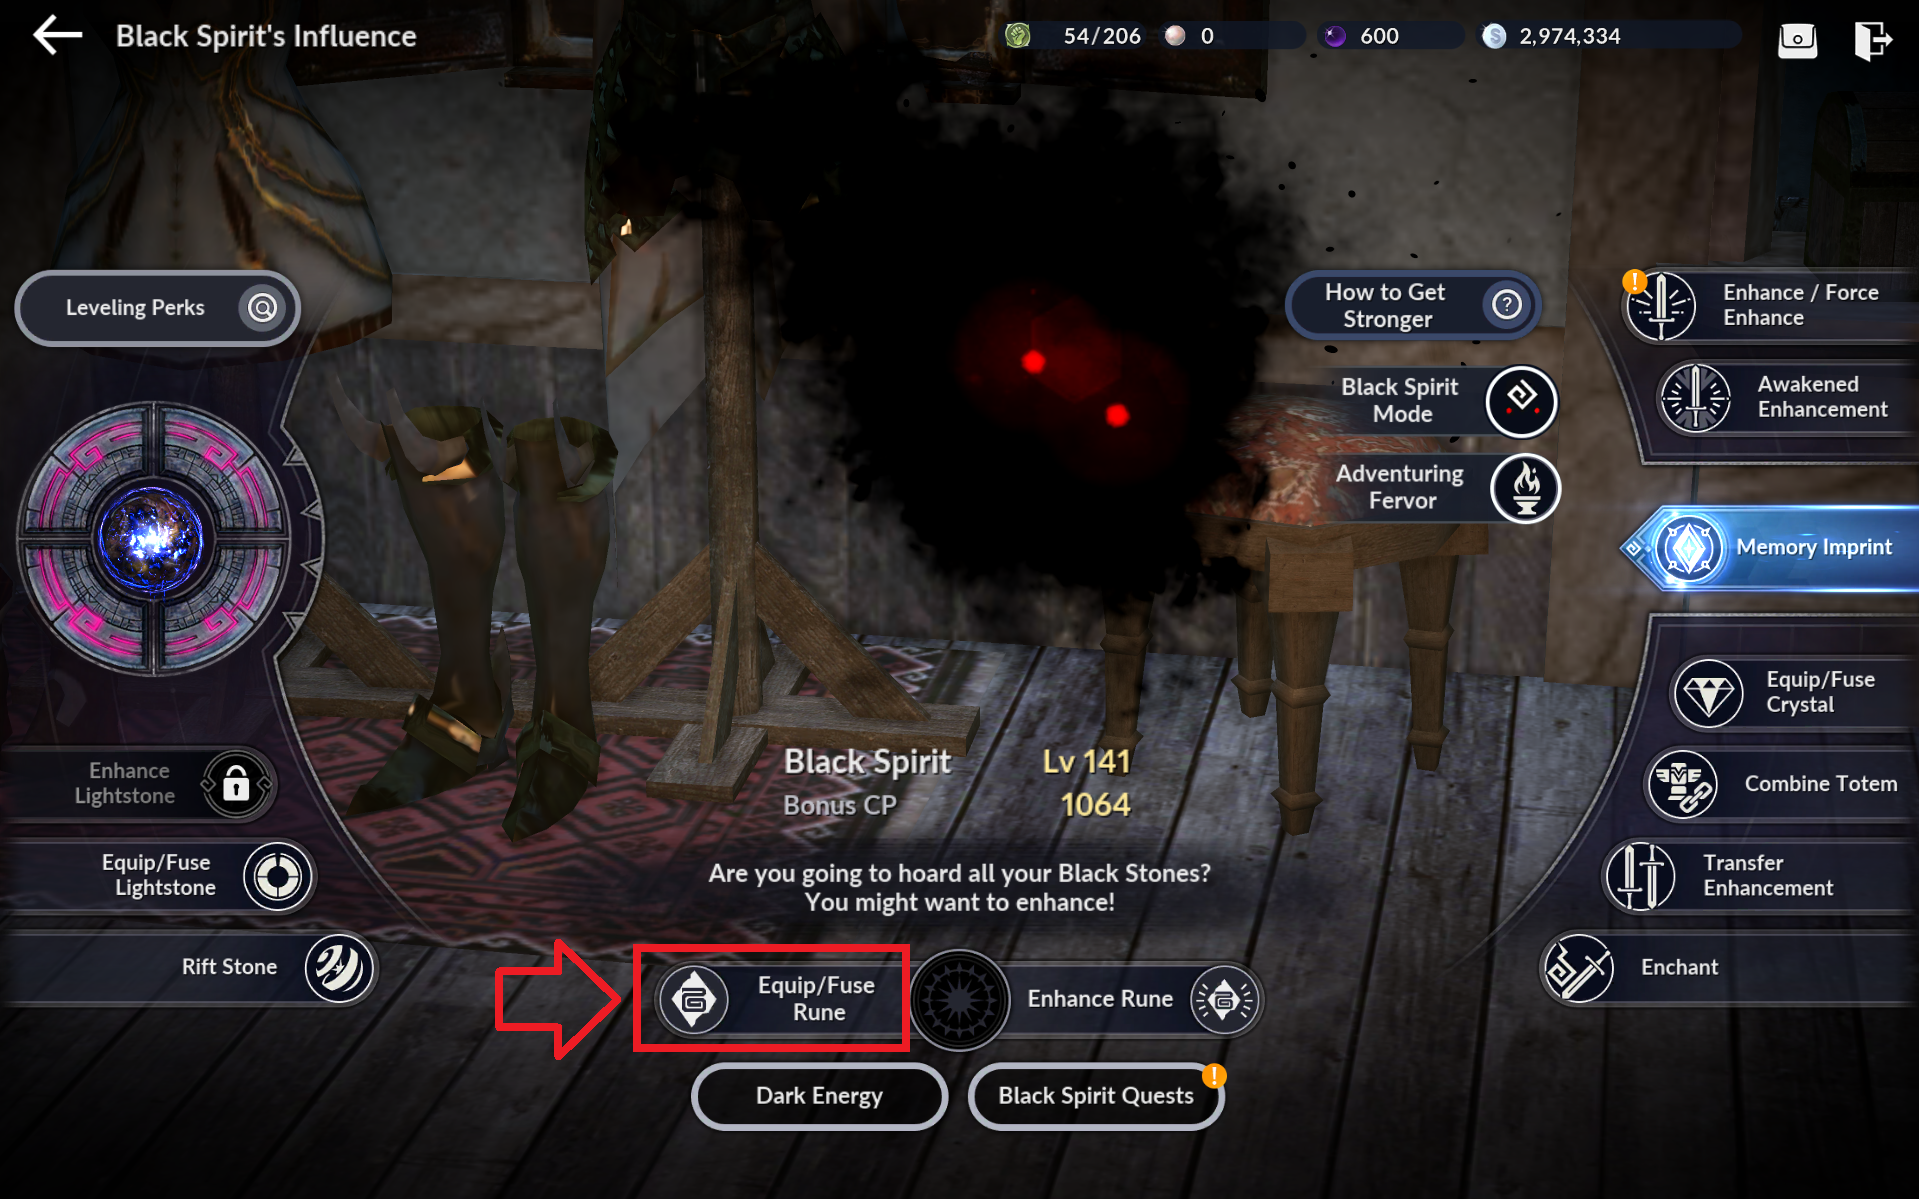
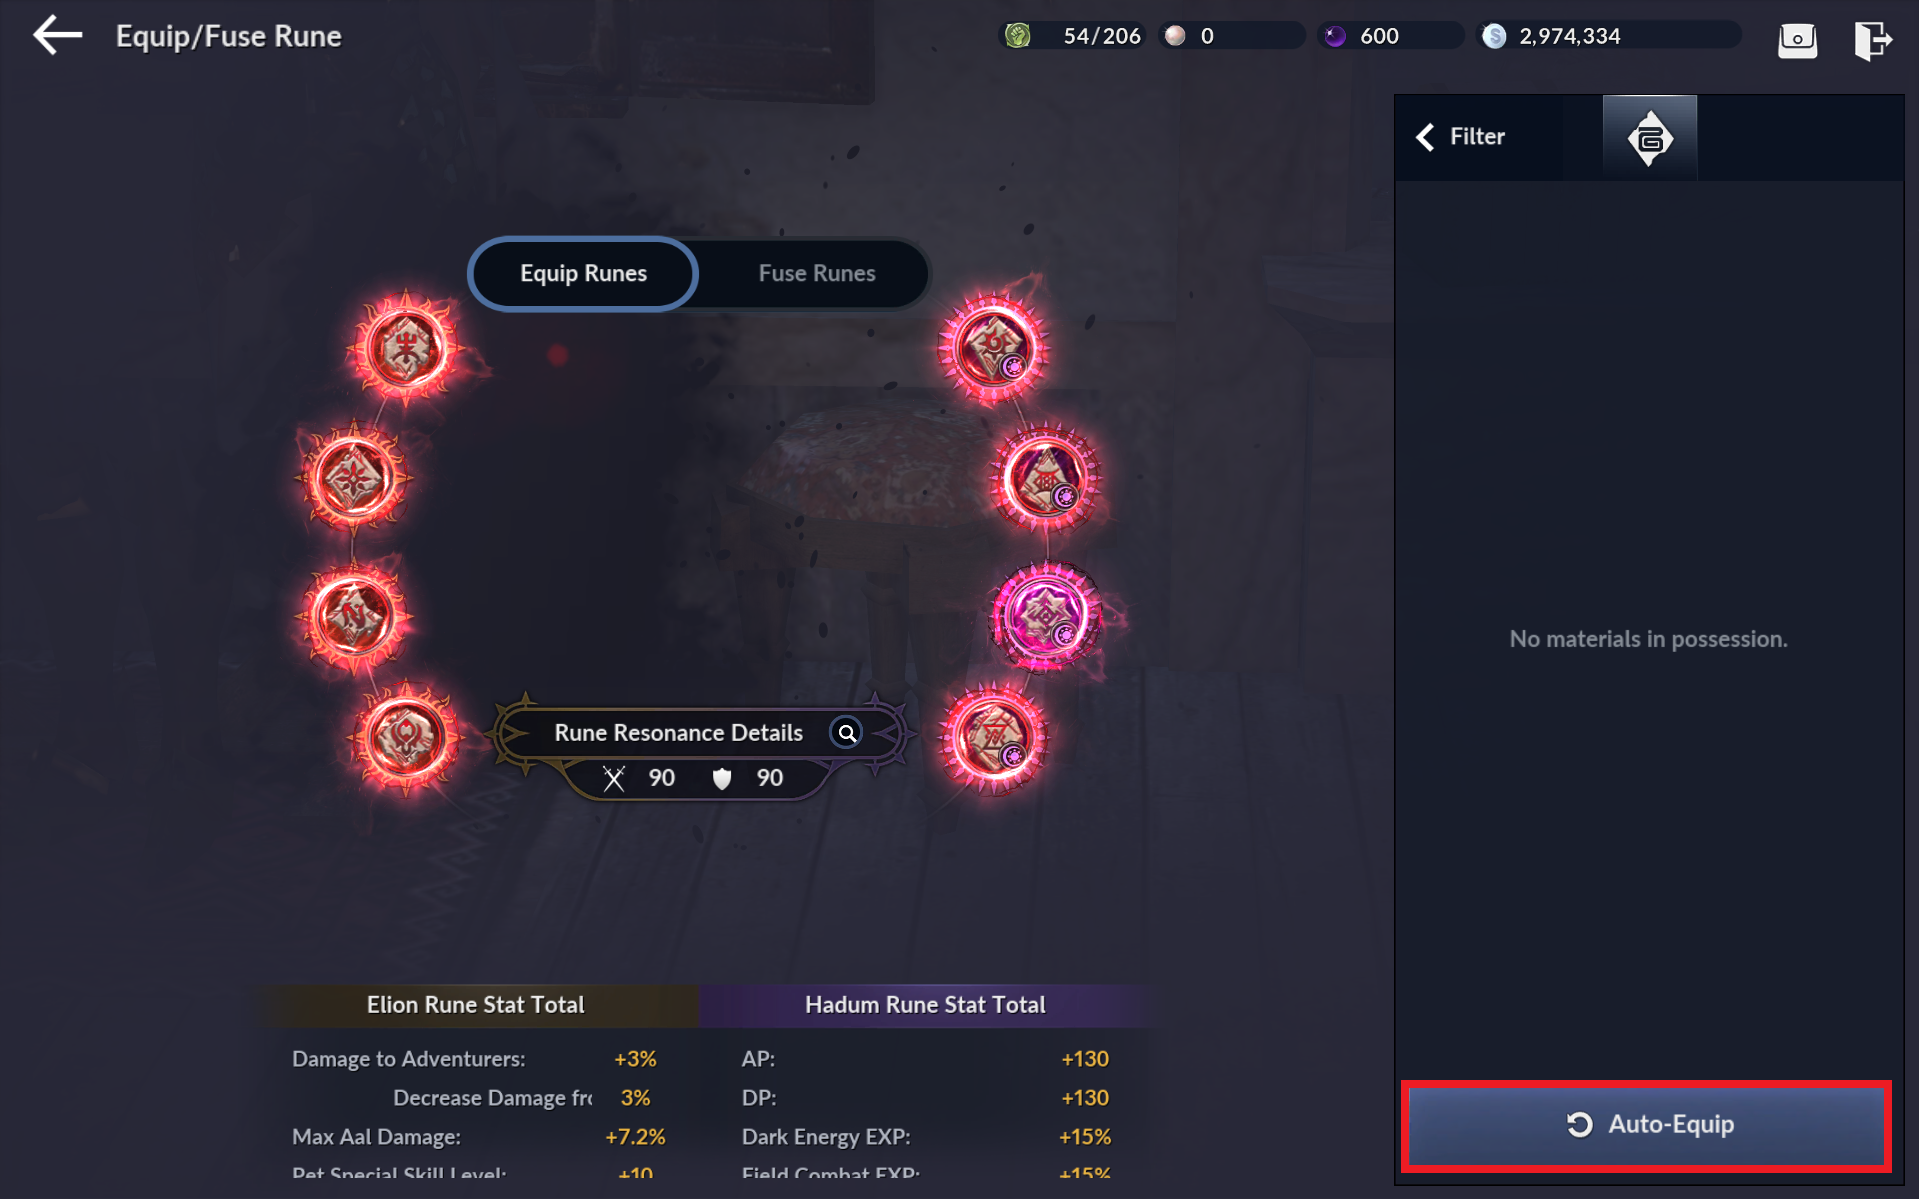
- In the Equip/Combine Rune menu, tap the Auto-Equip button to equip all of the runes you obtained.
27) Constellation
Explore a 'Constellation' 5 times to grow.
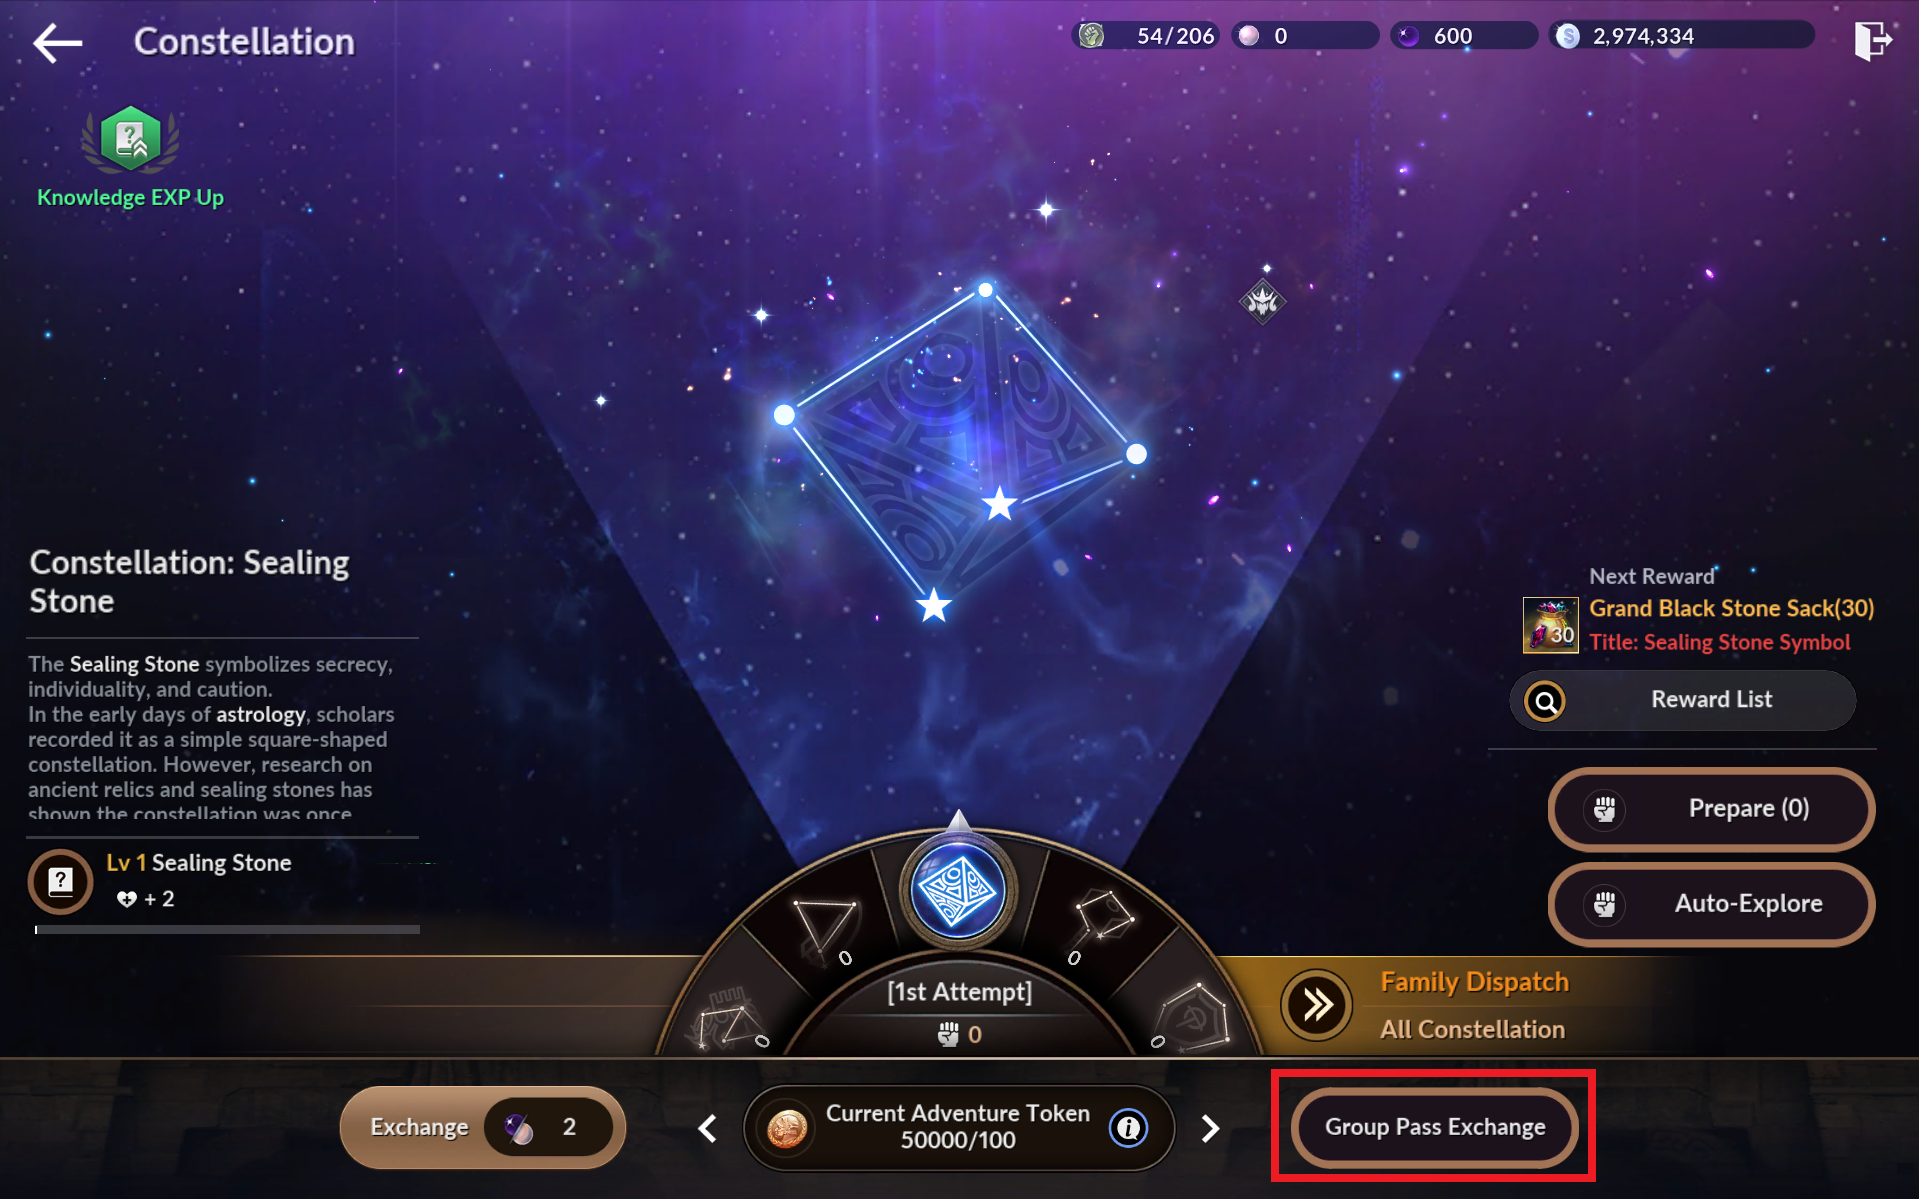
- Via the Season Pass's shortcut, or [Menu] - [Constellation], go to the Constellation menu, tap the Exchange Random Attempts button, and proceed with the exchange.
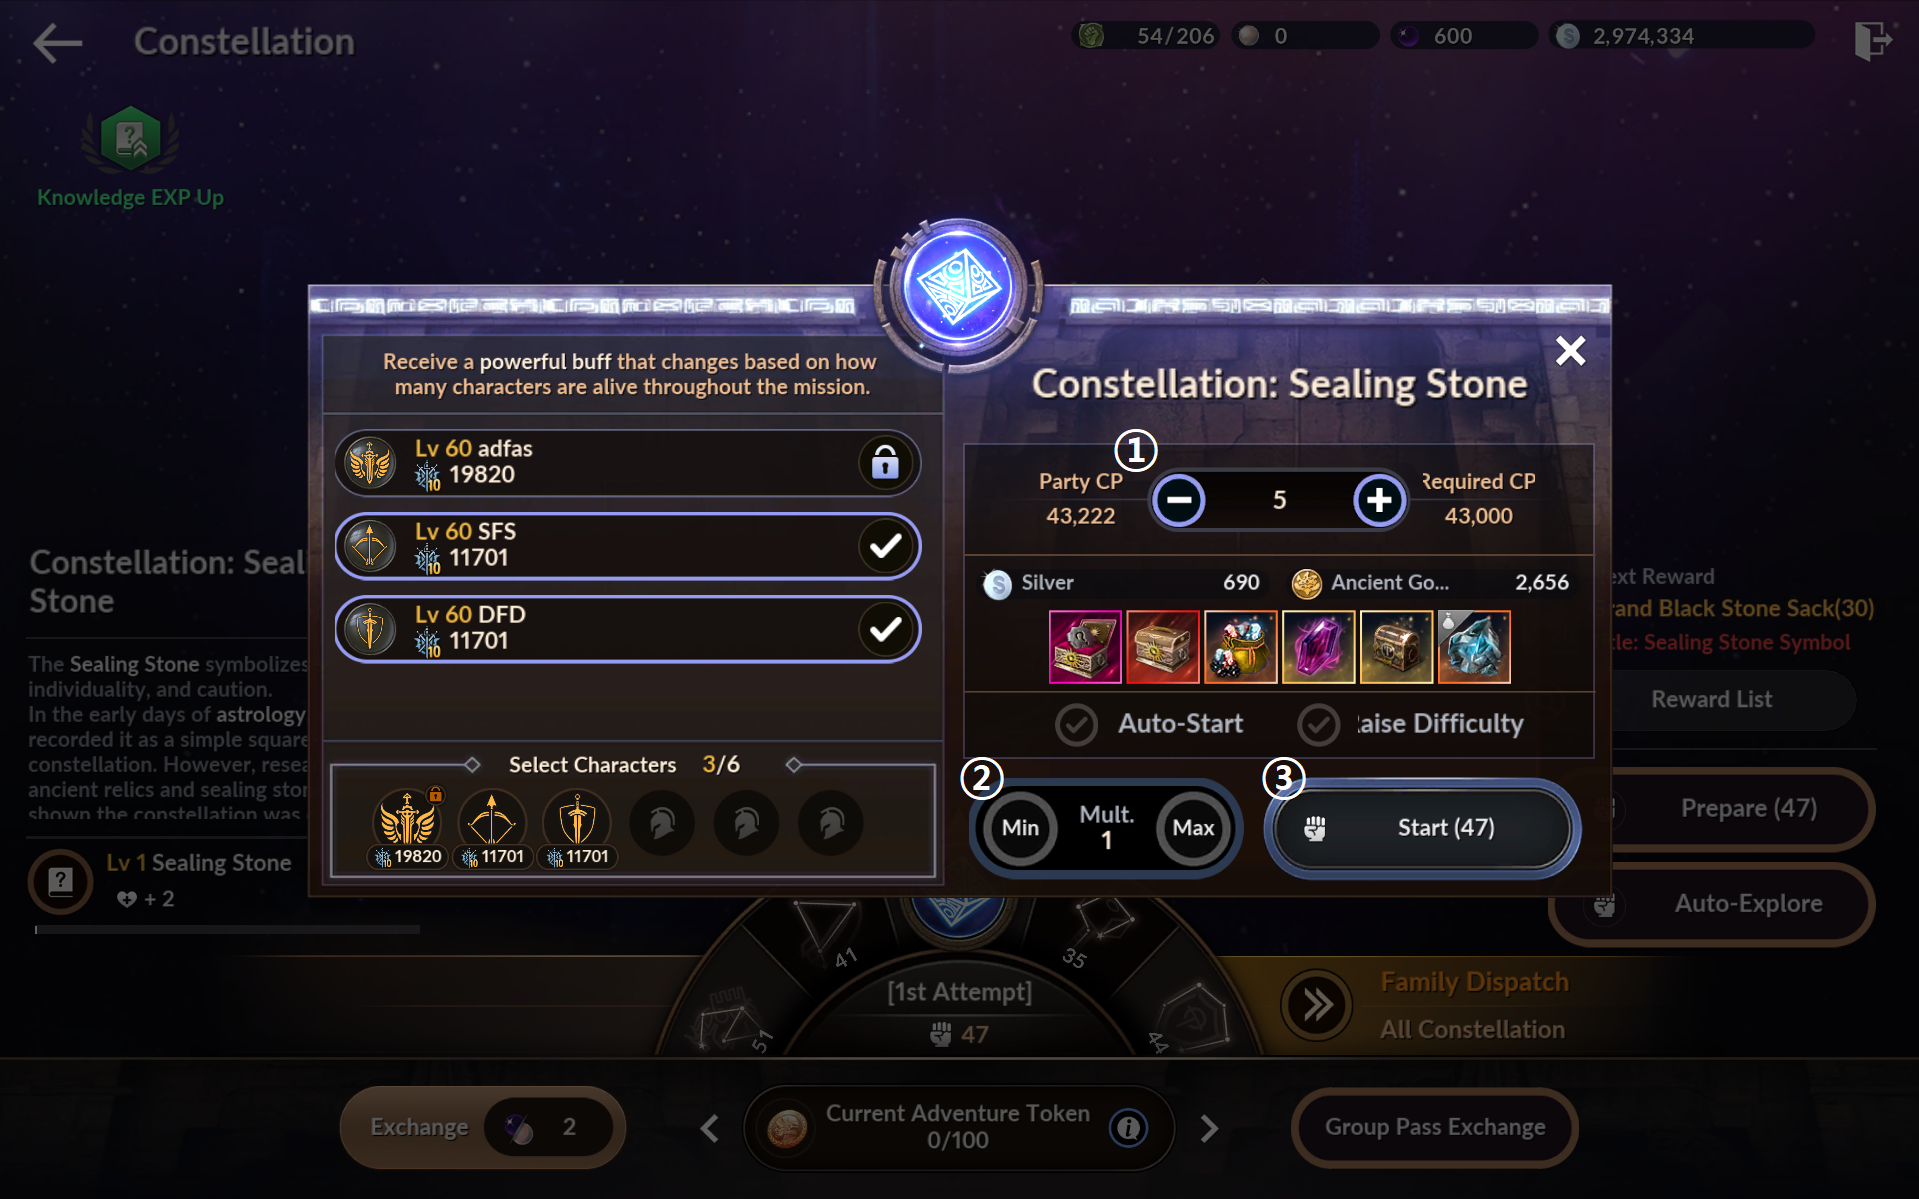
 1. Set the difficulty of the Constellation you want to explore.
2. Set the multiplier you wish to use,
3. Tap the Start Exploration button to explore the Constellation.
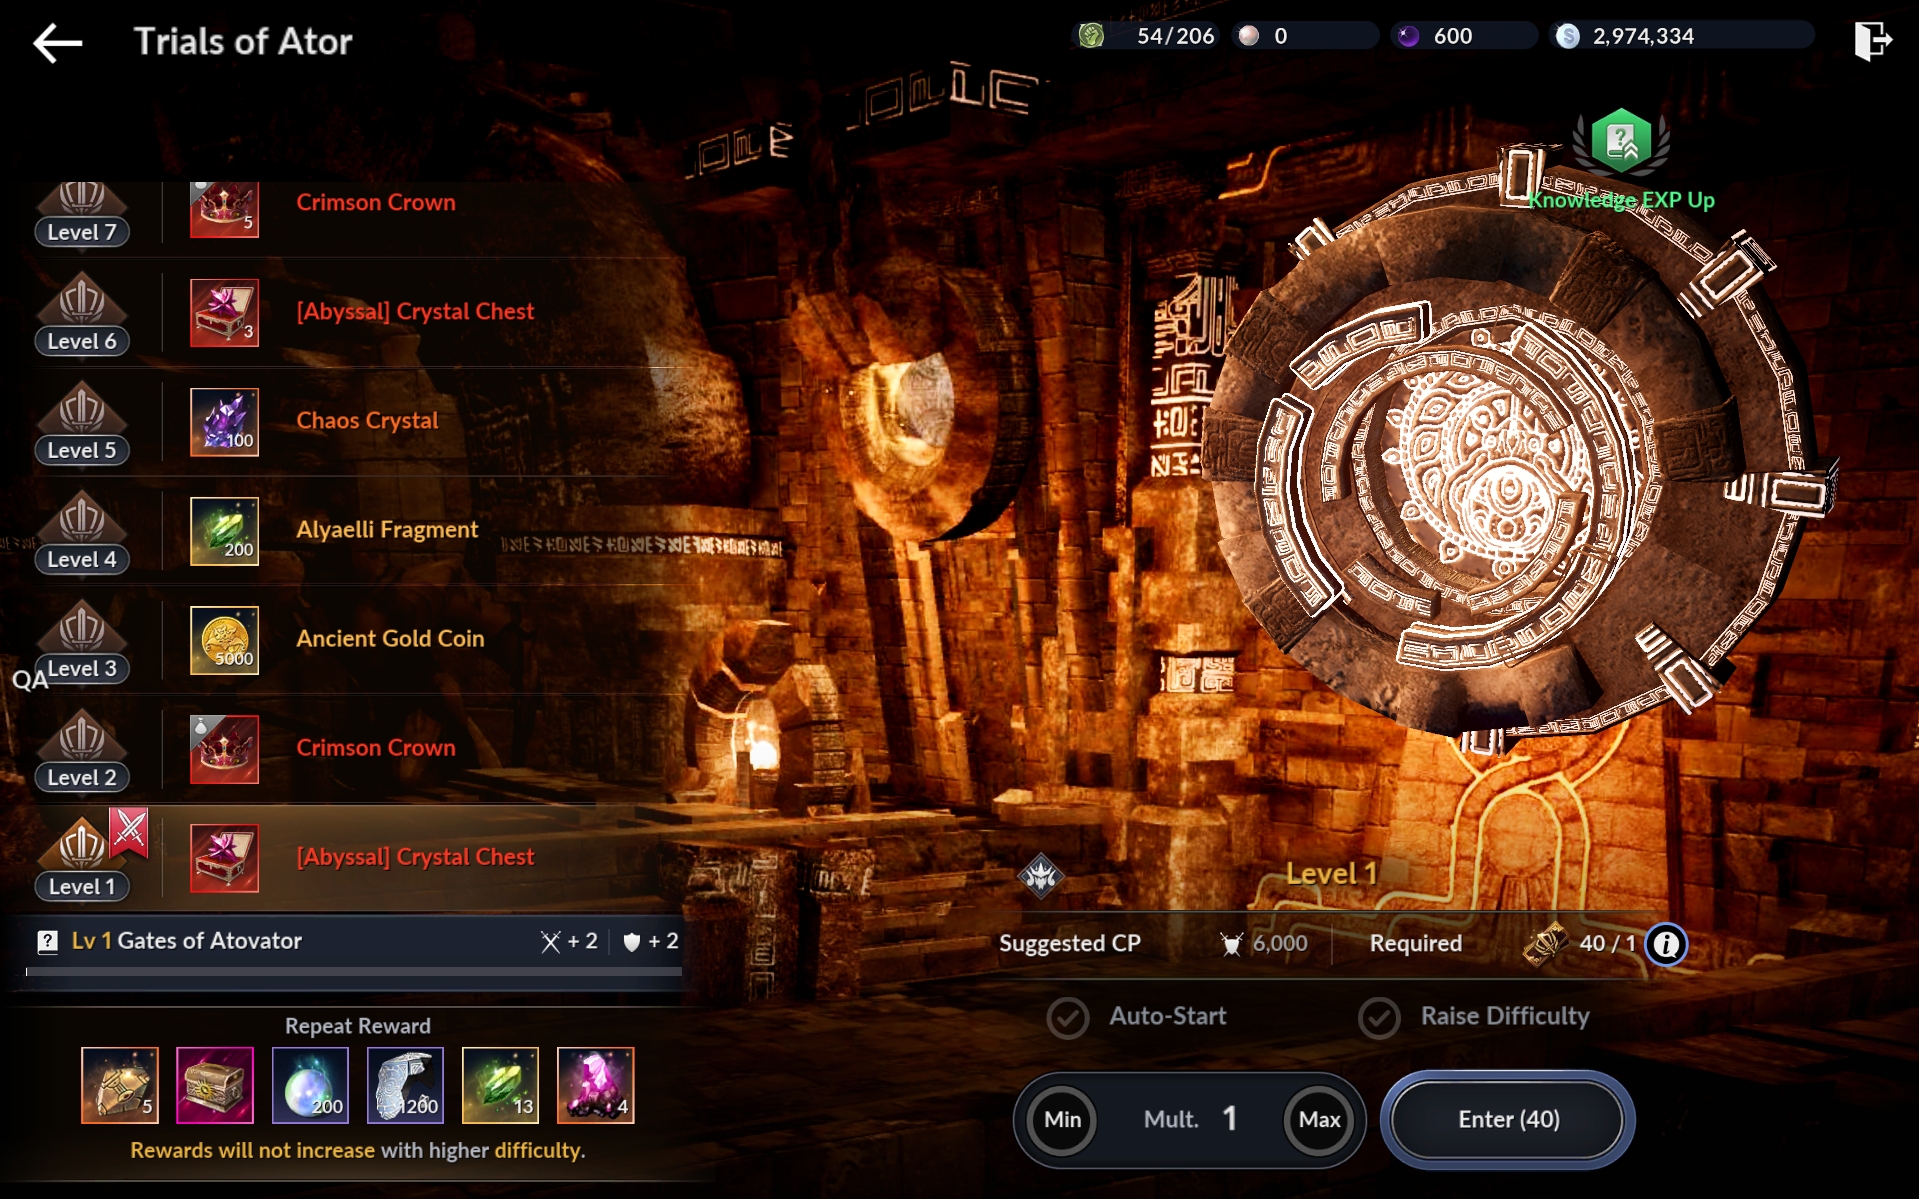
28) Trials
Conquer 'Trials of Ator, Ancient' once.
- Via the Season Pass's shortcut, or [Menu] - [Trials], move to the Trials of Ator menu, then take on the Trial via the Enter button.
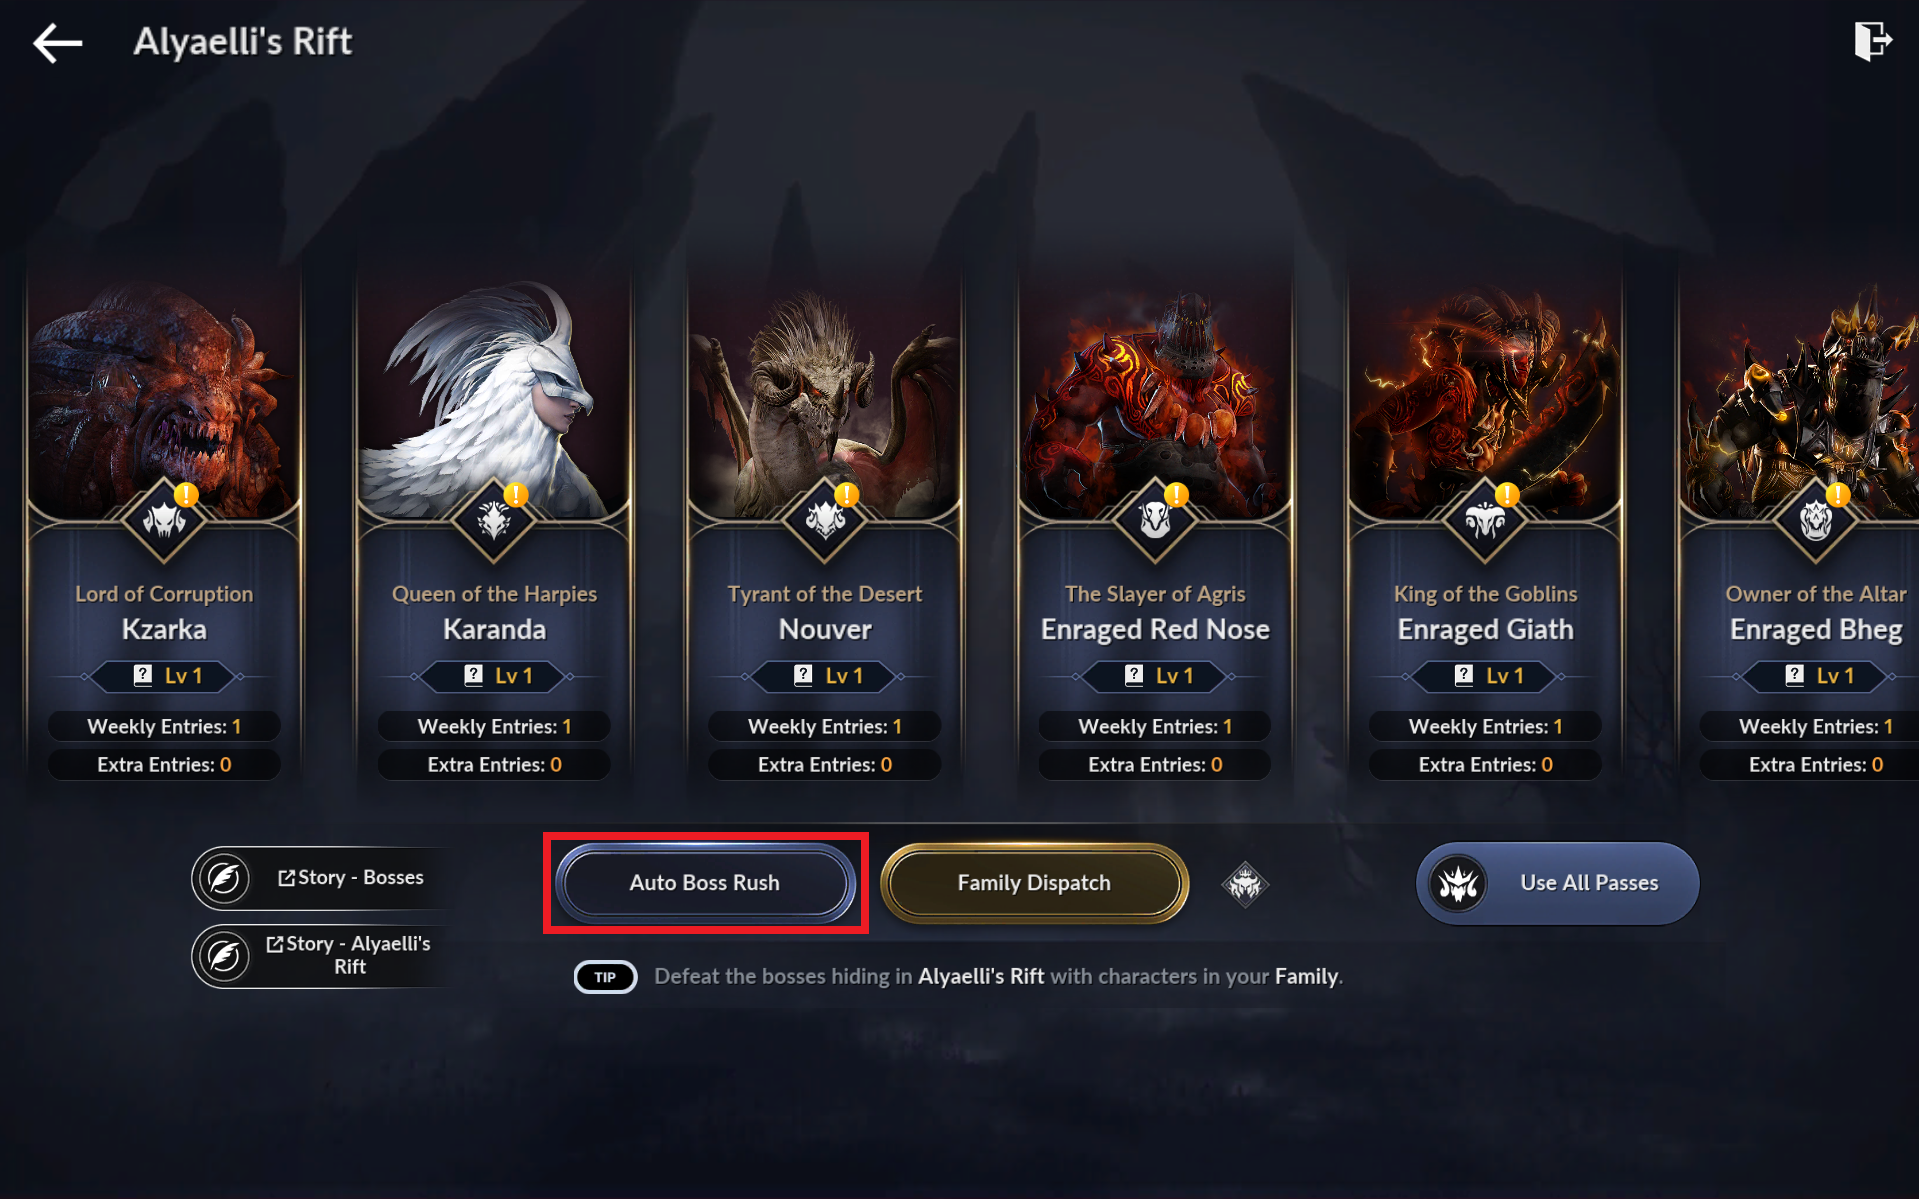
29) Alyaelli's Rift
Defeat the 'Alyaelli's Rift boss' once to grow.
- Via the Season Pass's shortcut, or [Menu] - [Alyaelli's Rift] menu, defeat the boss through either a single Boss Rush or Consecutive Boss Rush.
30) Enchant
Apply an 'Enchant to a piece of equipment' to grow.
- Via the Season Pass's shortcut, or [Black Spirit] - [Enchant] menu, proceed with Enchanting.
1. Select the equipment you want to enchant.
2. Select the Enchant slot you want to enchant.
3. Enchant once via the Enchant button, or use the Auto-Enchant button to proceed automatically.
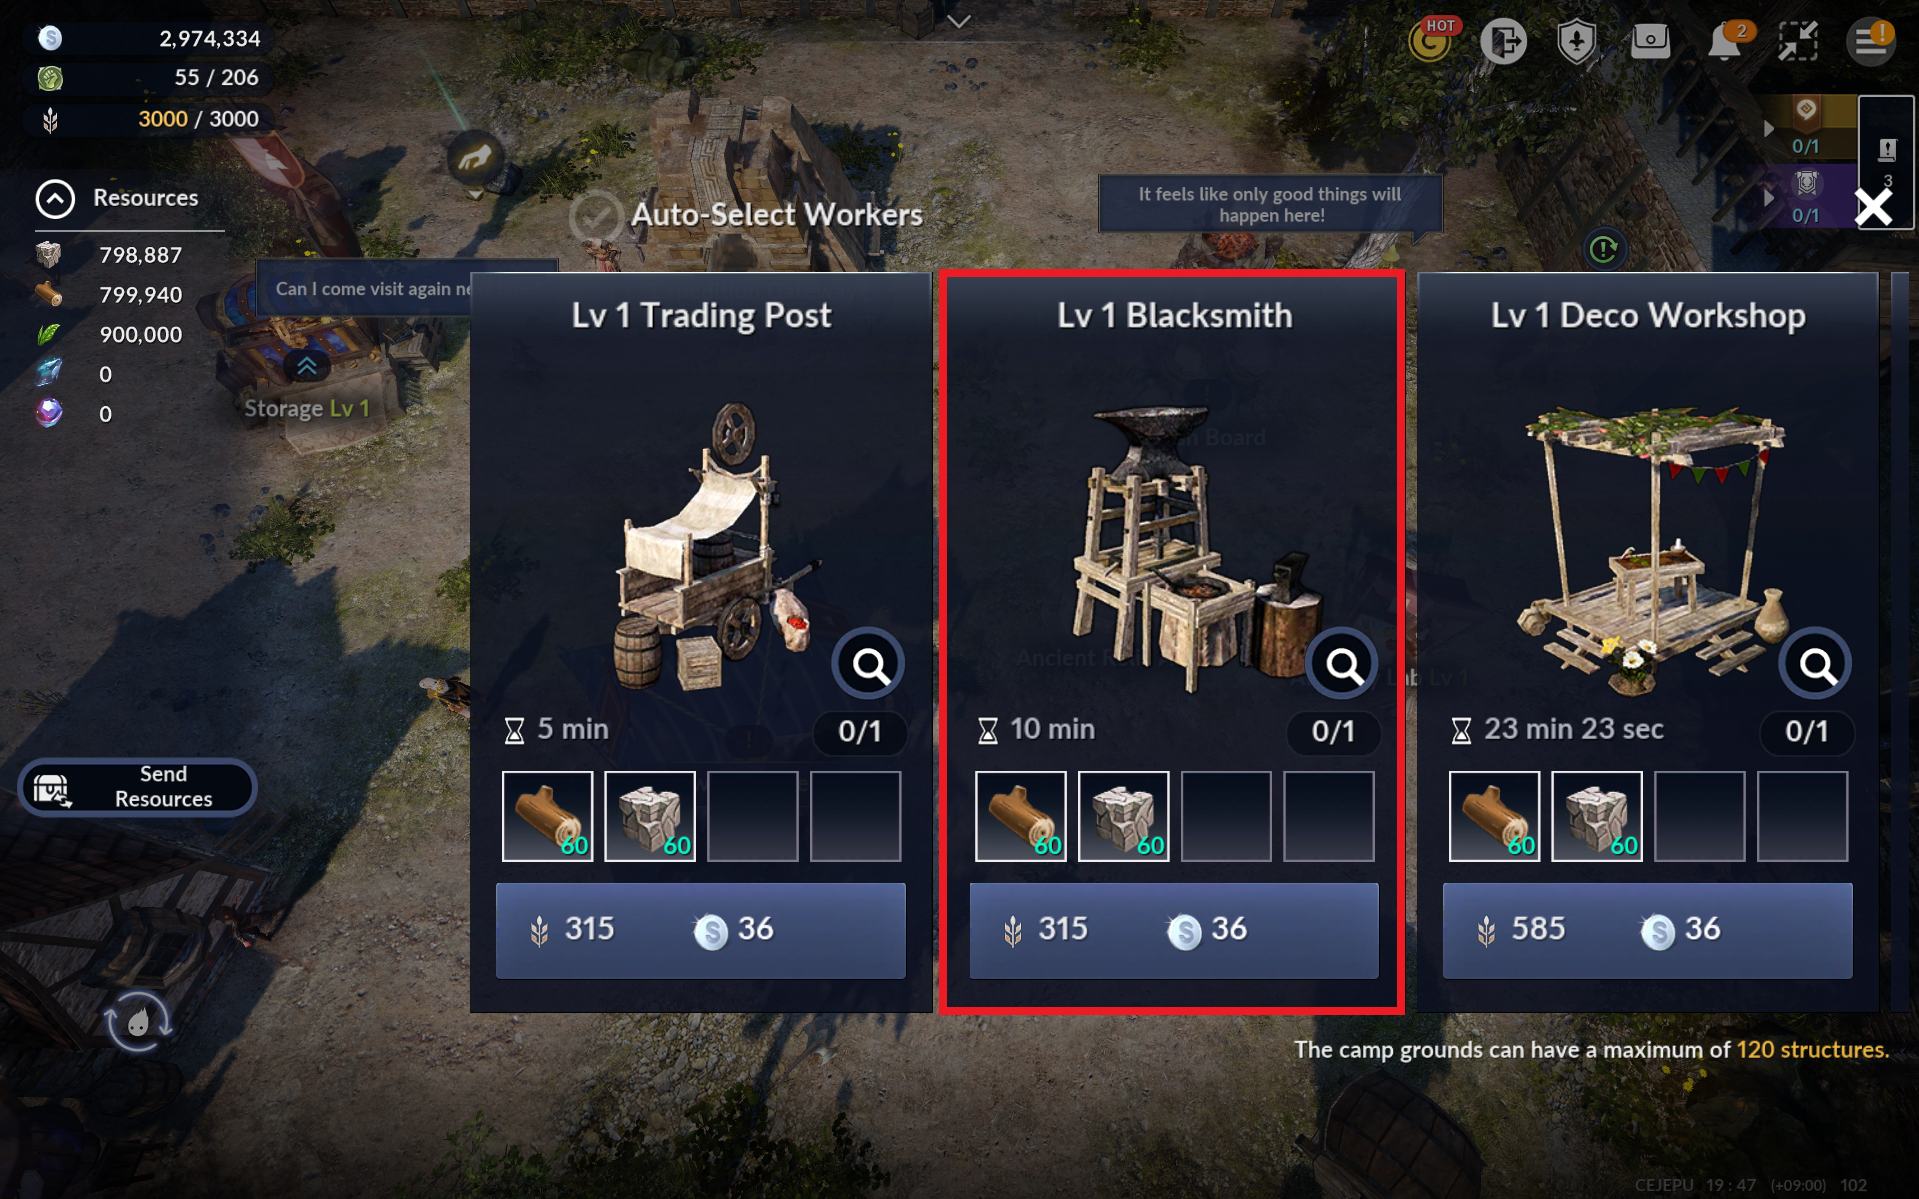
31) Camp IV/V
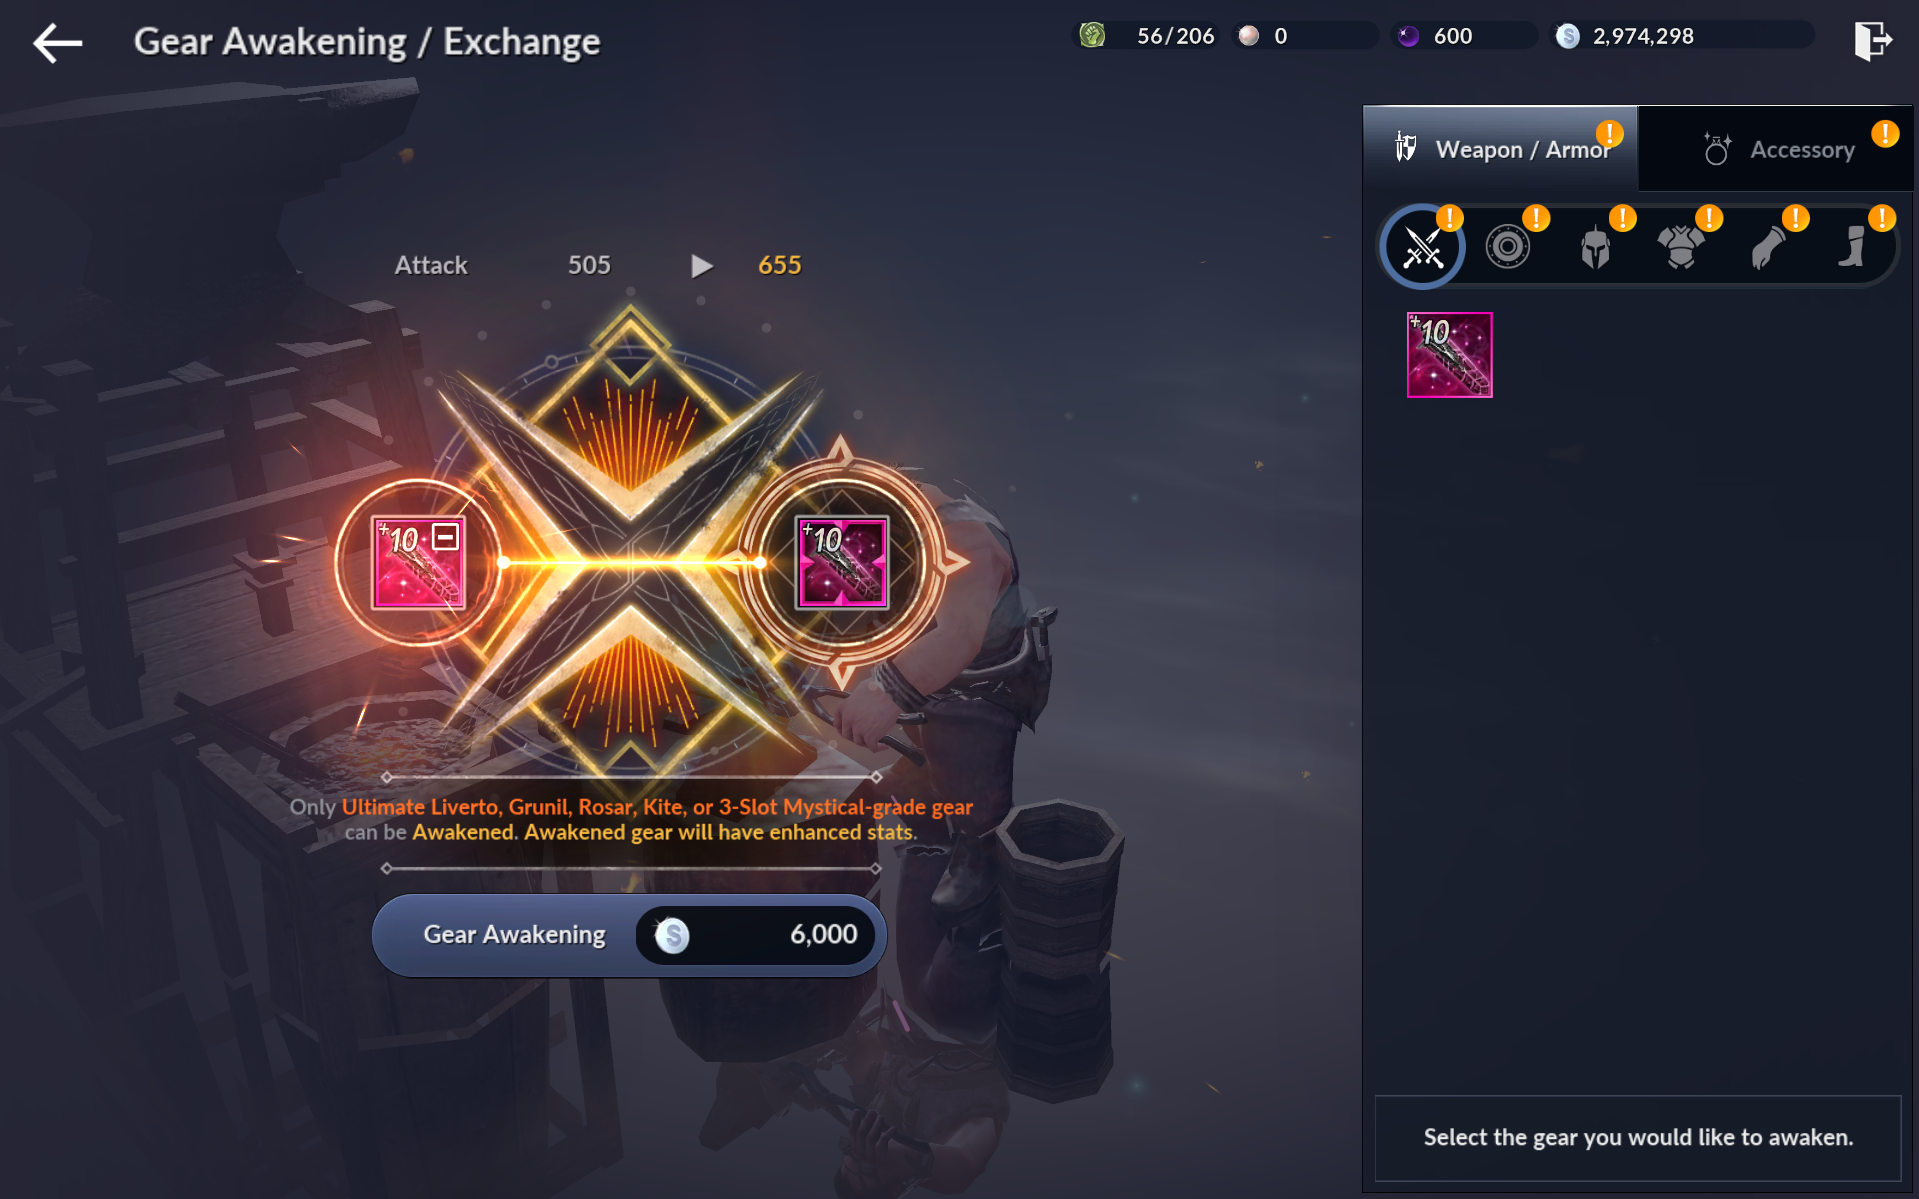
Build a 'Blacksmith' at your Camp, then Awaken a piece of Primal grade equipment.
- Via the Season Pass's shortcut, or by moving to your Camp, install a Blacksmith.
 - Via the Season Pass's shortcut, or the Camp's Blacksmith [Equipment Awakening/Exchange] menu.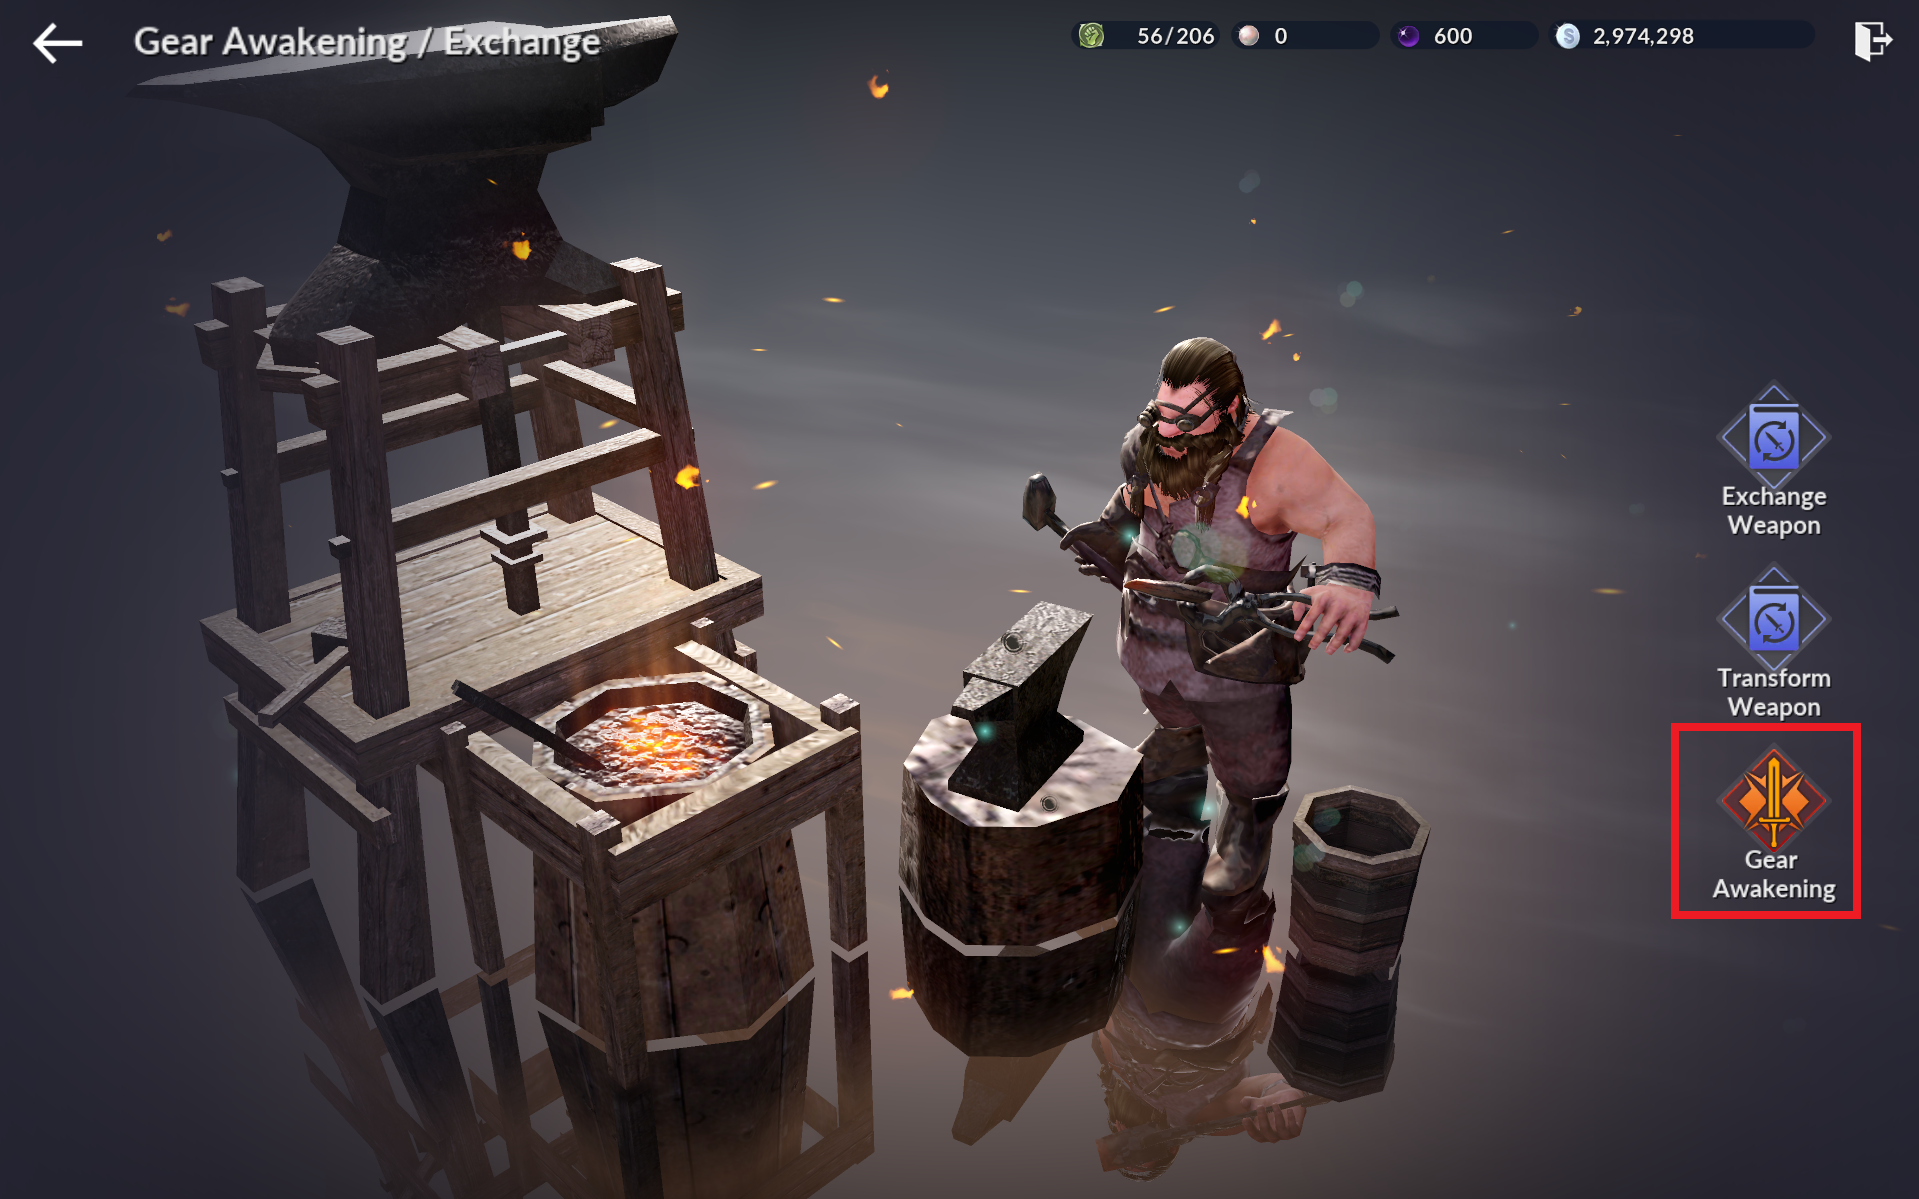
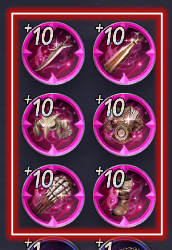
- Select 'Equipment Awakening' on screen, then Awaken all of your equipped weapons/armor.
32) Crafting
Craft or equip a 'Chaos grade or higher Main Weapon.'
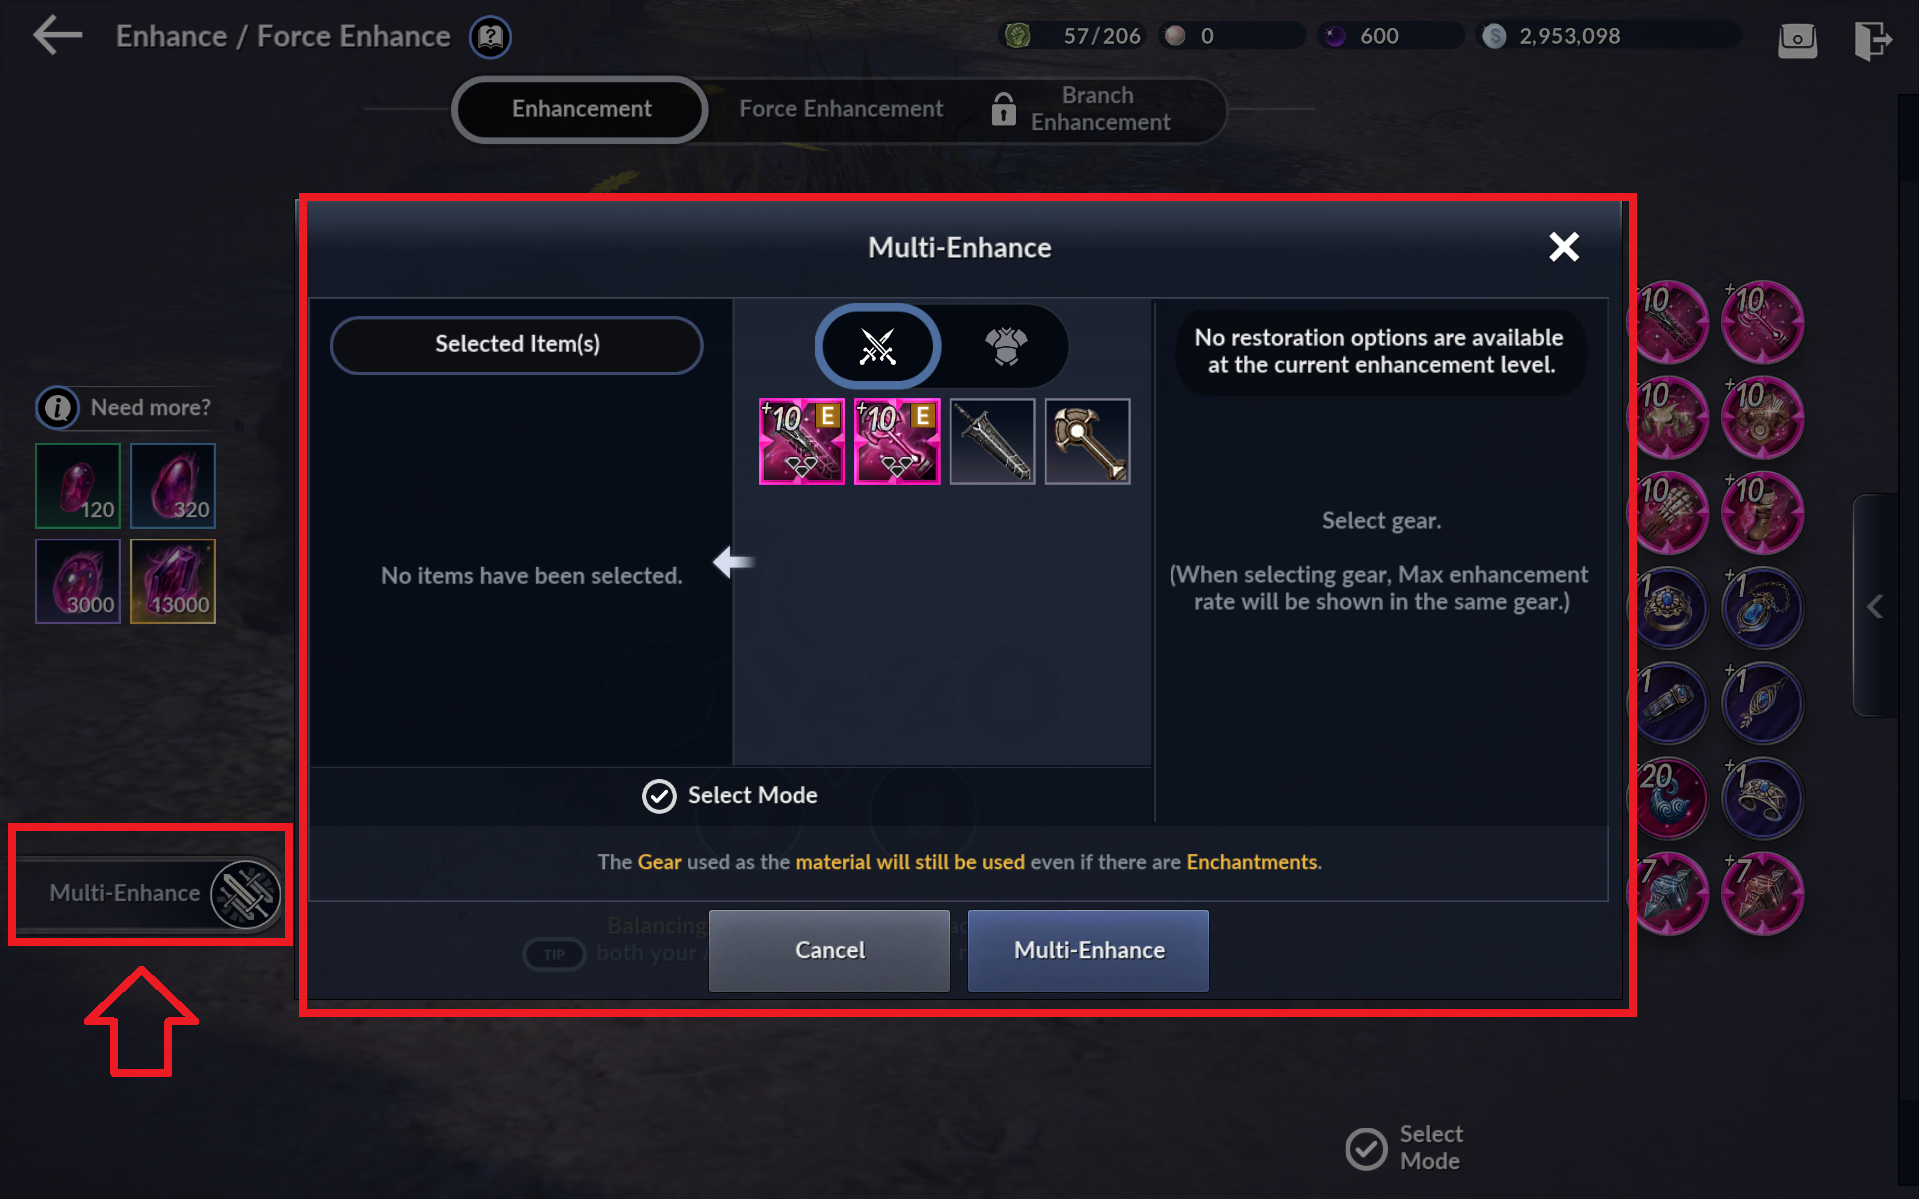
- To craft Chaos grade or higher equipment, you need equipment that is Awakened, Primal grade, and enhanced to +40 Potential.
- Use 'Batch Potential Enhancement' in the lower left of the [Black Spirit] - [Potential Enhancement/Forced Enhancement] menu to enhance all of your equipped gear up to +40.
 - From [Craft] - [Equipment], craft equipment enhanced up to +40 into Chaos grade equipment.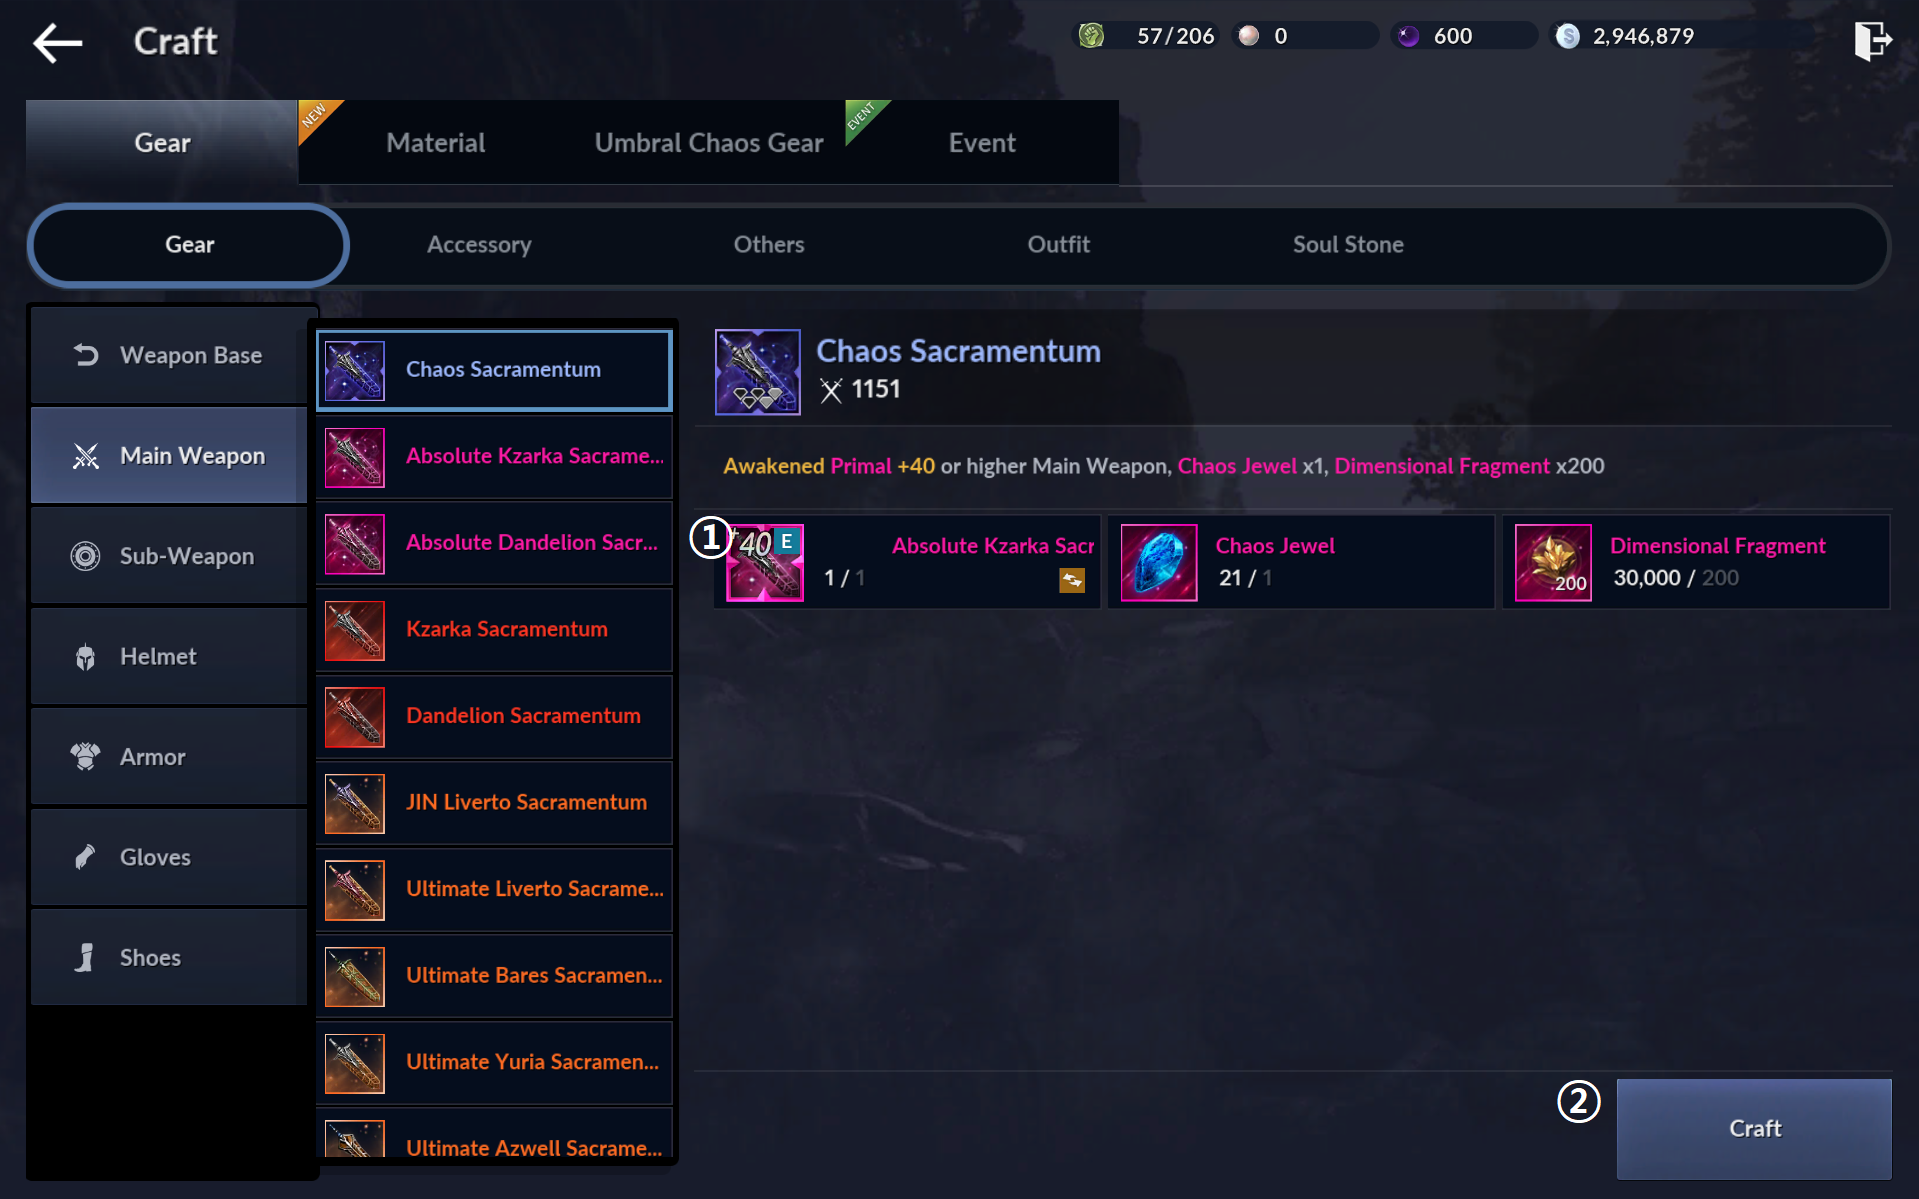
33) Camp VI/VII
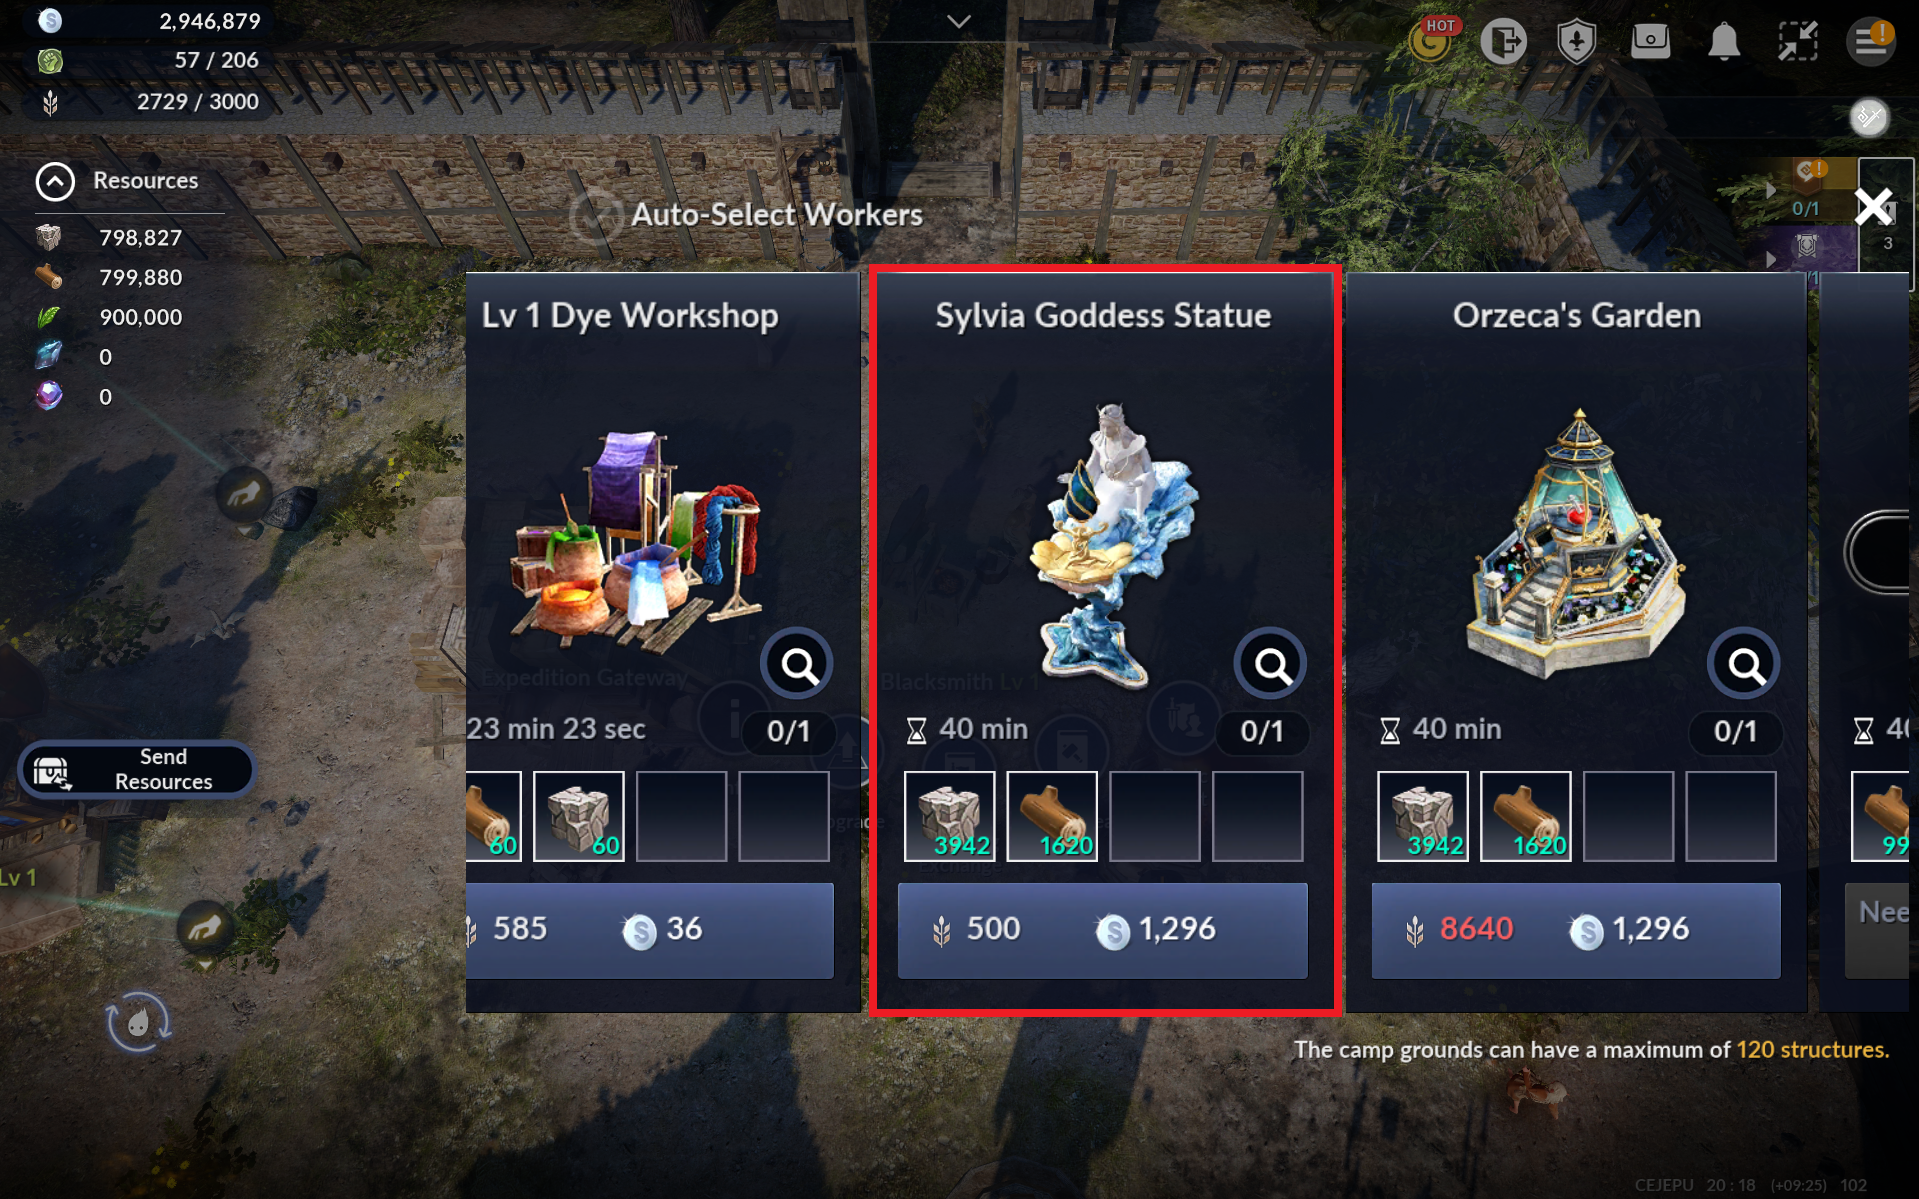
Install the 'Sylvia Goddess Statue' at your Camp, then reach Level 10 for the Sylvia Goddess Statue.
- Via the Season Pass's shortcut, or by moving to your Camp, install the 'Sylvia Goddess Statue.'
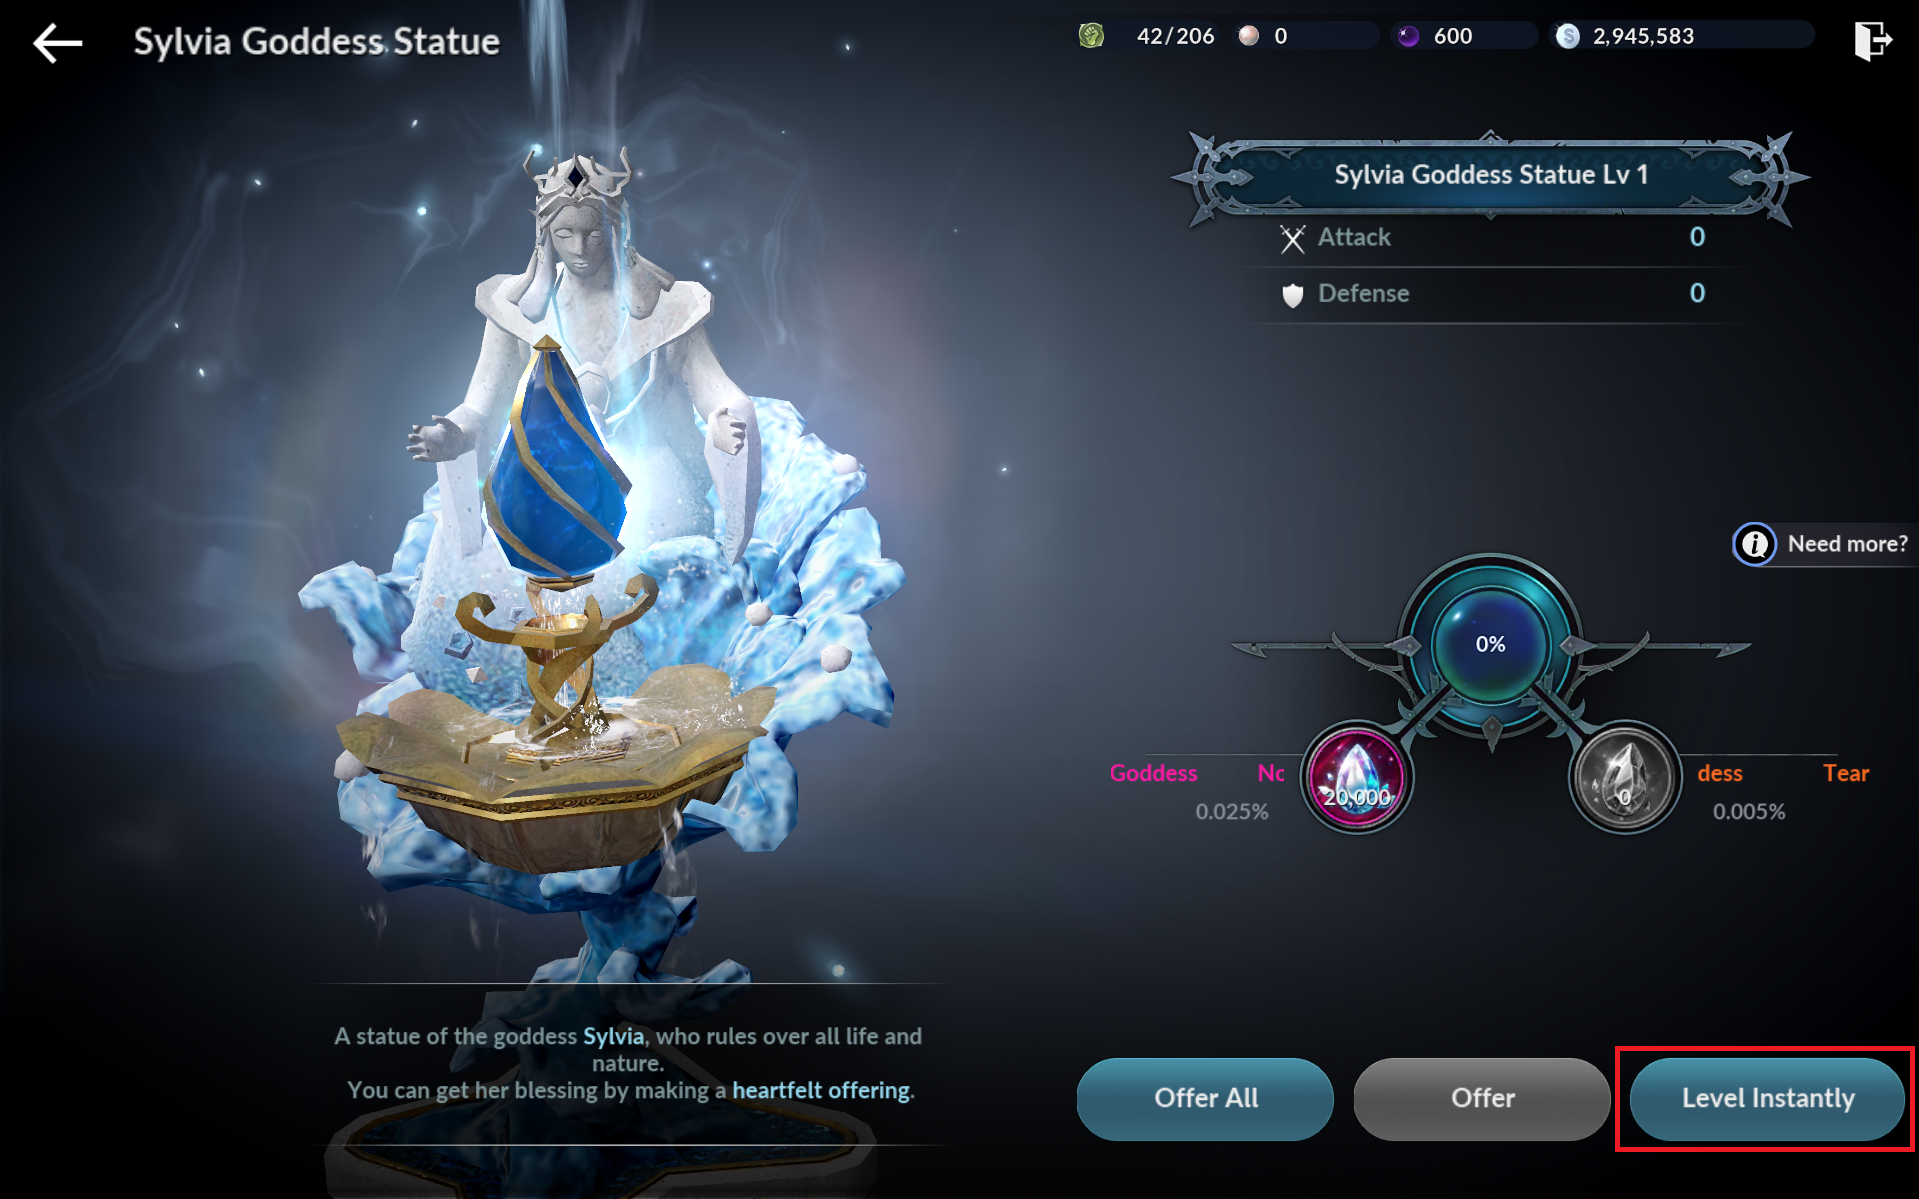
 - Use the 'Rippling Tear of the Goddess' obtained from the Sylvia Goddess Statue installation task to offer up to Level 10 for the 'Sylvia Goddess Statue.'
35) Adventurer Progression Log
Adventurers who have graduated from the Season Pass can take on the 'Adventurer Progression Log'! After completing 'Camp VII,' the final quest of the Remaster Season, moving to the 'character select screen' and logging back in will activate the Adventurer Progression Log.
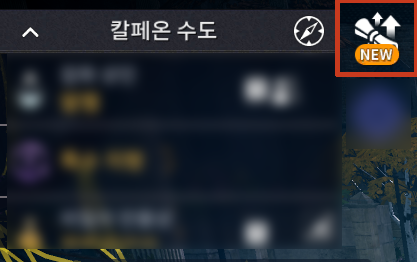
- After it's activated, tap the [Adventurer Progression Log] icon located on the right side of the minimap to check and progress quests.
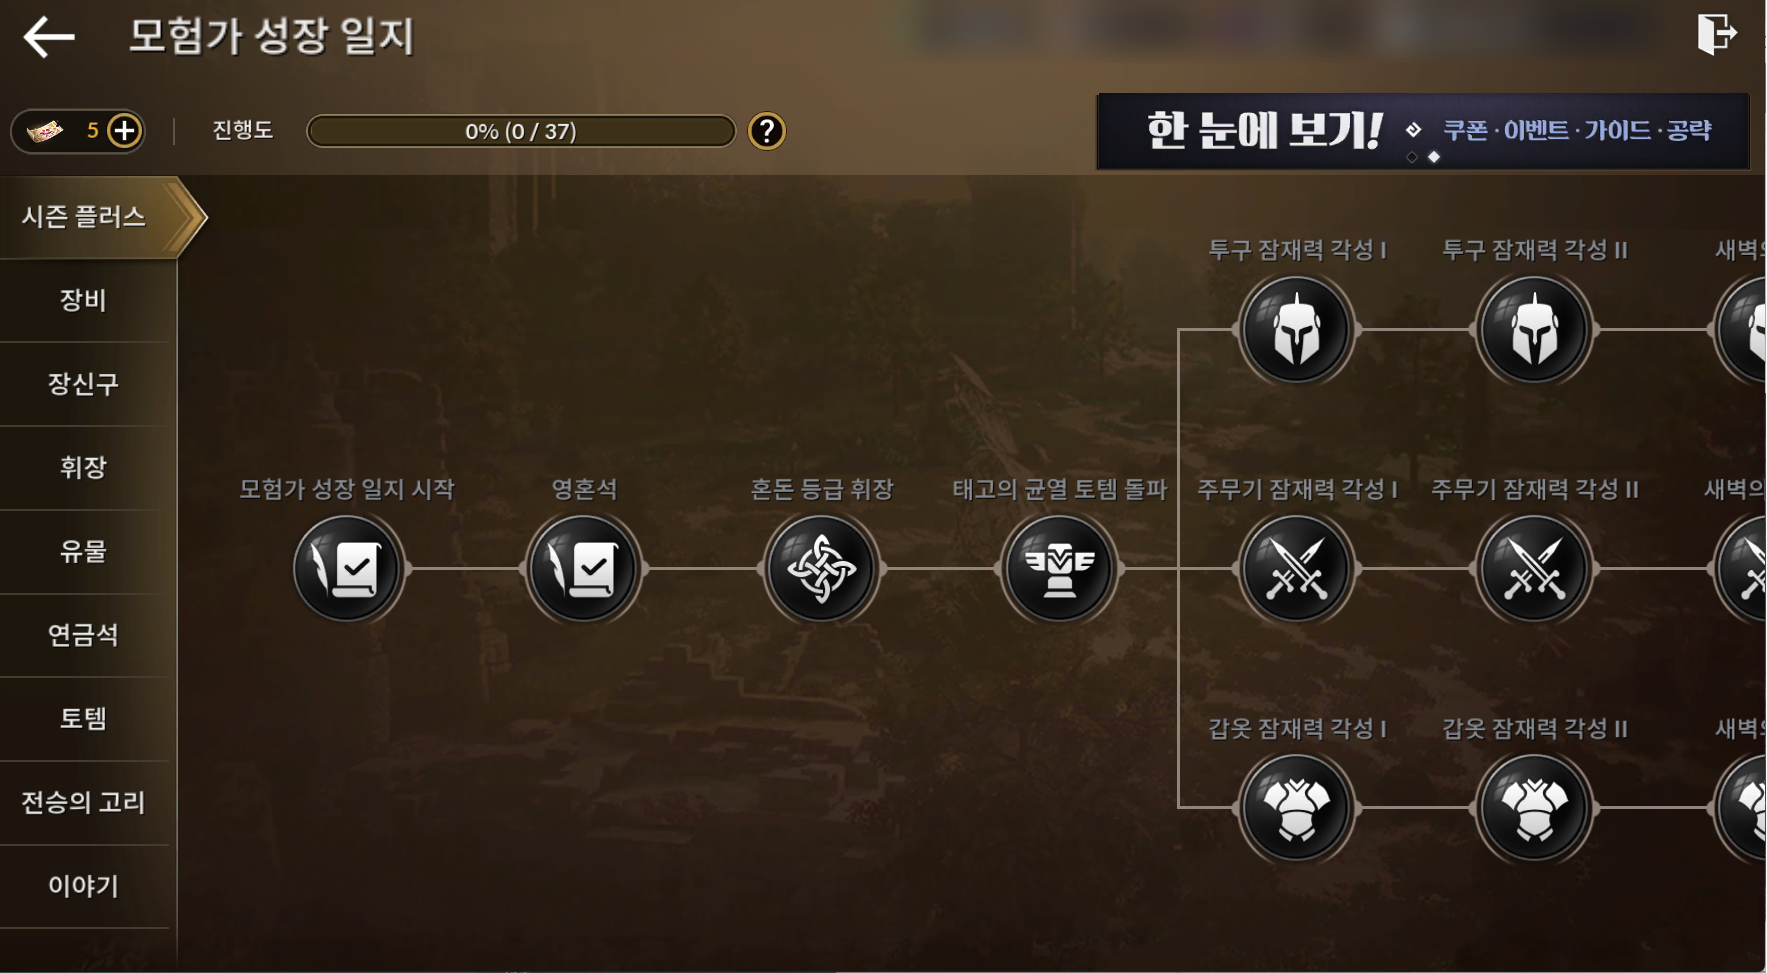
- Grow your character by progressing through the Adventurer Progression Log! You can find more details about the 'Adventurer Progression Log' through the shortcut button below.
🎓 34) Season Pass Graduation ▼ Expand

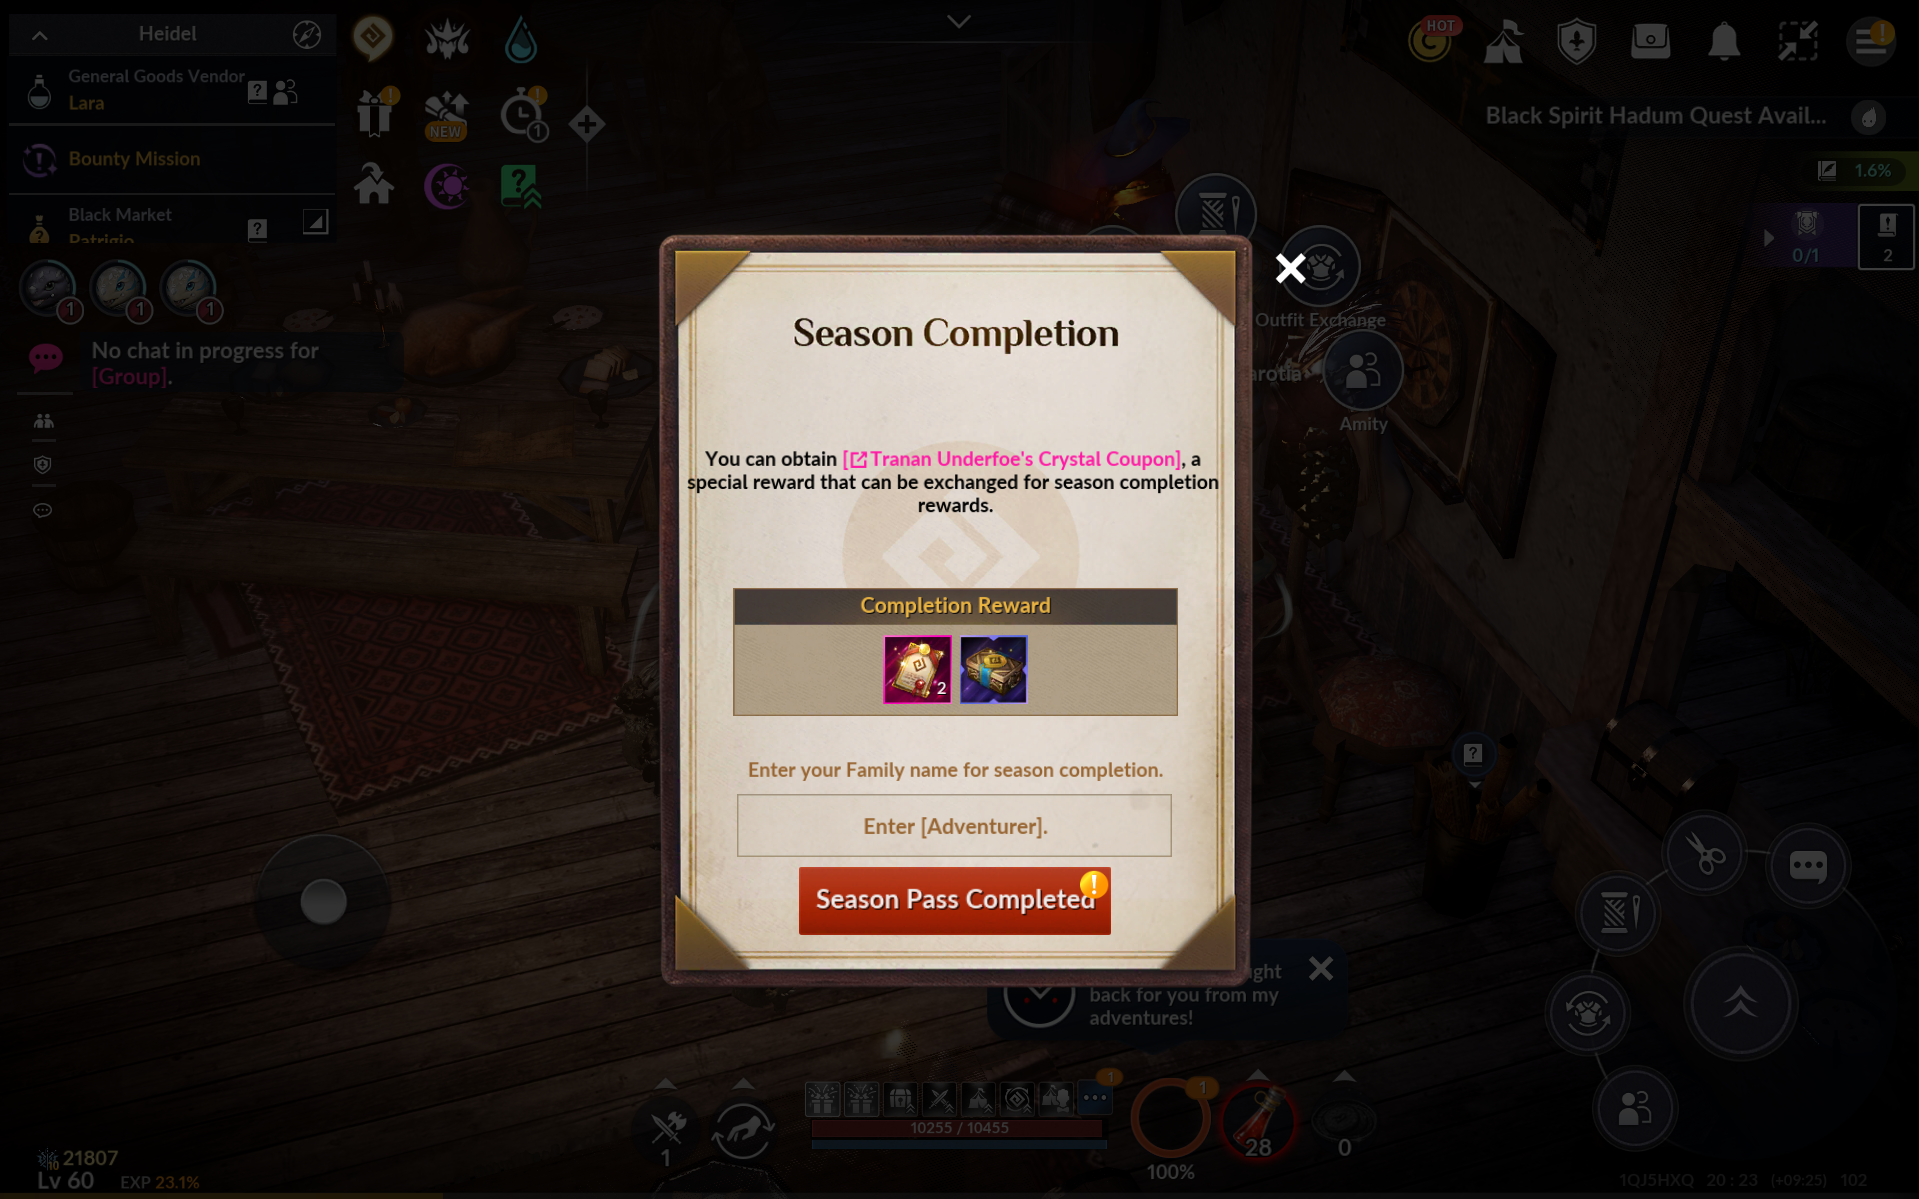
Use your graduation reward and the items obtained from Season Pass rewards to raise your Combat Power to a whole new level!
- After moving to Tranan Underfoe in Velia, tapping the 'Exchange' button lets you exchange Tranan Underfoe's Crystal Exchange Coupon for either 'Perilla's Star' or 'Secrua Crystal.'
* After exchanging for a Secrua Crystal, use an Appearance Ornament Selection Box in your inventory to select an appearance you can wear, then equip the Secrua Crystal via Equip Crystal in the Black Spirit menu.
* If you have obtained both 'Perilla's Star' and 'Secrua Crystal,' you can sell Tranan Underfoe's Crystal Exchange Coupon to the NPC shop for 100,000 silver.
🧭 Adventure Guide for After Graduation ▼ Expand
After graduating from the Season Pass, we'll help you easily figure out what content to enjoy and how to use the items you've newly received!
📔 Progress the Adventurer Progression Log
Completing 'Camp VII,' the final quest of the Remaster Season, unlocks the Adventurer Progression Log! Move to the 'character select screen' and log back in to activate the Adventurer Progression Log.
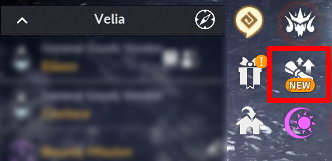
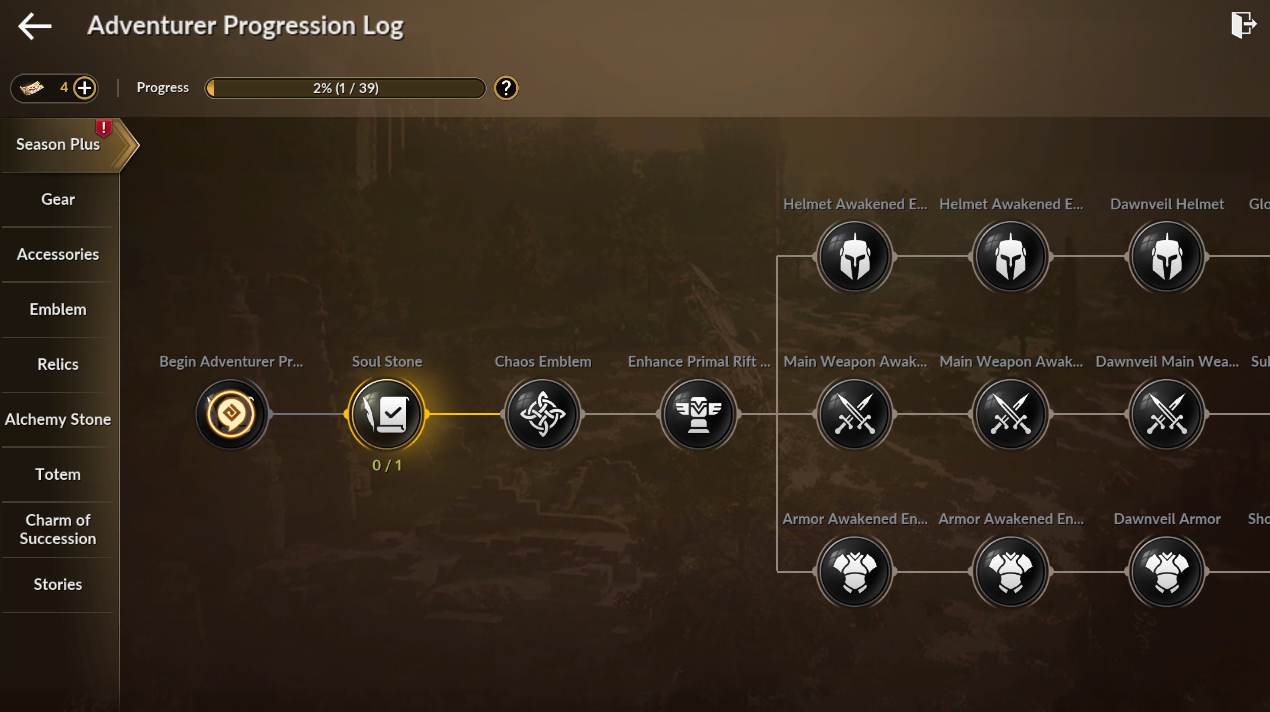
Progressing through 'Season Plus' in the Adventurer Progression Log lets you obtain +8 Void grade equipment & +7 Void grade accessories! You can also obtain various other items needed for growth through other quests, so take it step by step!
🗡️ Regular Field Hunting!
When hunting in regular fields, you can obtain 'Adventure Fervor' as a reward for defeating up to 60,000 monsters per day.
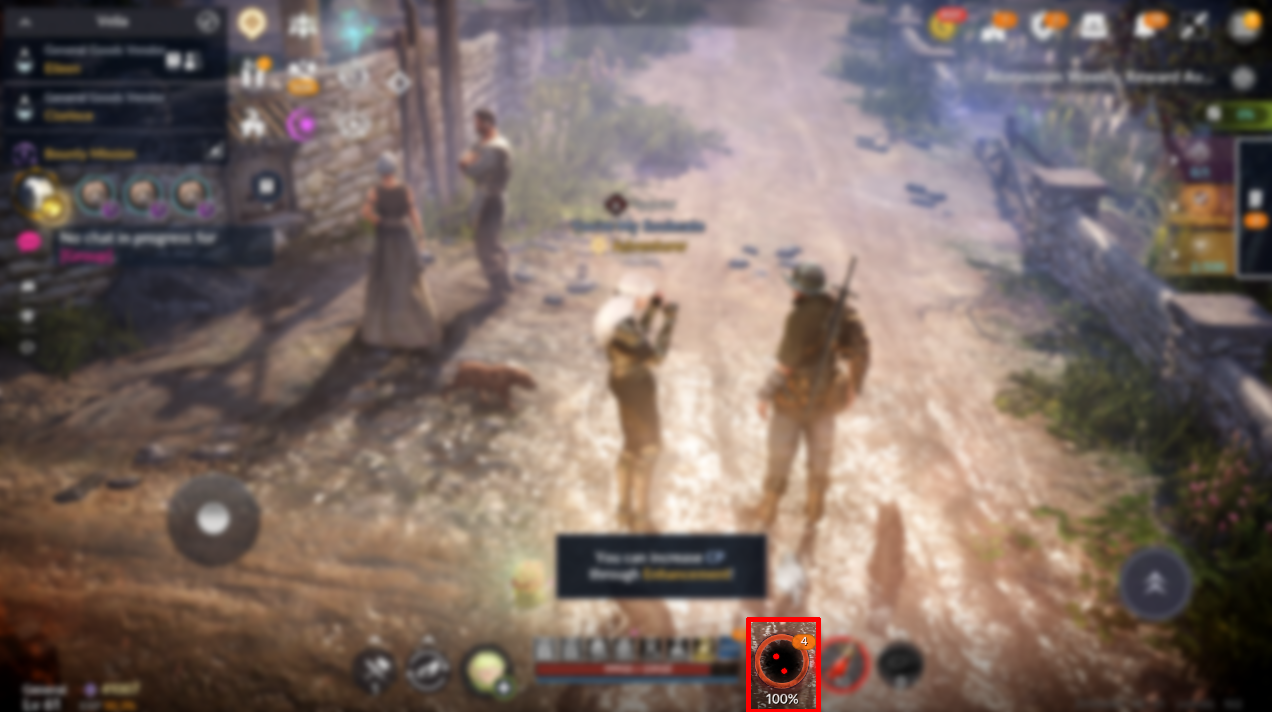
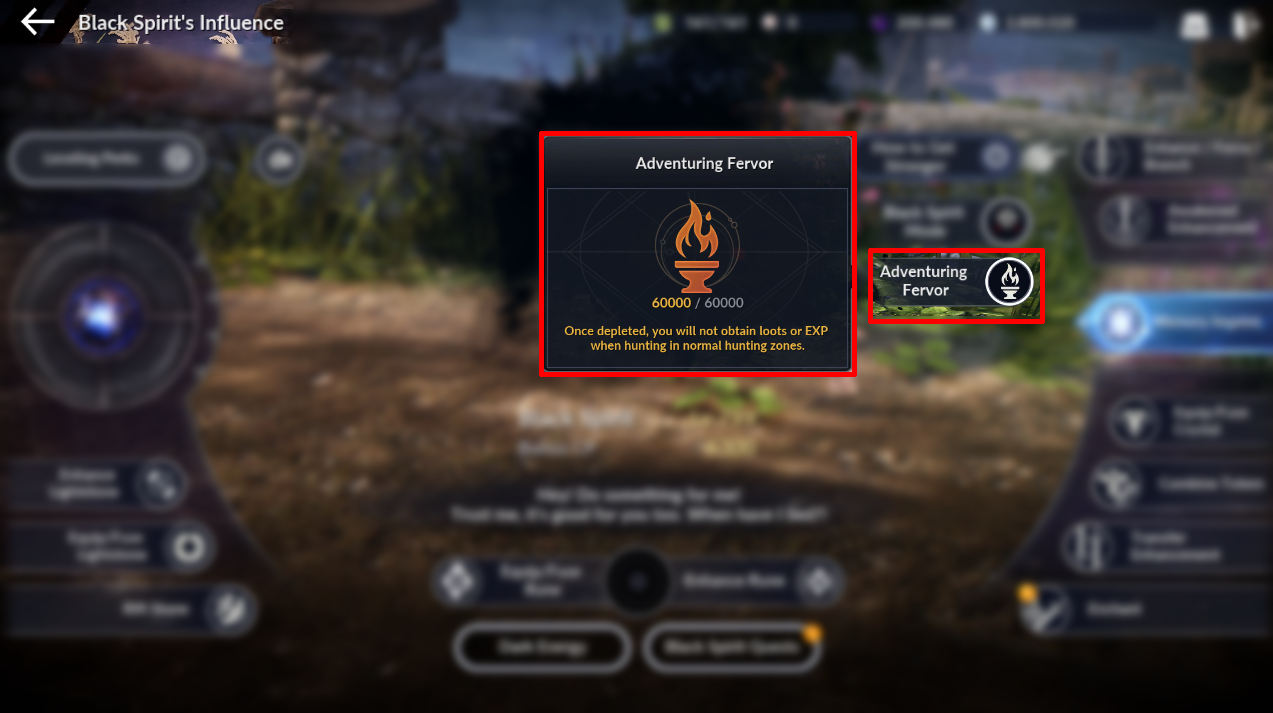
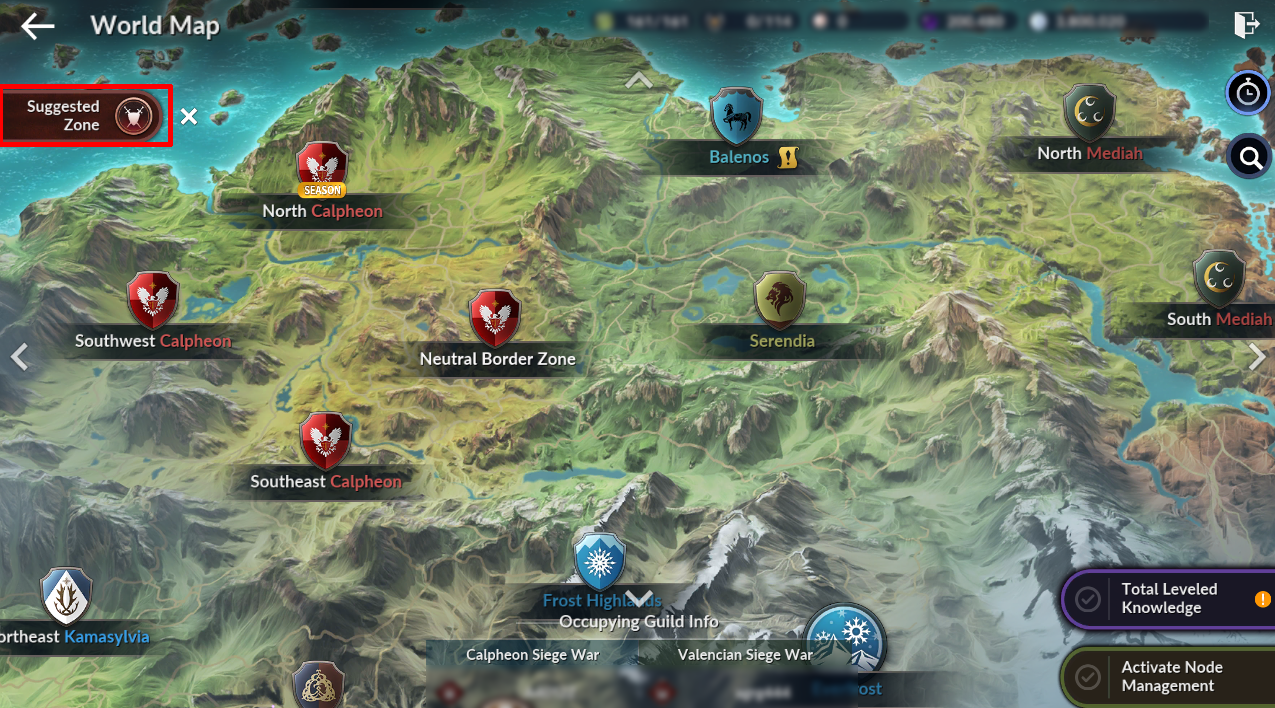
* Adventure Fervor is refilled up to a maximum of 60,000 points every day at midnight. Pressing the 'Recommended Hunting Ground' button on the World Map recommends regular field zones suited to your Combat Power range! (Recommended zones are marked above the zone icon.)
You can find more details about Harmony Zones (regular fields) in the Adventurer's Guide below!
🔸 Continue your adventure according to your Combat Power using the options below
🚀 Progress Quests and Stories
- Main Quest: Obtain terrain and NPC Knowledge, character EXP, and growth items
- Land of the Morning Light: Unlocks the Black Shrine boss
- Legacy Skill: Sherekhan's Legacy / Rabam Skill: Trials Passed Down from Antiquity
- Combining a Harmony Alchemy Stone: The Awakening Power of Harmony
- Ataraxion Co-op Dungeon: The Story of Vaamakia and Sicarakia
⏳ Hunt in Zones That Match Your Combat Power
(You can obtain items even without Adventure Fervor!) To adventure smoothly, you'll need to obtain terrain Knowledge and activate altars. (Obtain terrain Knowledge by exploring, and tap altars from the NPC list on the minimap!)
Edana's Coin, Light-Infused Crystal, Black Spirit Rune, etc.
* You can obtain 1 Purified Water per day from the Content Usage Status menu.
Voidsent Eye (Snowy Mountain), Sealed Charm of Succession (Sherekhan), Chaos Crystal, Root of Sorcery, Supreme EXP Scroll, etc.
* Note: hunting grounds that drop 'Supreme EXP Scroll' have a relatively lower chance of dropping the main rewards (Voidsent Eye/Charm of Succession).
* You can obtain 1 Citron Tea/Clockwork per day from the Content Usage Status menu.
Akhram Prophecy 50%/100%, Caphras Secret Book Page, Lapis Lazuli, Riftborn Fervor, Chaos Jewel/Core, Ah'krad, etc.
* Move to the Chaos Rift entrance for stages I-XVII by Combat Power on the World Map-Region, and buy 10 (180 minutes) entry scrolls per week from the NPC.
Voidsent Eye (Jade Starlight Forest), Noble Tear of the Goddess (Jade Starlight Forest), Sealed Charm of Succession (Tshira Ruins), Chaos Core, Dimensional Fragment, Chaos Crystal, Shadow Knot, Boss Stamp, Ancient Tablet, Adventure Token, Advanced EXP Scroll
* Via Menu - Nightmare - Auto-Move, you can buy 7 (21 hours) 'Dreamward Lanterns' per week from the NPC at the rift entrance.
You can find helpful tips for your Black Desert Mobile adventure in the notice below.
🎁 Season Graduation Reward Item Guide ▼ Expand
Check out where to use the items you obtained while progressing through the season!
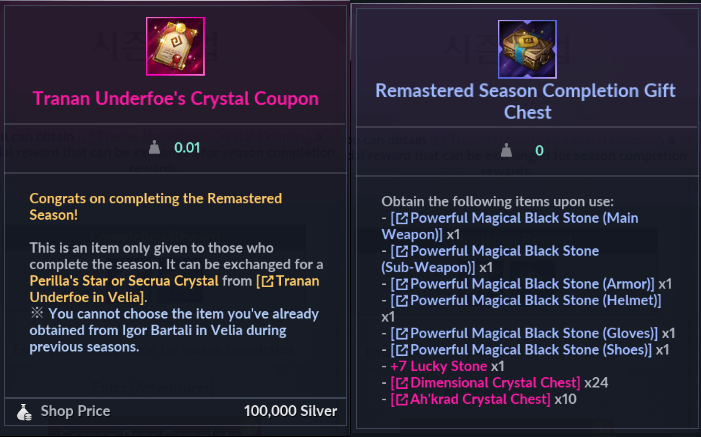
Perilla's Star
A special crystal that can be equipped to an Appearance Ornament. Grants +100 Combat Power when equipped.
Secrua Crystal
A special crystal that can be equipped to an Appearance Ornament. Grants +100 Combat Power when equipped! You can upgrade the Secrua Crystal's grade to [Abyssal-Void] to obtain additional stats.
Brilliant Primal Glyph
Obtain the Primal Glyph with the highest stats. Can be inscribed onto a Relic.
Luminous Chaos Inscribed Glyph
Using it from your [Inventory] lets you check its stats, and once checked, the Glyph can be inscribed onto a Relic at your Camp's [Ancient Relic Altar].
| Glyph Stat Range |
|---|
| ㆍAttack Power: 111 - 133 |
| ㆍDefense: 57 - 71 |
| ㆍDamage dealt to Adventurers: 0.8 - 1.3% |
Black Stone of Pure Magic
Attempt Potential Awakening on a +5 Chaos/Void grade item to succeed at +6 with a 100% success rate.
① Tap [Menu > Black Spirit > Potential Awakening].
② Select the [+5 Chaos/Void grade item] you wish to Awaken.
③ Registering a Black Stone of Pure Magic as a material lets you succeed at Awakening to +6 with a 100% success rate.
Black Stone of Potent Magic
Attempt Potential Awakening on a +6 Chaos/Void grade item to succeed at +7 with a 100% success rate.
① Tap [Menu > Black Spirit > Potential Awakening].
② Select the [+6 Chaos/Void grade item] you wish to Awaken.
③ Registering a Black Stone of Potent Magic as a material lets you succeed at Awakening to +7 with a 100% success rate.
Dimensional Crystal Chest
Obtain 1 Dimensional Crystal from the Aal/Labreve/Ahib/Sert line. Dimensional Crystals can be equipped to gear.
Ah'krad Crystal Chest
Obtain 1 Ah'krad Crystal from the Aal/Labreve/Ahib/Sert line. Ah'krad Crystals can be equipped to accessories.
💎 Perilla's Star / Secrua Crystal ▼ Expand
🔸 How to Equip
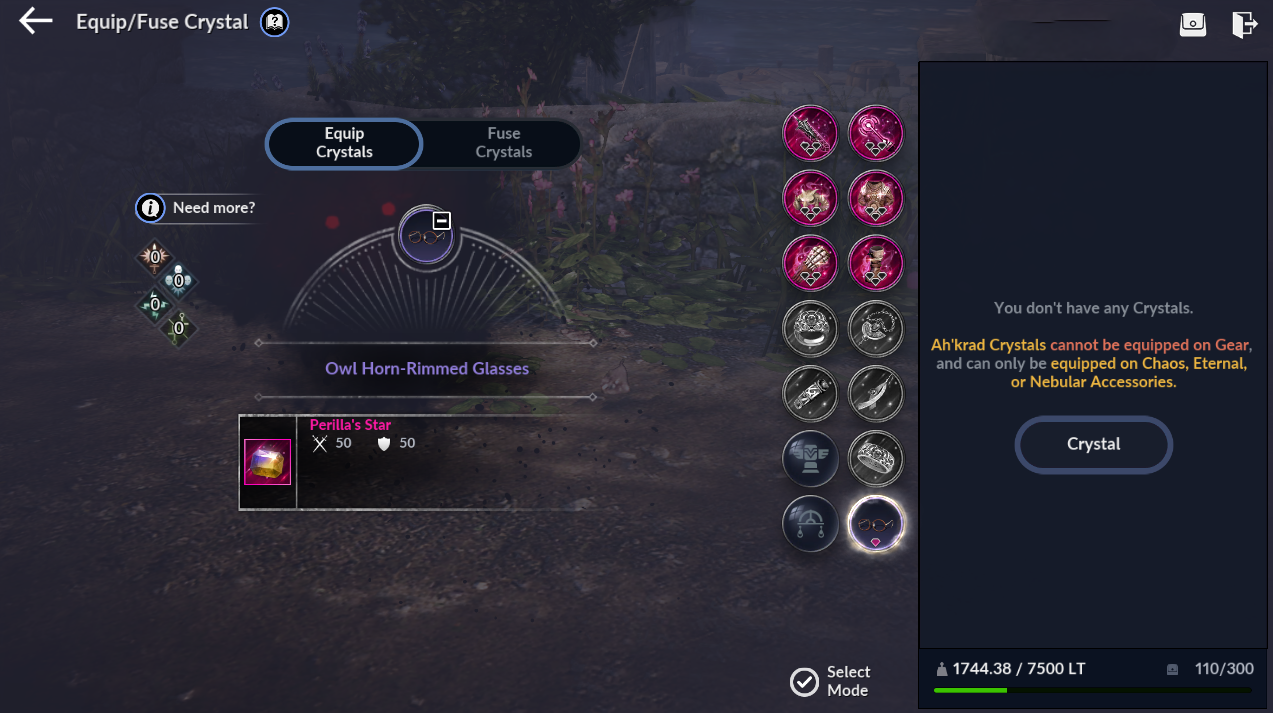 Equip Perilla's Star / Secrua Crystal from [Black Spirit menu - Equip Crystal]!
🔸 Secrua Crystal (can be upgraded up to Void grade)

| Crystal Grade | Stats |
|---|---|
| Mythical | ㆍAttack Power +50 ㆍDefense +50 |
| Abyssal | ㆍAttack Power +50 ㆍDefense +50 ㆍField Item Acquisition Rate: +1% ㆍField Combat EXP Gained: +5% ㆍAdditional Attack Power vs Monsters: +50 |
| Primal | ㆍAttack Power +50 ㆍDefense +50 ㆍField Item Acquisition Rate: +2% ㆍField Combat EXP Gained: +10% ㆍAdditional Attack Power vs Monsters: +100 |
| Chaos | ㆍAttack Power +50 ㆍDefense +50 ㆍField Item Acquisition Rate: +3% ㆍField Combat EXP Gained: +15% ㆍAdditional Attack Power vs Monsters: +150 |
| Void | ㆍAttack Power +50 ㆍDefense +50 ㆍField Item Acquisition Rate: +5% ㆍField Combat EXP Gained: +25% ㆍAdditional Attack Power vs Monsters: +200 |
🔸 Secrua Essence
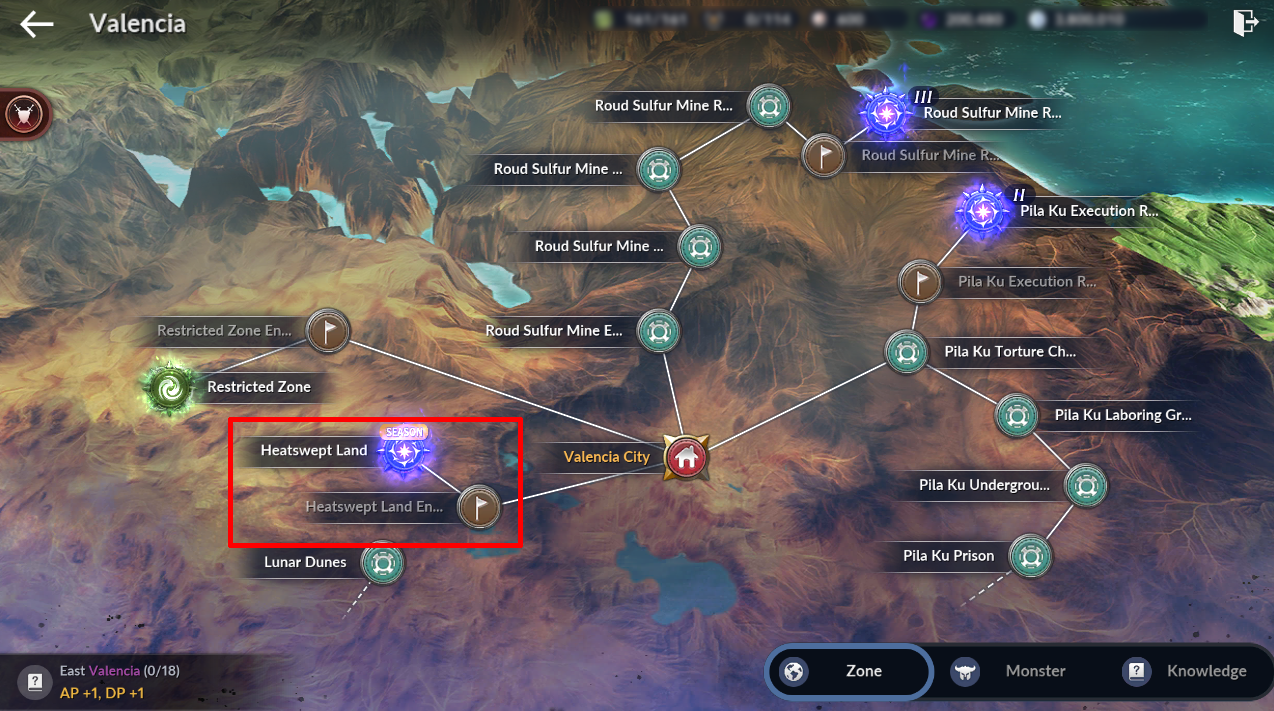 Secrua Essence can be obtained from the 'Heatswept Land' region in eastern Valencia.
⚙️ Growing Your Chaos Grade Equipment ▼ Expand
The Chaos grade equipment you obtained while progressing through Season Pass quests! There are several ways to raise your Combat Power with it. We recommend checking each one out one by one!
🔸 Enchanting Chaos Grade Equipment
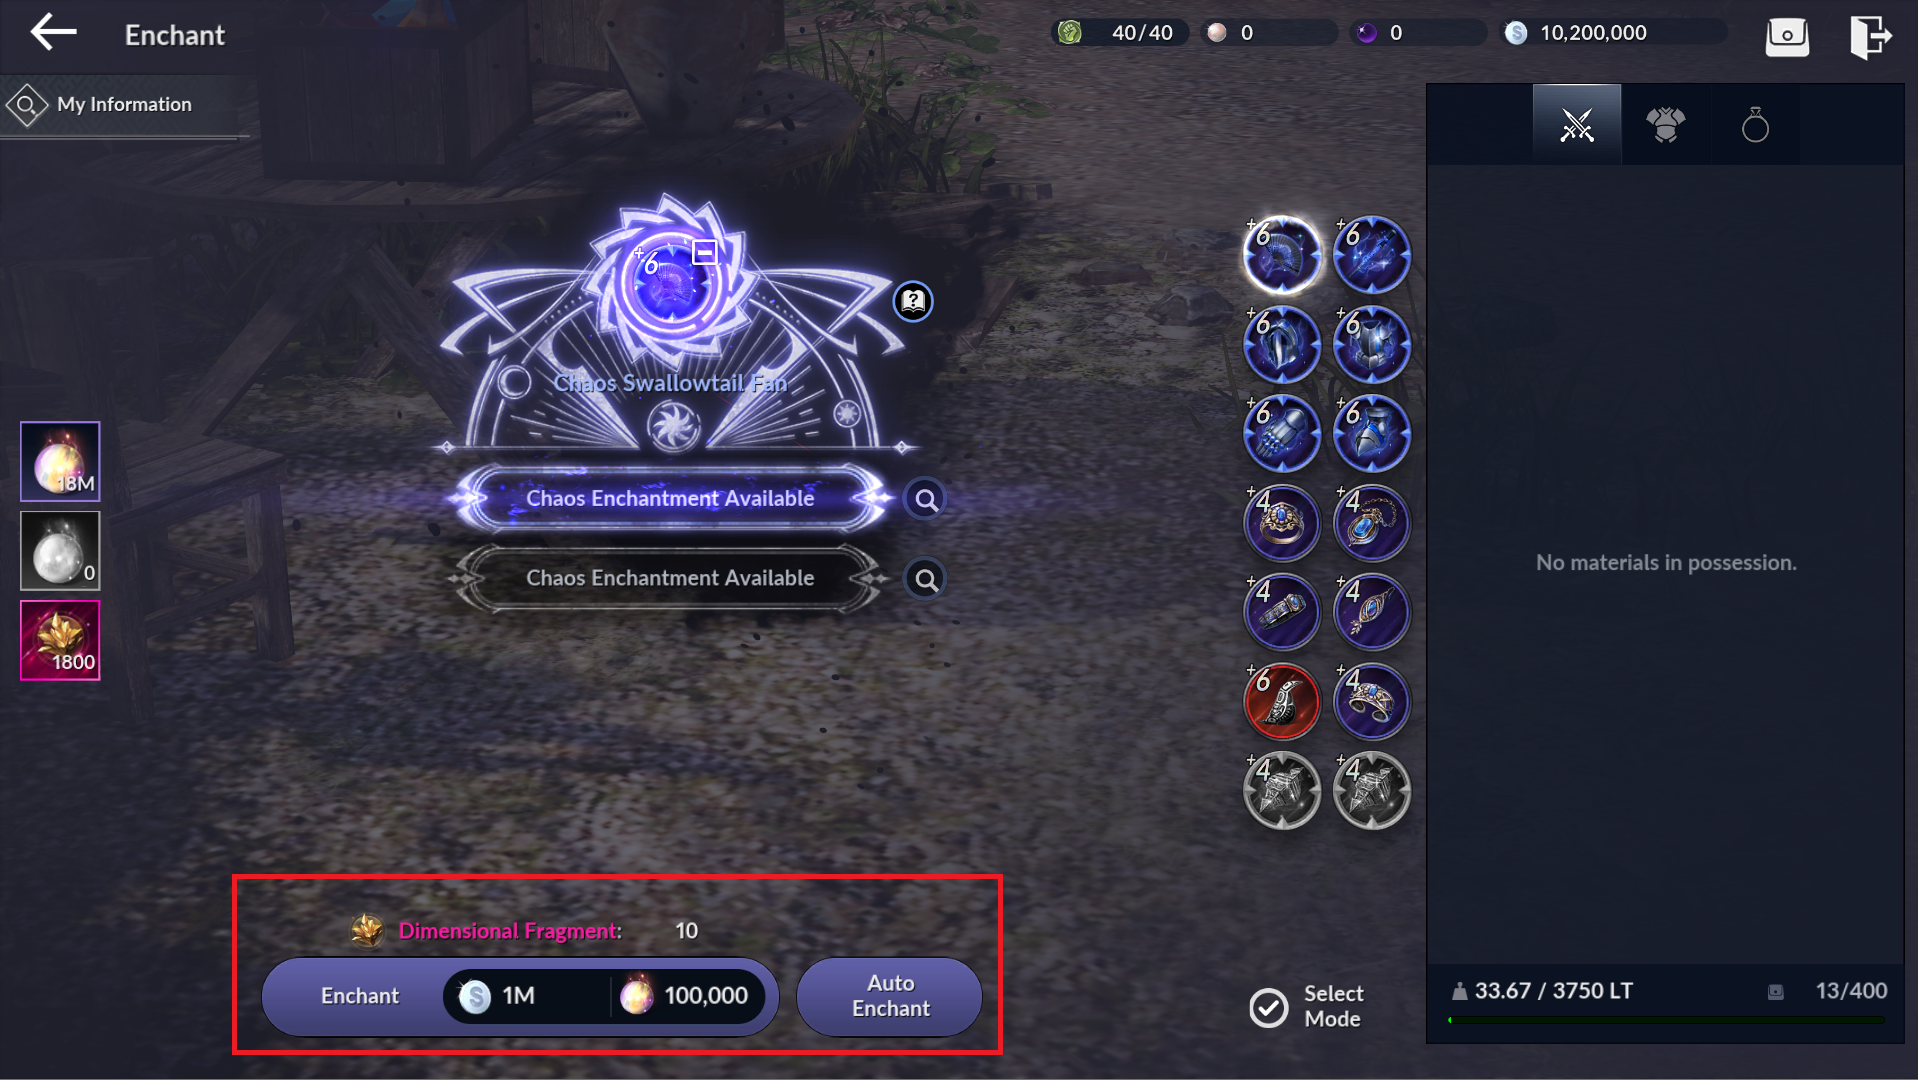 Enchant using 100,000 Mana Essence, 10 Dimensional Fragments, and 1,000,000 silver!
🔸 Equipping Crystals to Chaos Grade Equipment
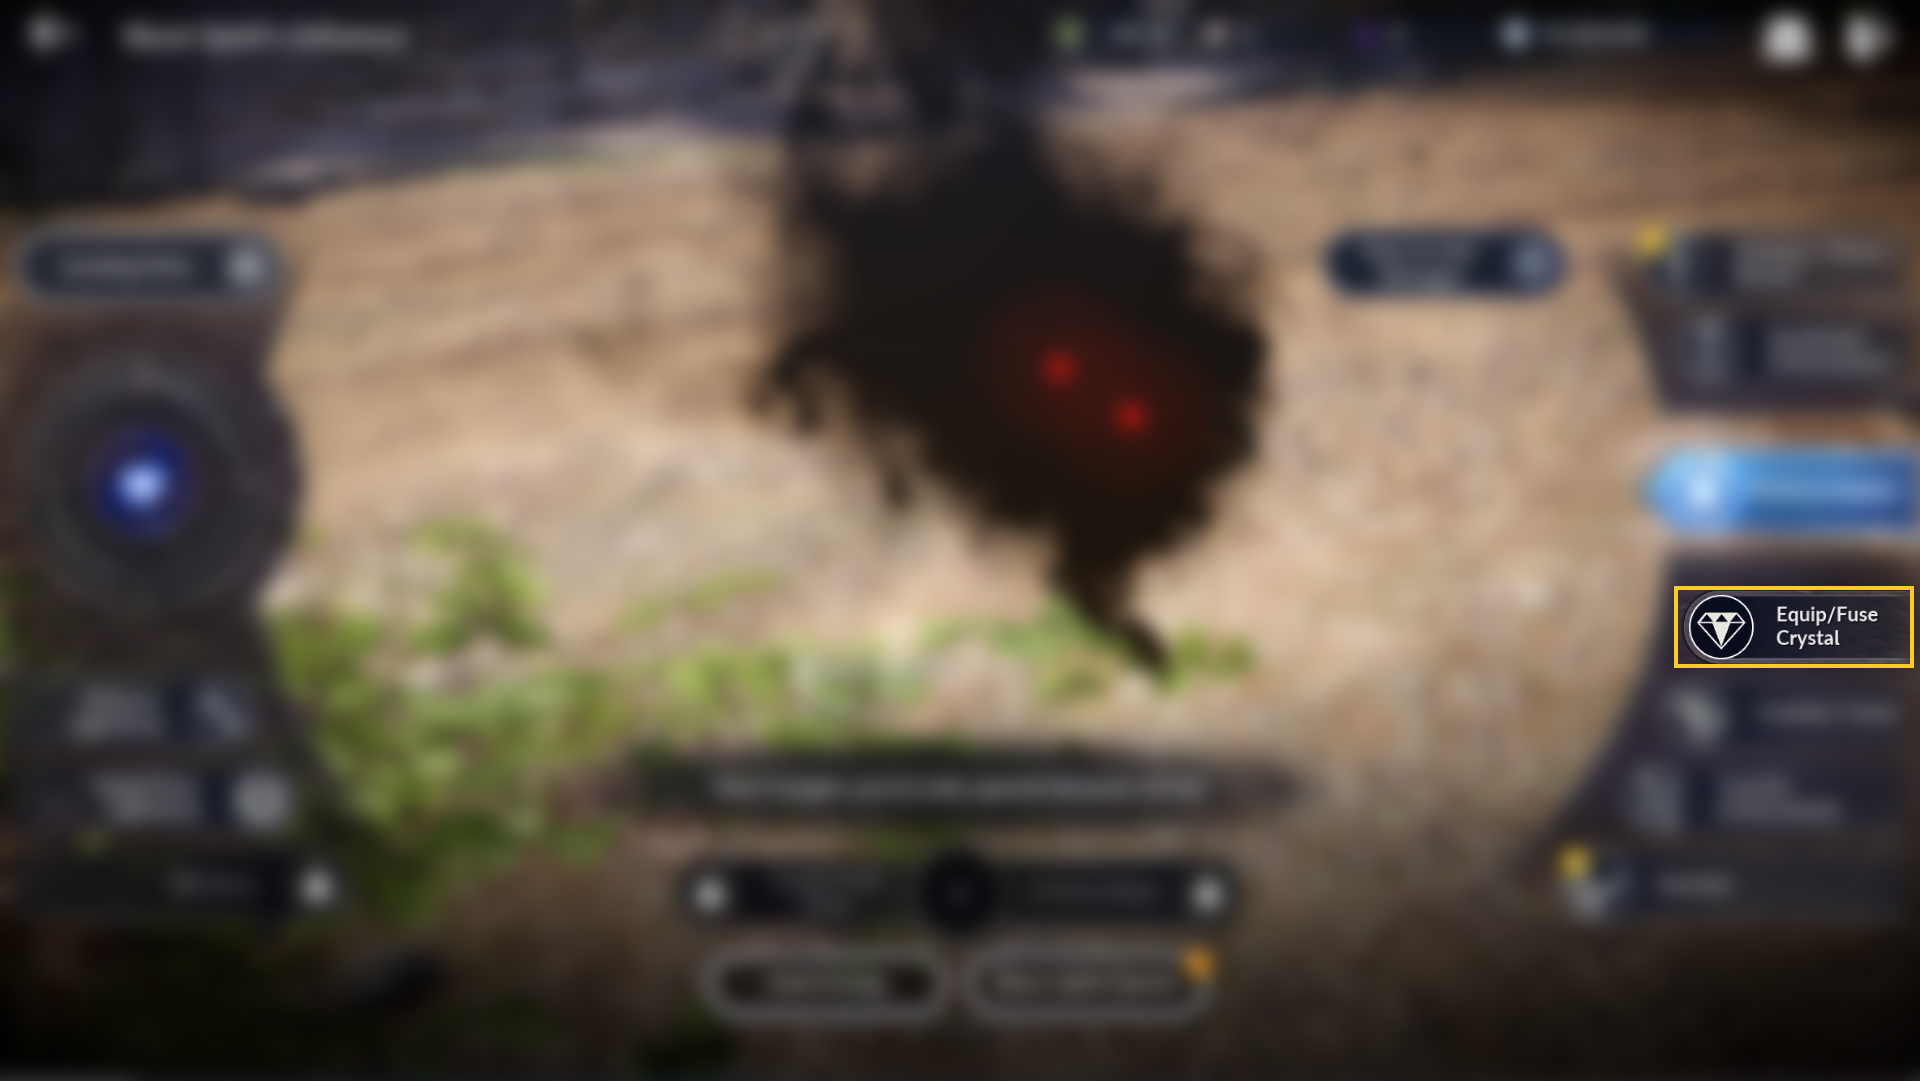
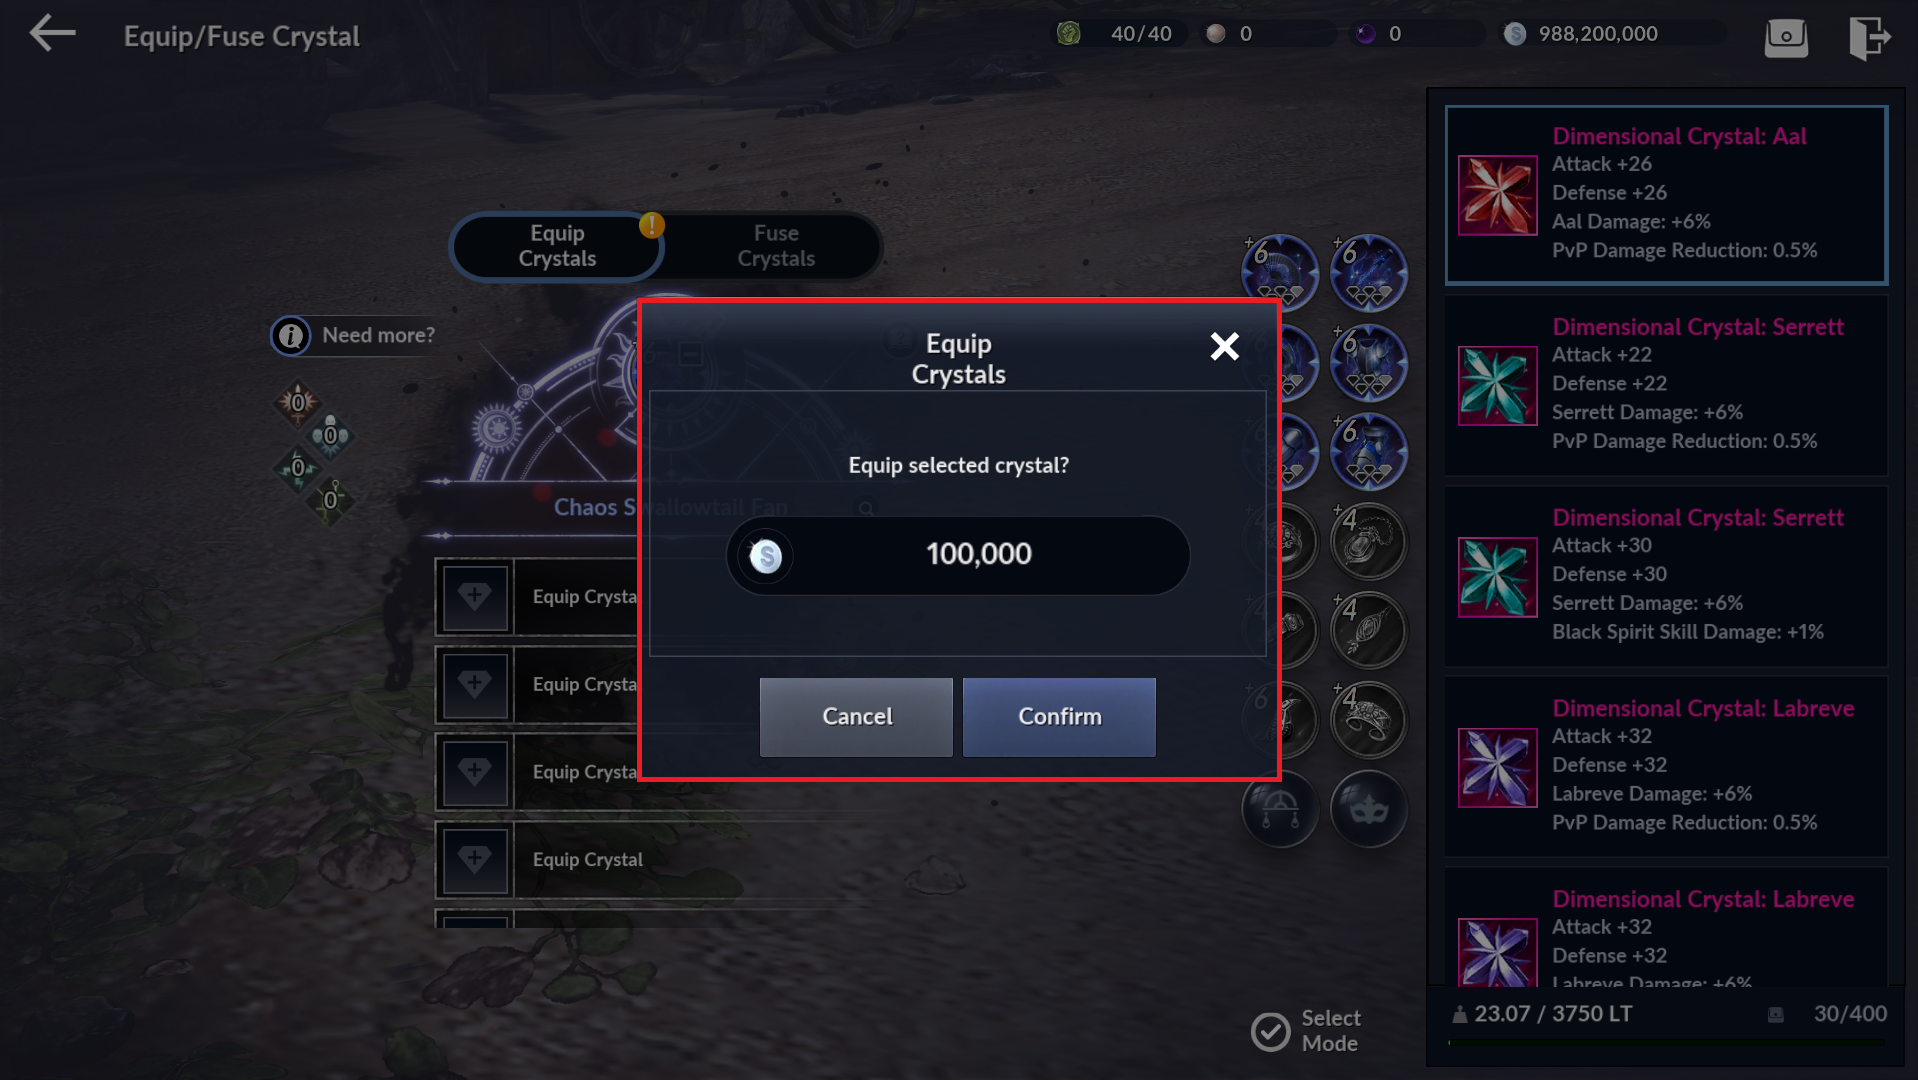
🔧 How to Craft a Dimensional Crystal
You can craft one from the [Craft-Materials-Crystal] menu by using an Empty Crystal, Dimensional Fragment, Cron Stone, Abyssal Crystal Fluid, and silver.
ㆍEmpty Crystal: Can be purchased from NPC Genoveva using Dark Coins.
ㆍDimensional Fragment: Can be obtained by having your Black Spirit absorb [Abyssal grade or higher equipment] via [Black Energy], or purchased from NPC Genoveva using Dark Coins.
ㆍCron Stone: Can be crafted at the Alchemy Lab in your Camp, or purchased from the Pearl Shop.
ㆍAbyssal Crystal Fluid: Can be crafted from the Craft menu using 15 Abyssal grade crystals as material.
ㆍAbyssal grade crystal: Can be obtained as a completion reward from the Co-op Rush, or by combining lower-grade crystals.
💍 Awakening Chaos Grade Accessories ▼ Expand
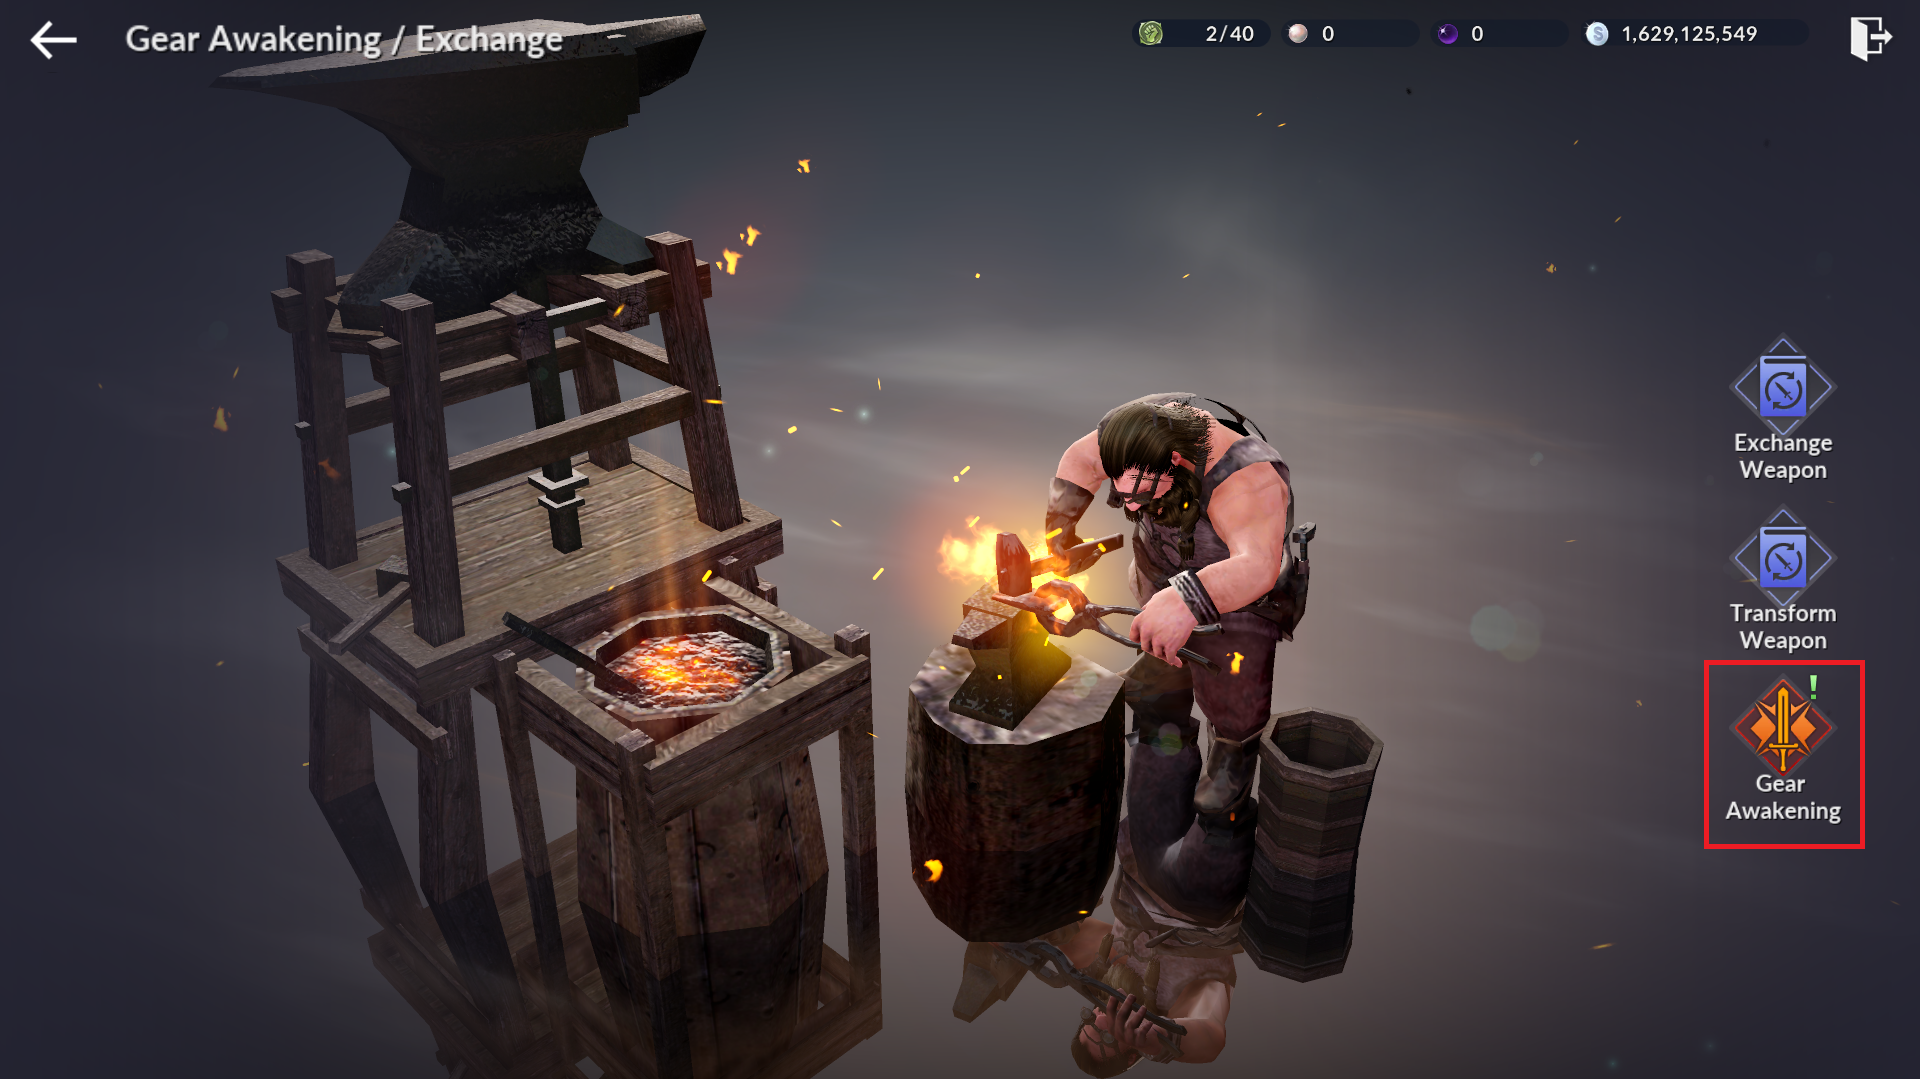
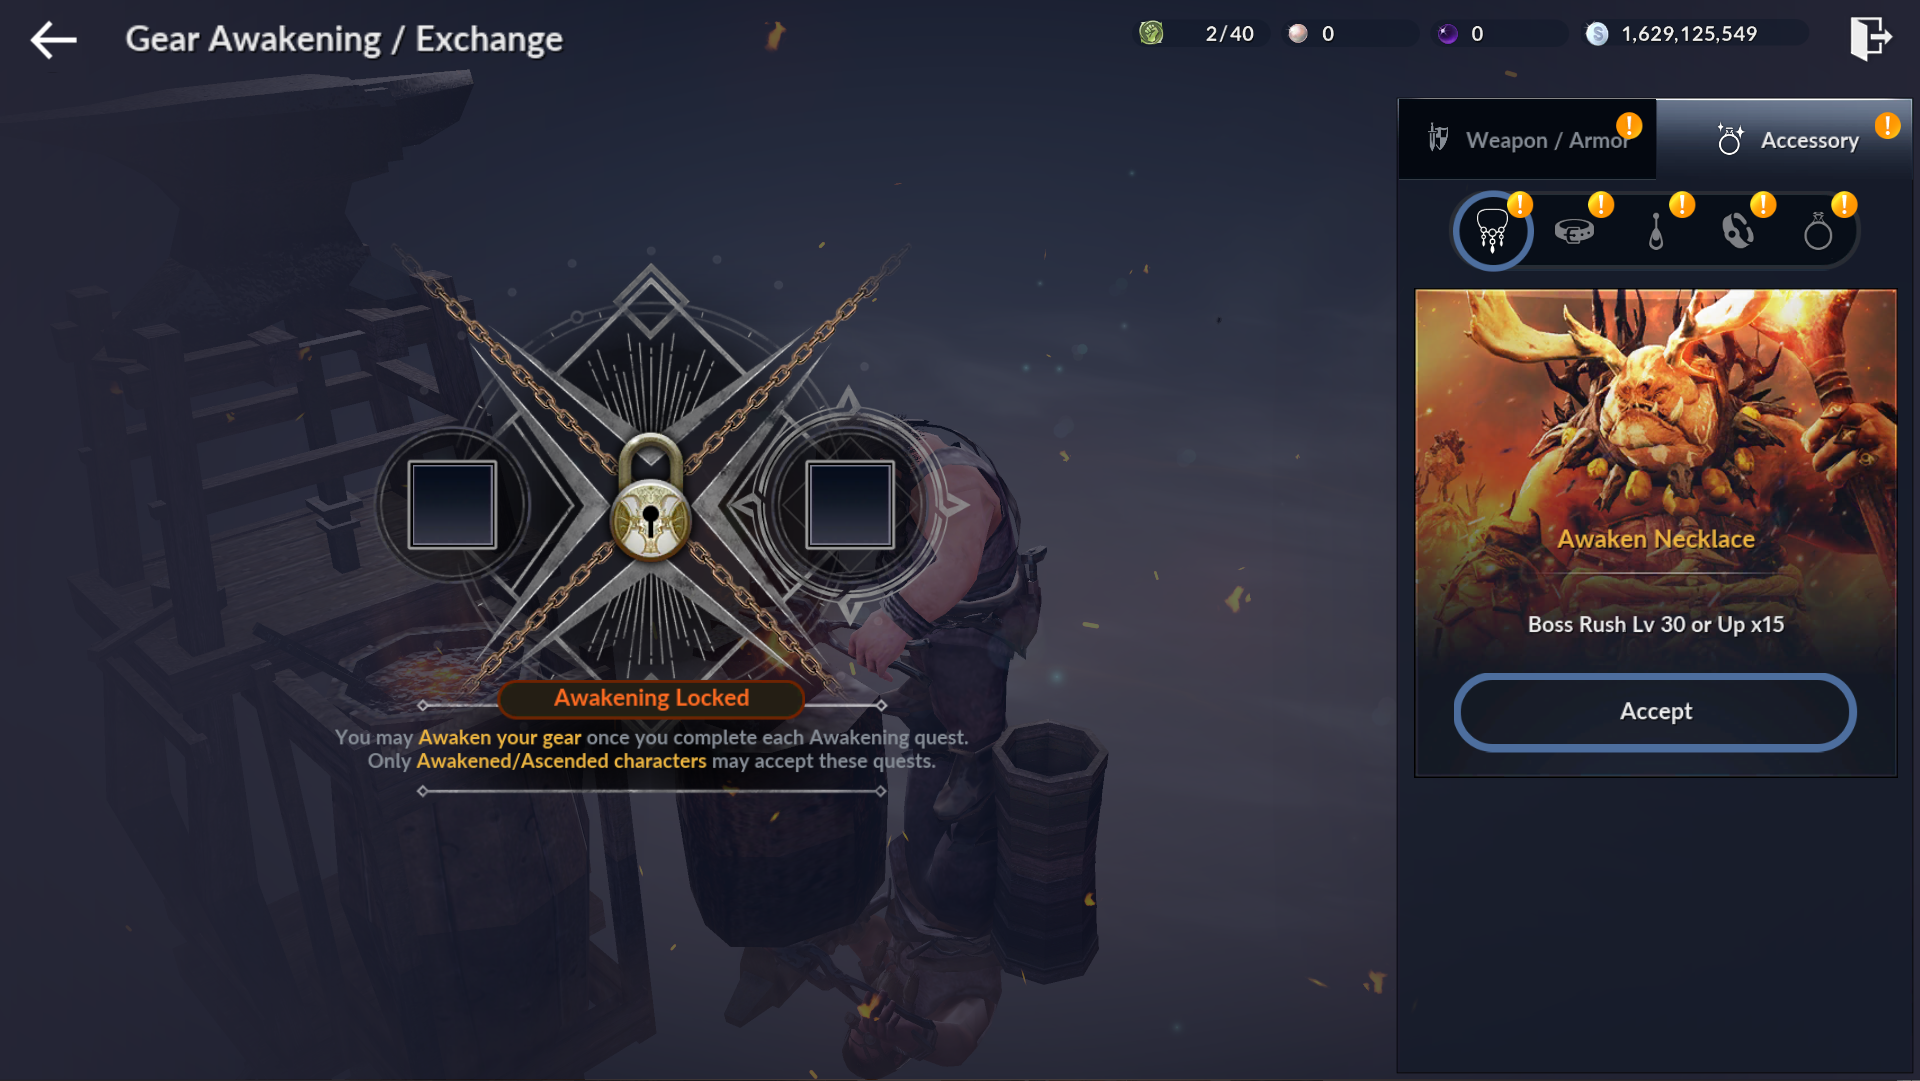
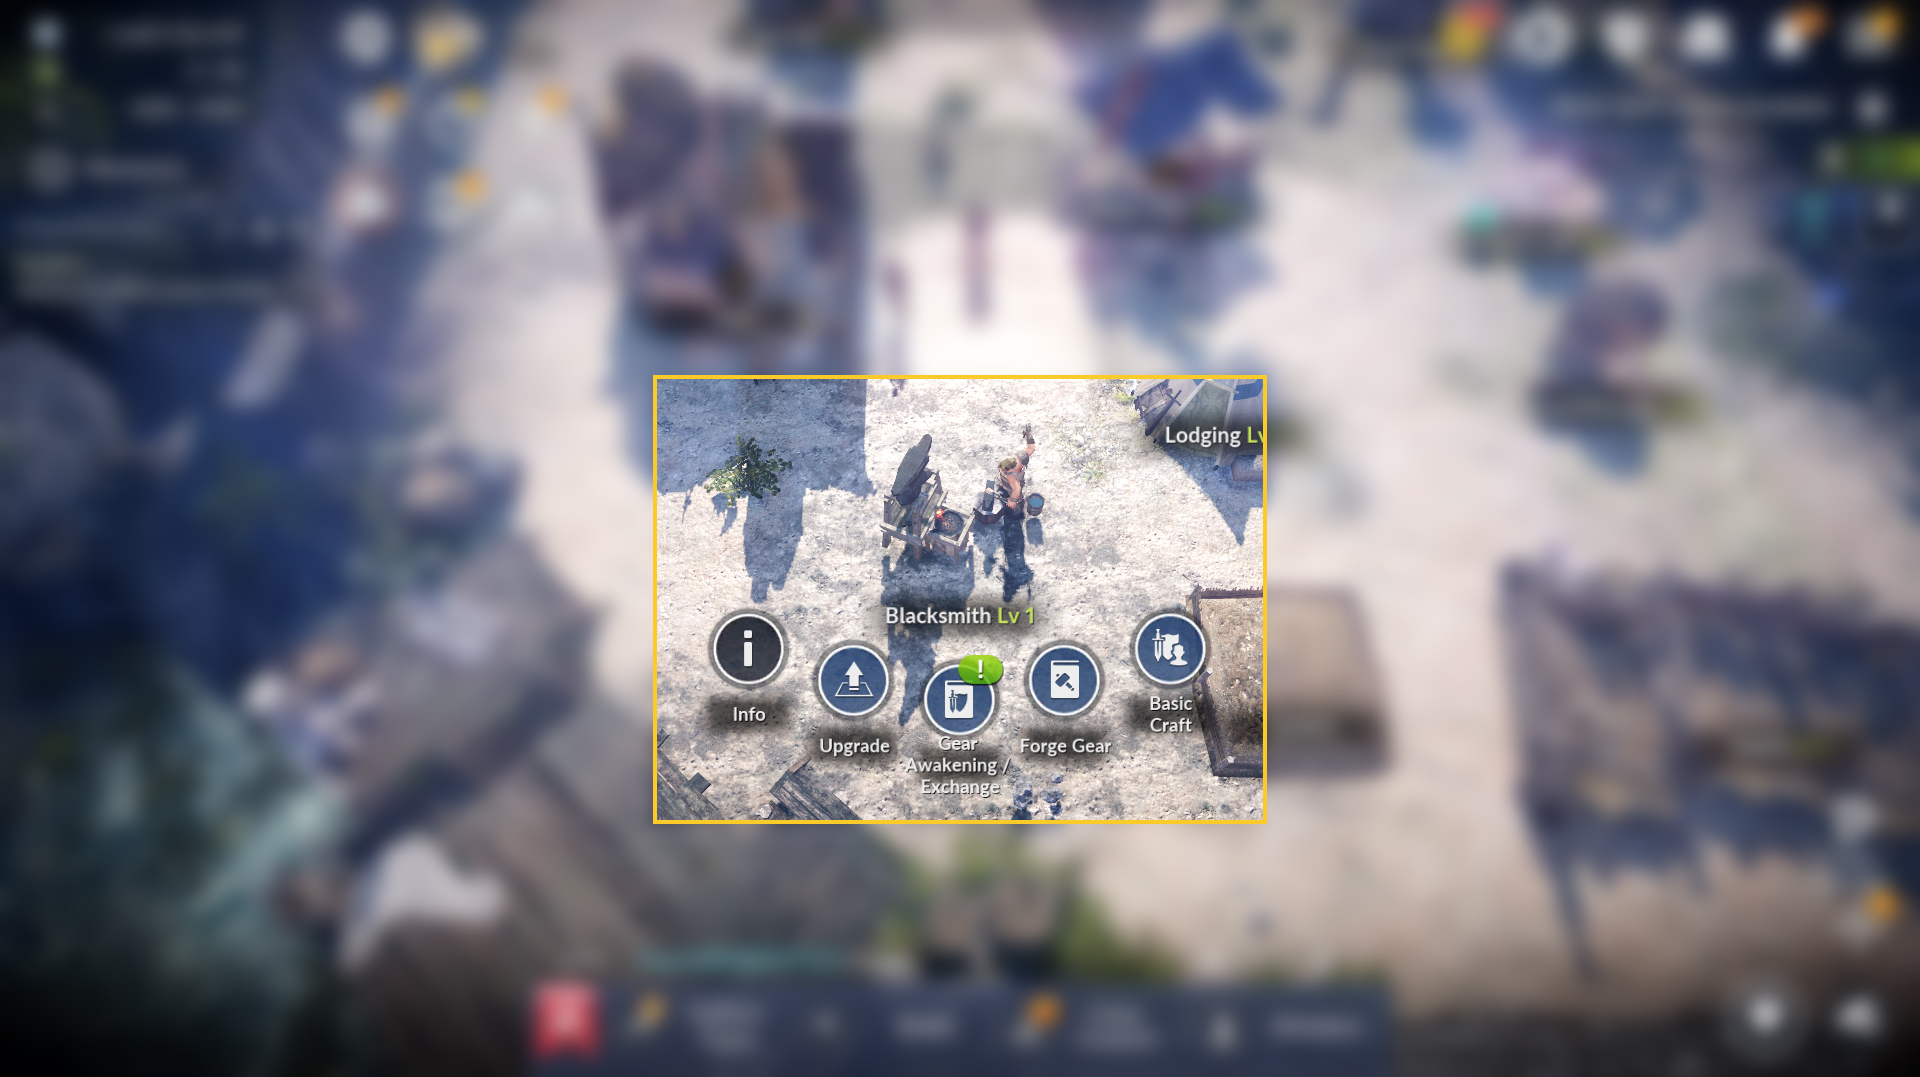 Awakening the Chaos accessory obtained from your graduation reward grants even more Combat Power!
🔯 Rift Totem ▼ Expand
🔸 How to Combine Rift Totems
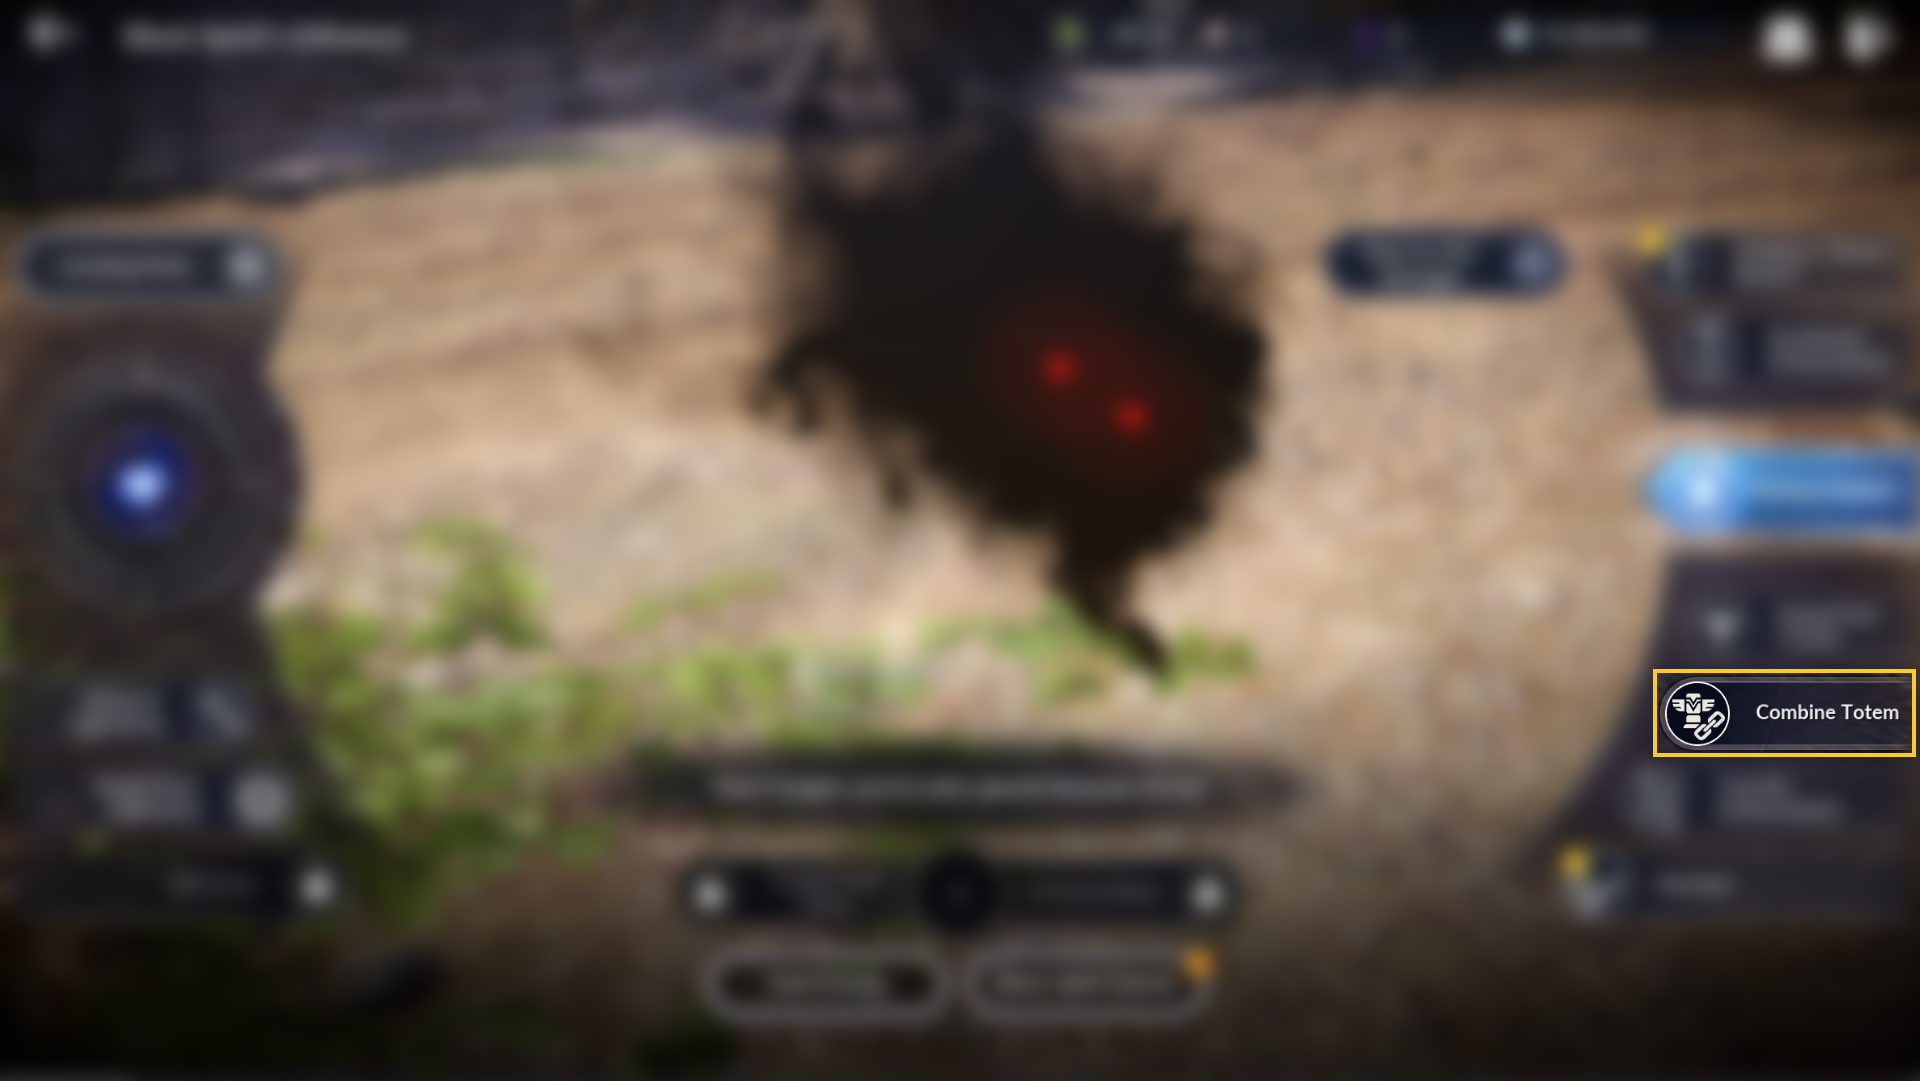
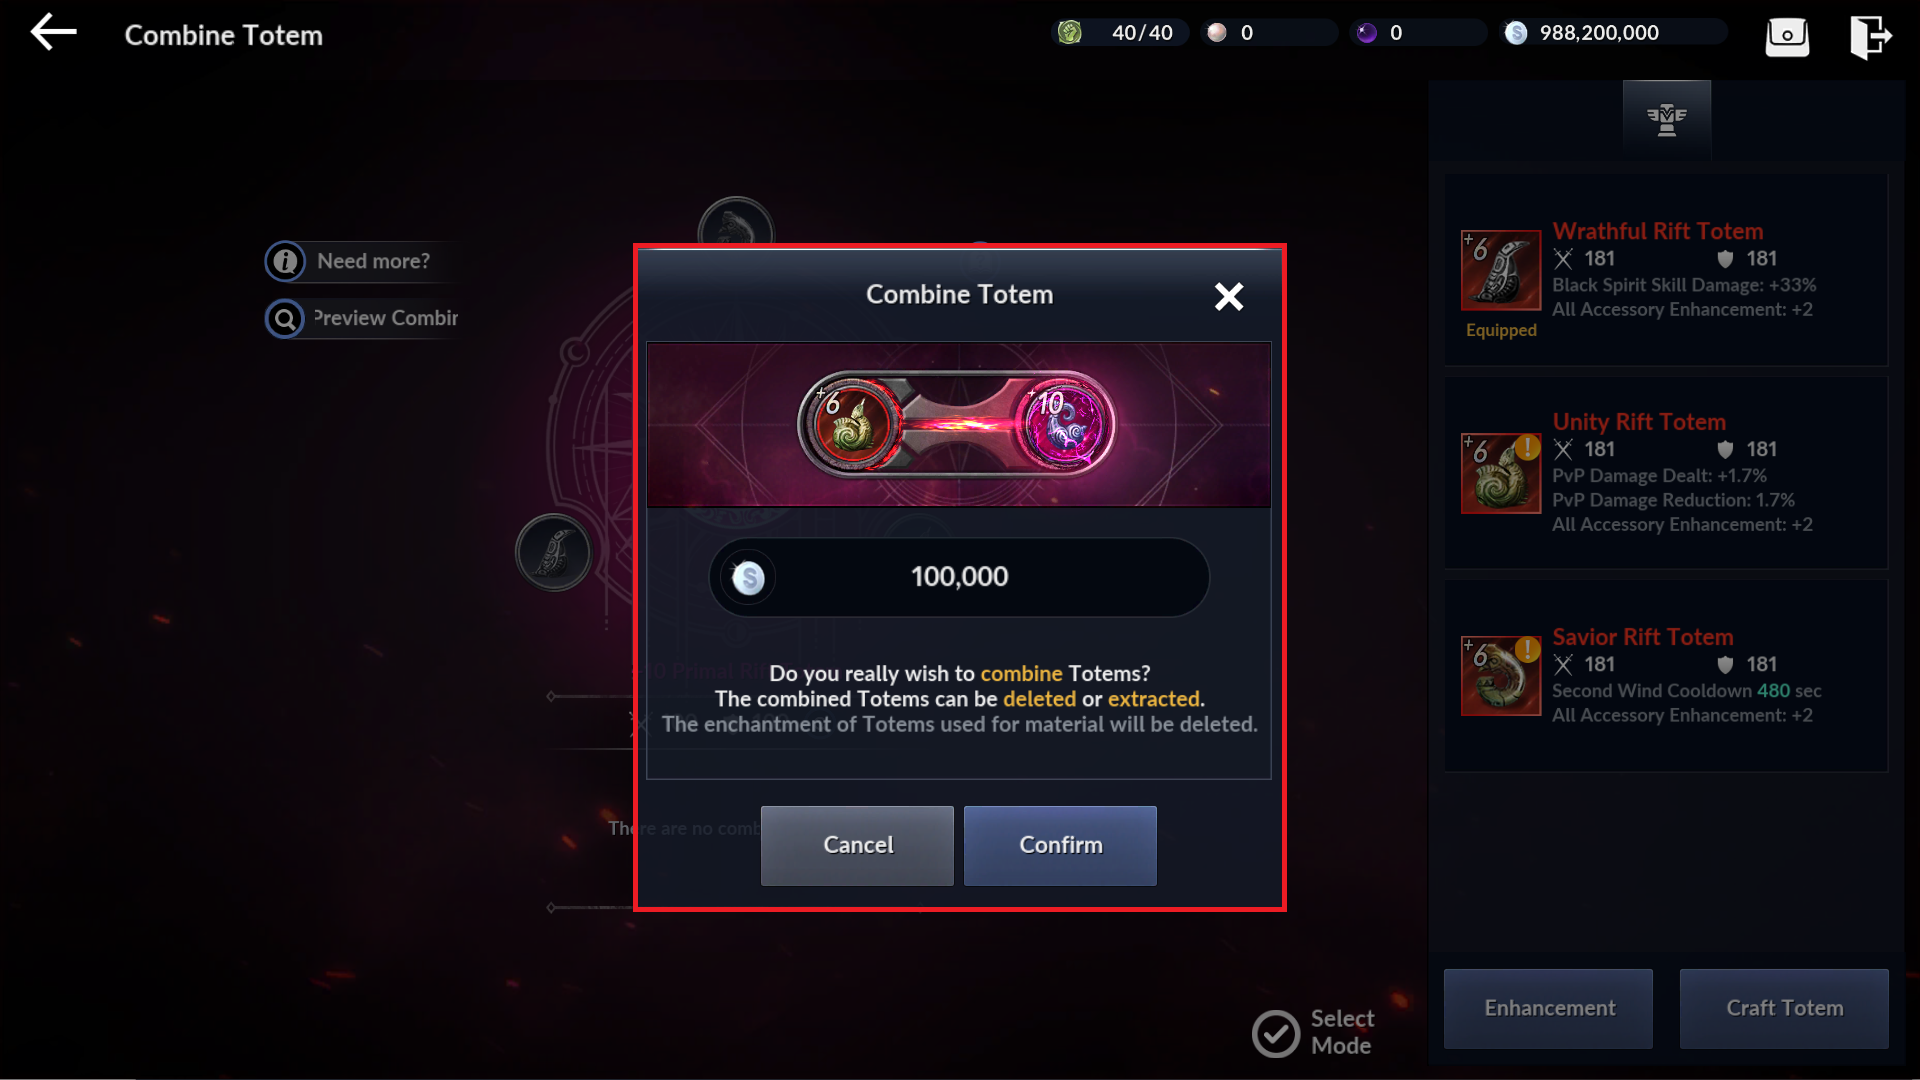 An Abyssal Totem (red) must be combined into a Primal Totem (pink)!
🔸 How to Enhance a Primal Rift Totem
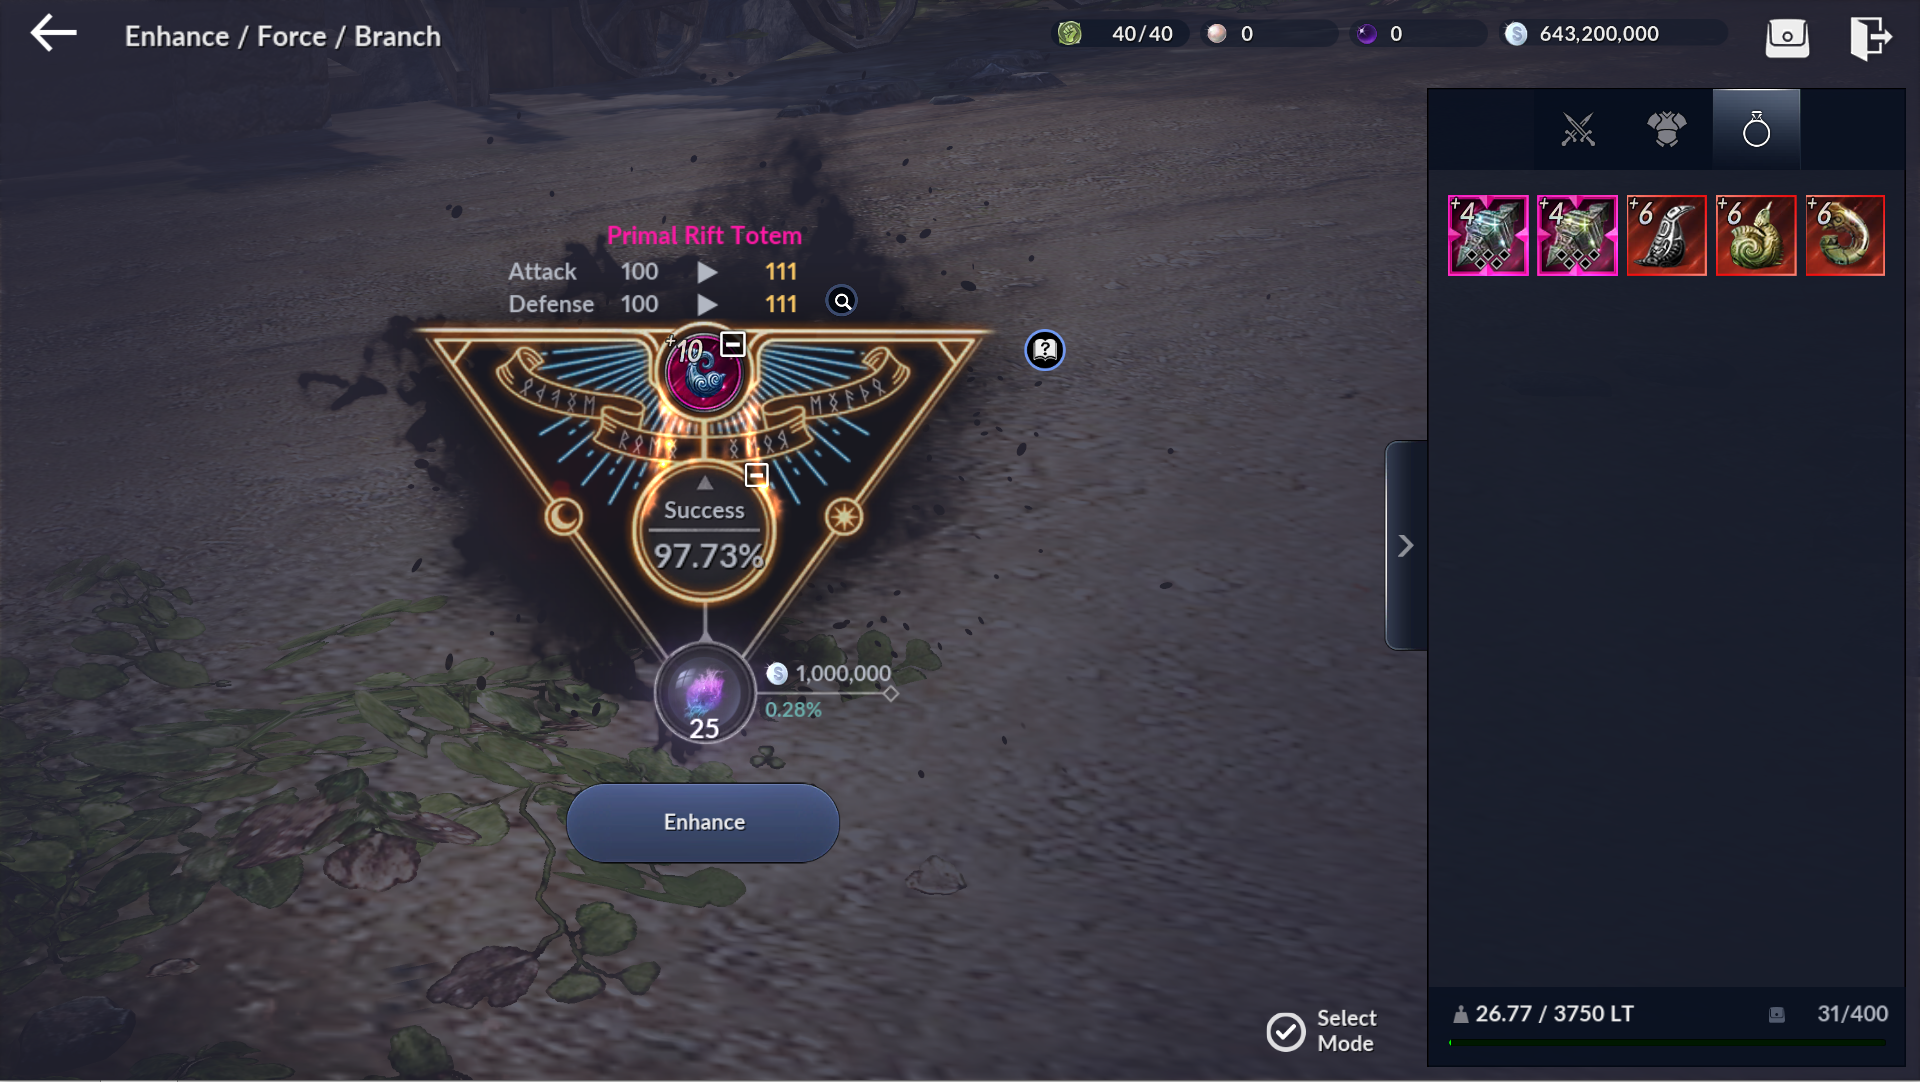 Use Root of Sorcery to increase your Enhancement success rate!
🏺 Relic & Glyph ▼ Expand
🔸 Equipping a Relic
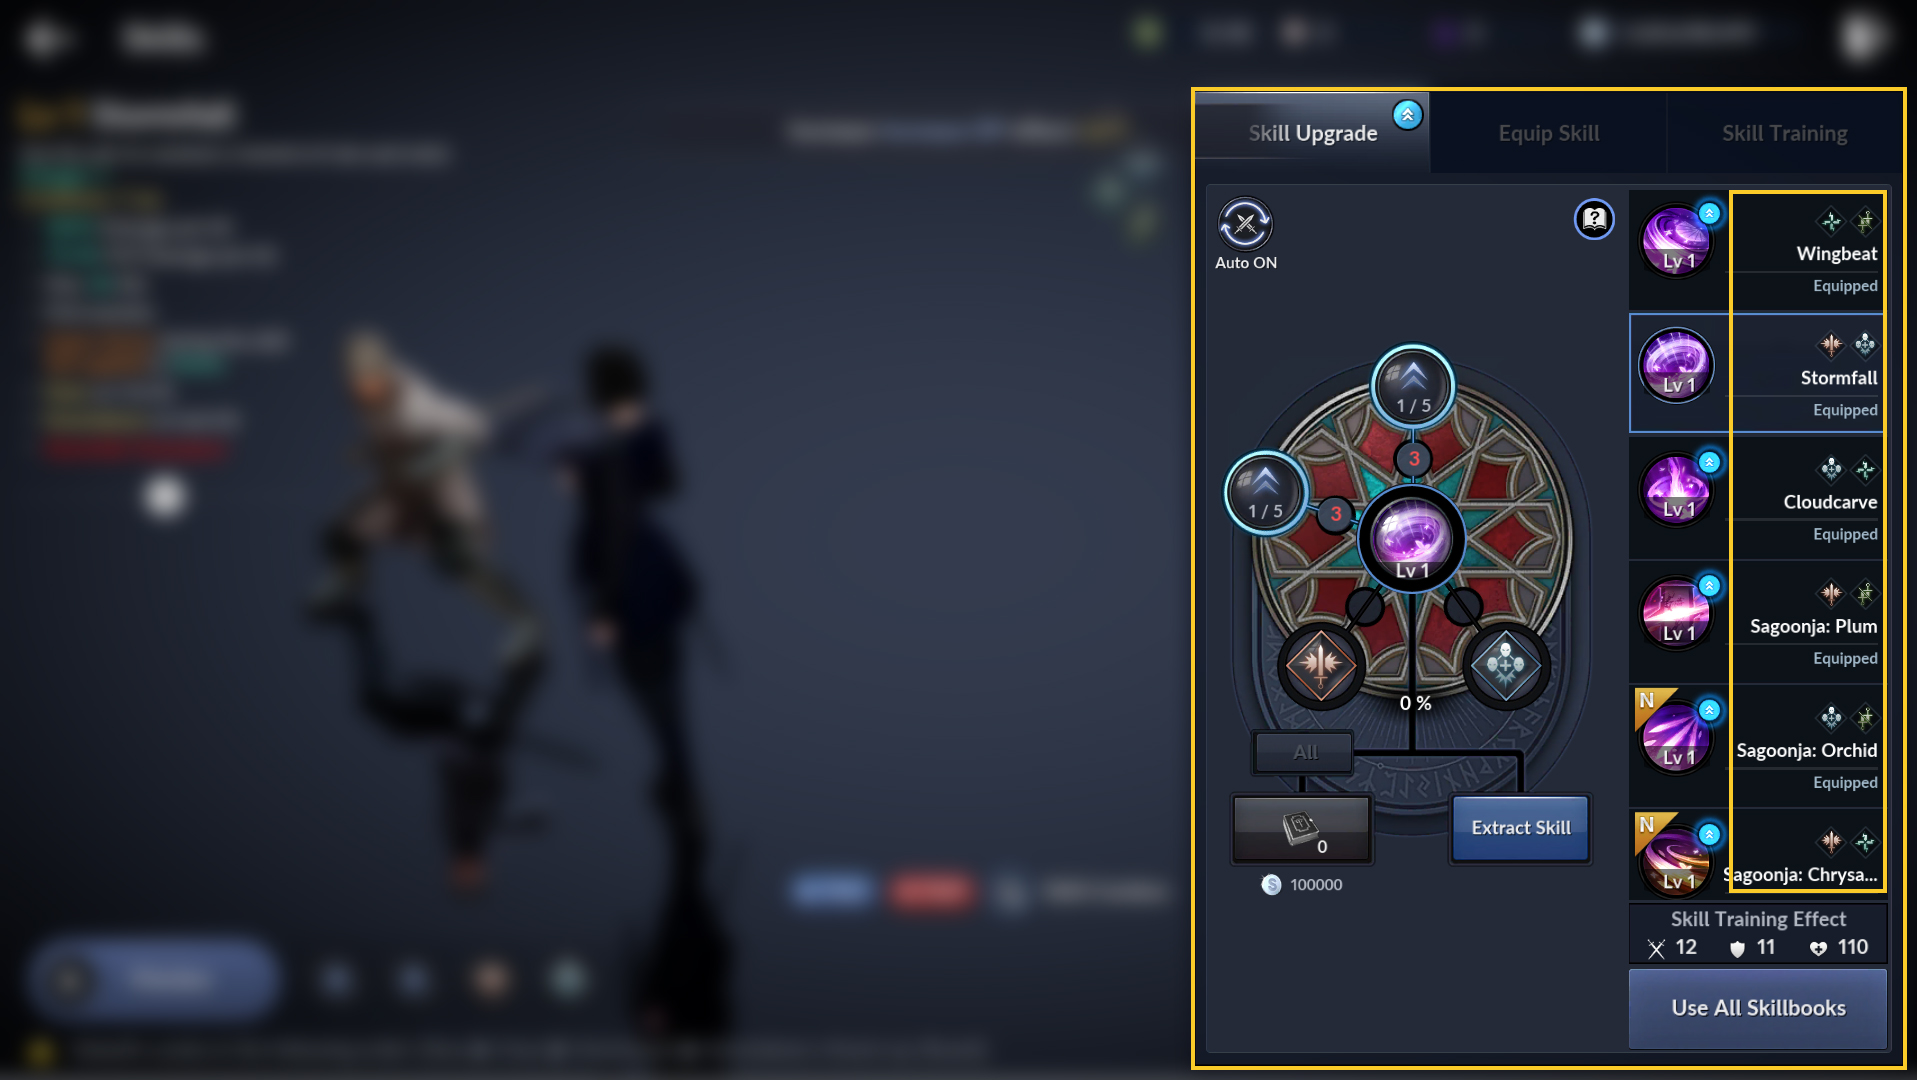
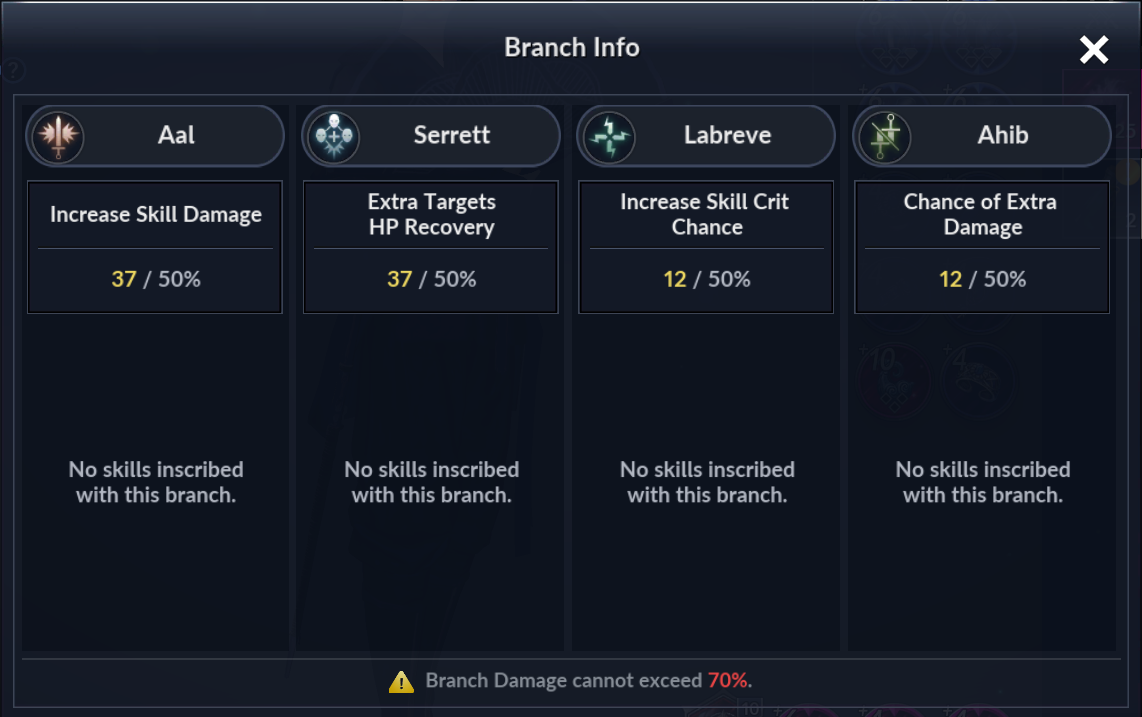 Select the line you want from the Skills menu! Try equipping a Relic for the line you use most often!
🔸 Relic Glyph
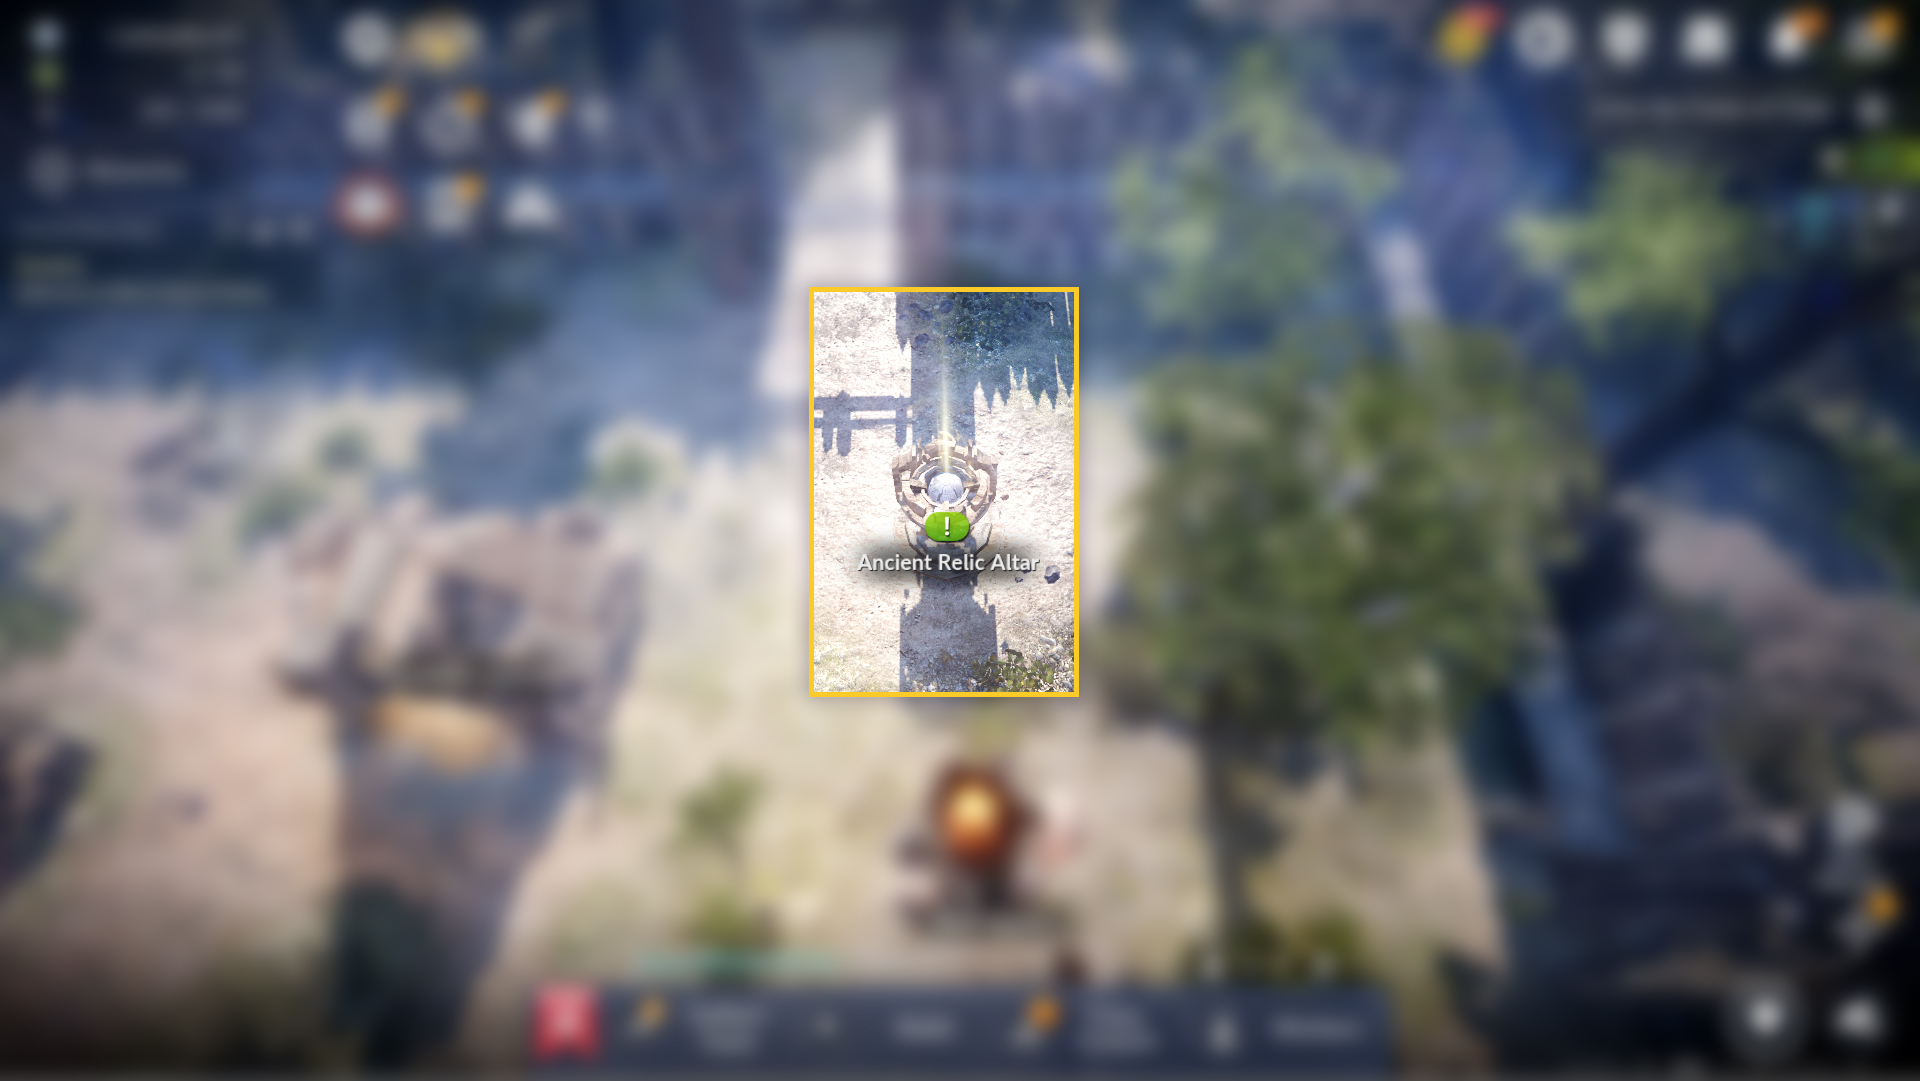 First, please build an Ancient Relic Altar at your Camp!
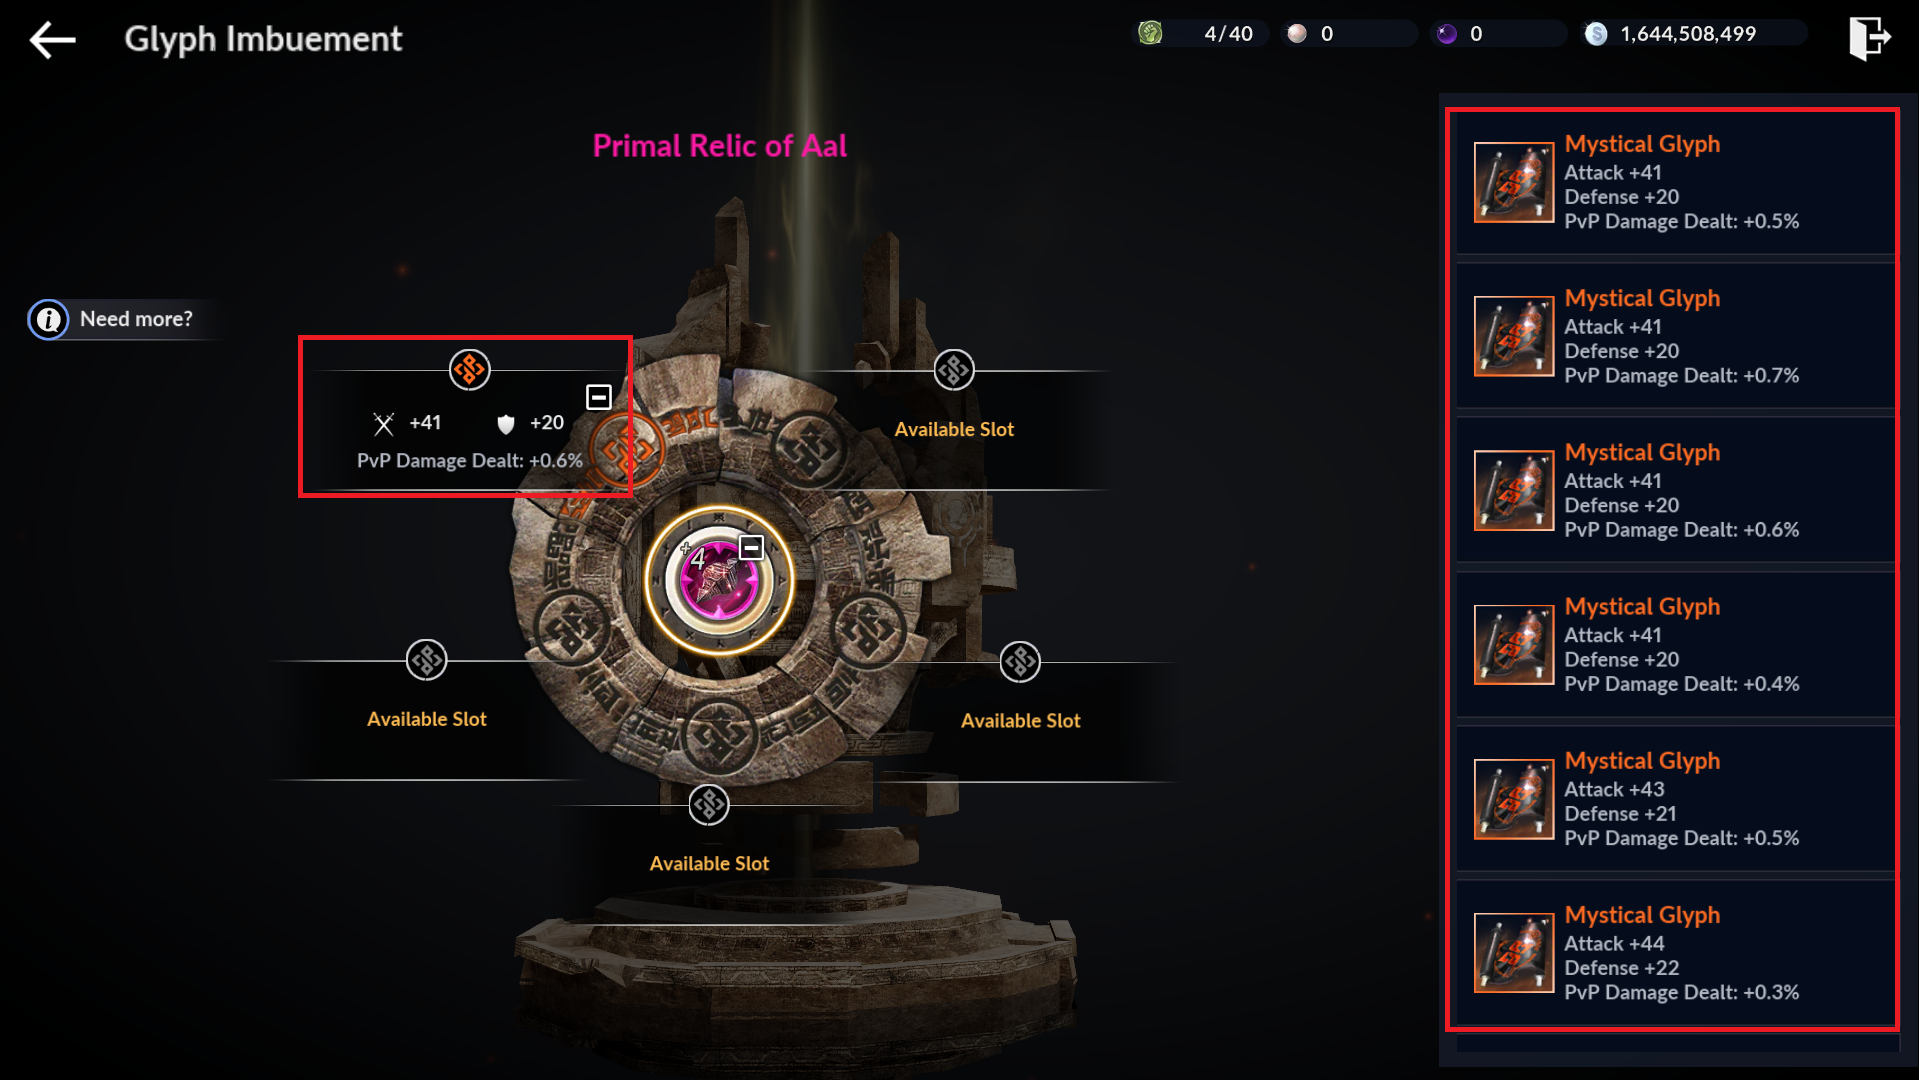 Inscribe the Glyph you received as a graduation reward onto your equipped Relic!
🛡️ Family Emblem ▼ Expand
🔸 How to Enhance an Emblem
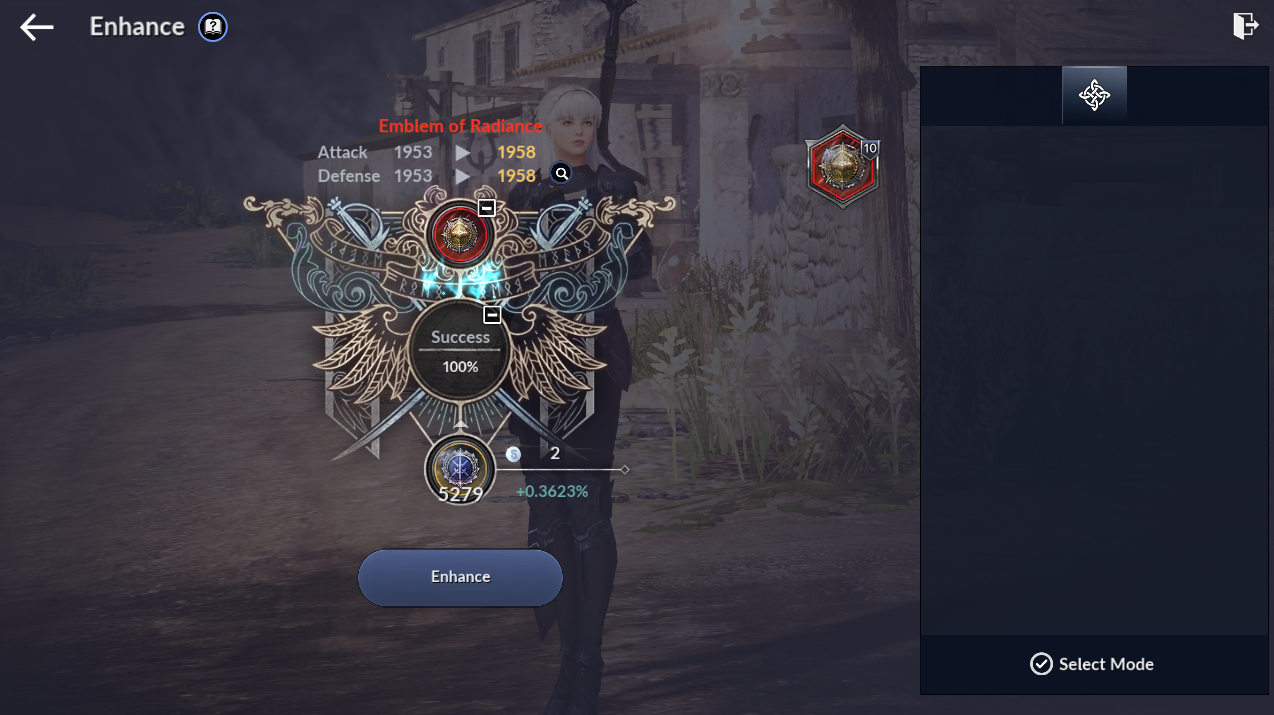 Finished transferring? Use the Glory Token you received as a graduation reward!
🔮 Alchemy Stone ▼ Expand
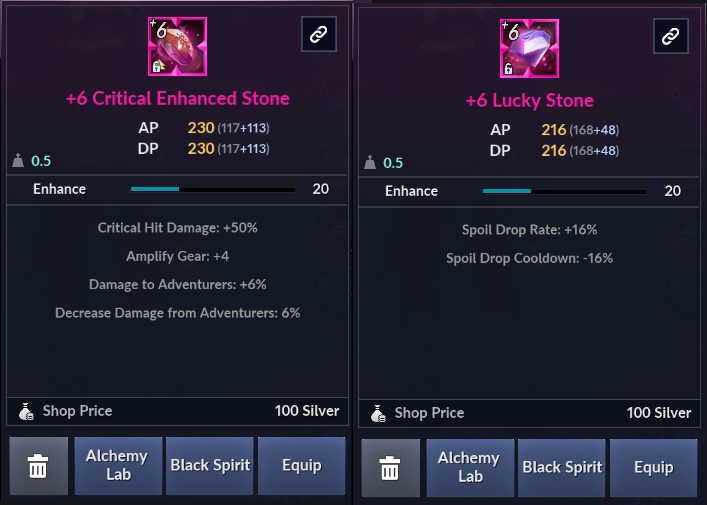 Alchemy Stone of Enhancement: Greatly increases Critical Hit Damage, amplifies equipment stats, and raises Combat Power!