Siege War
One of the best ways to foster unity in your Guild is to participate in Node War or Siege War. Siege War will give your Guild the opportunity to take control of a Castle!
|
Table of Contents |
|
01. Siege War Schedule |
|
02. Siege War Bidding |
|
03. Siege War Preparation |
|
04. General Battle Guide |
|
05. Calpheon Siege War |
|
06. Valencian Siege War |
|
07. How to Win and Rewards |
① When
Siege War will take place every Saturday between 20:00 ~ 21:30 (For all servers).
② Where
Siege War will take place in 2 areas on each server: Valencia and Calpheon. 3 Guilds can participate in each Siege War.
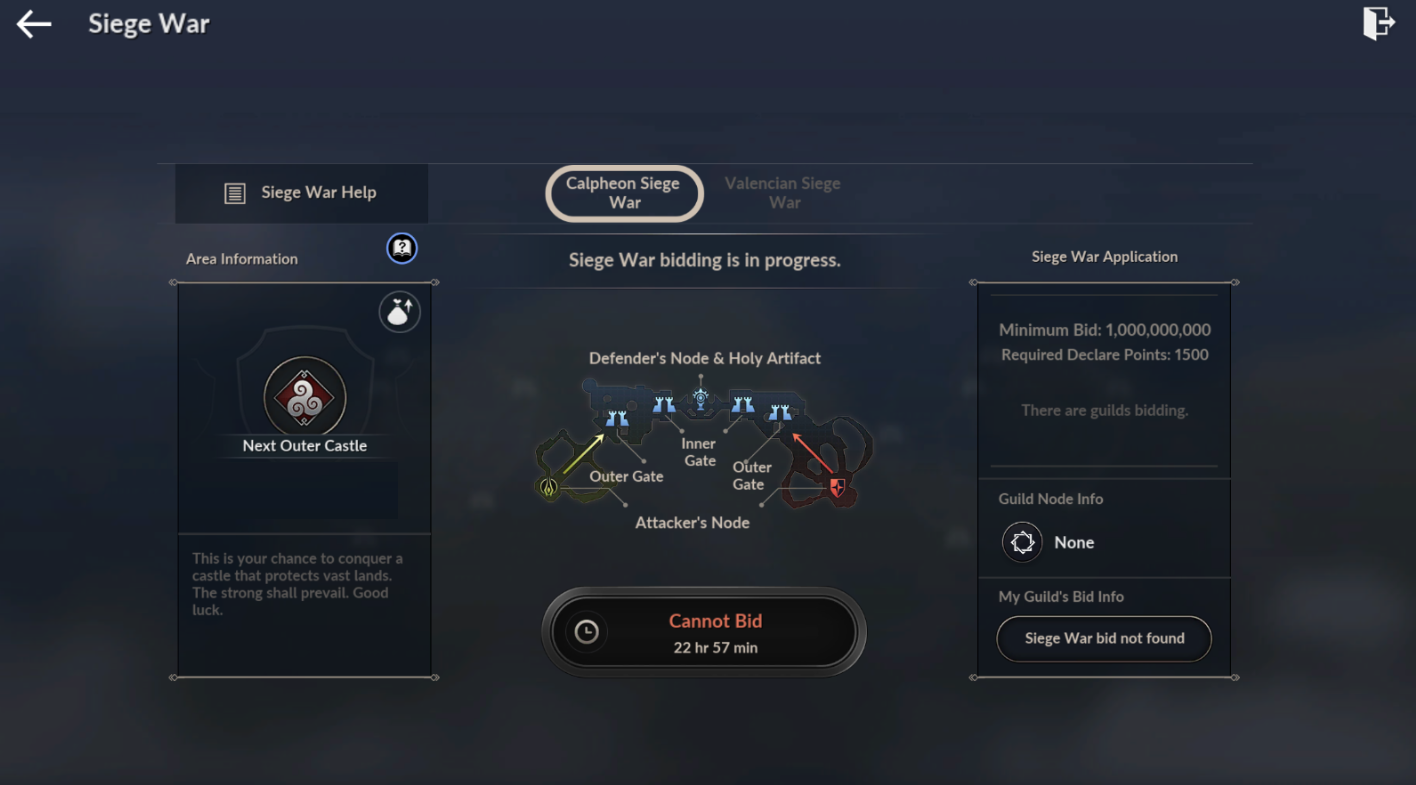
■ How to Bid
You can find out more details on Siege War, and begin bidding, by tapping the [Siege] button in Guild Fortress - Siege Gateway.
- To bid for Siege War you will need Nodes level 2 or higher.
- The updated Siege War offers a new type of gameplay involving swapping the Attacker/Defender.
ㆍThe guild who succeeds in defending against the Siege until the time ends will win.
ㆍ When the attacking Guild destroys the defending Guild's Holy Artifact, the Guild that destroyed the Artifact will become the defending Guild.
※ Example:
1) The Siege war begins with Guild A as defender and Guilds B and C as attackers.
2) If Guild B destroys the Holy Artifact within 16 minutes, Guild B will become the new defending Guild and Guild A will take their place as an attacking Guild. Guild C will remain an attacking Guild.
3) If Guild B manages to protect the Holy Artifact for 16 minutes, they have succeeded in defending and will win the Siege war.
4) If Guild B's Holy Artifact was destroyed within 14 minutes by Guild C, their attacker/defender roles will be swapped, and the defense time limit will be reduced to 14 minutes.
ㆍ The time it took to destroy the Holy Artifact is set as the new time limit for the next defense round.
ㆍ Should the Artifact be destroyed in under 10 minutes, the time limit for the next round will be set to 10 minutes and it will be the last round. The guild that succeeds in this round will be final winner.
ㆍ If a Siege War continues until 9 PM (the time limit for Siege War) the Guild which is defending at that point will win the game.
ㆍ When the attacker/defender roles are swapped, they will be moved to their nodes. Any Siege Weapons that were in mid-summon will be cancelled and they can be summoned again. This does not apply to destroyed or dead weapons.
ㆍ Example: If you started the war with 5 Ogres, then 1 Ogre dies and you are summoning 1 Ogre when the swap happens, you will have 4 Ogres that can be used.
■ Requirements
- Guilds must be at least level 5
- Guilds must possess a level 2 or higher Node.
- At least 10 Guild members must be in the Guild that is bidding for the Siege War.
※Guild Masters and Officers can make a bid only if all the requirements above are met.
※ Siege War bidding will automatically be placed on either Calpheon or Valencia.
※ If your Guild wins the bid for Siege War, all Nodes that your Guild controls will be lost.
Bidding is carried out with Guild Funds, and the Guilds with the top 3 bids will be chosen.
However, Guilds must have at least 10 Guild members in the Guild at the time of bidding and at least 10 Guild members must participate in the Siege War.
If your Guild fails to have at least 10 Guild members participating in the Siege War, your Guild won’t be able to make another bid for the next 7 days following the end of the Siege War.
Once the bids are completed and 3 Guilds are chosen, the preparation period will begin.
Preparation time is 10 hours (10:00 - 20:00, for all servers), and this is the time to prepare and discuss strategies for the upcoming Siege War.
① Reinforcement
By using Camp Resources, you can raise the levels of your Guard Tower, Barricade, and Holy Artifact up to level 10.
There are no other restrictions to reinforcement though there are separate offensive and defensive units with which to reinforce.
| Role | Reinforceable Objects |
| Attackers | Guard Tower, Barricade, Holy Artifact |
| Defenders | Gate Sentry, Guard Tower, Holy Artifact |
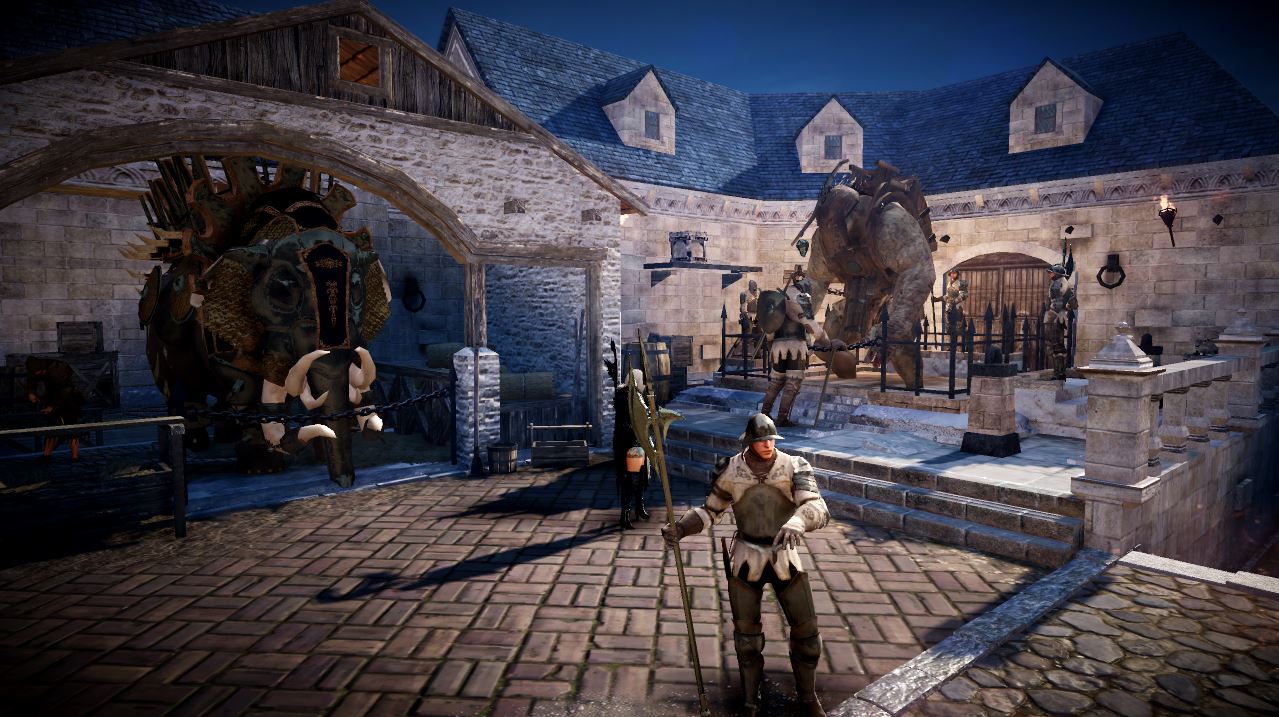
② Siege Weapons

You cannot produce or level up Siege weapons during the Siege War. This must be completed during the preparation phase.
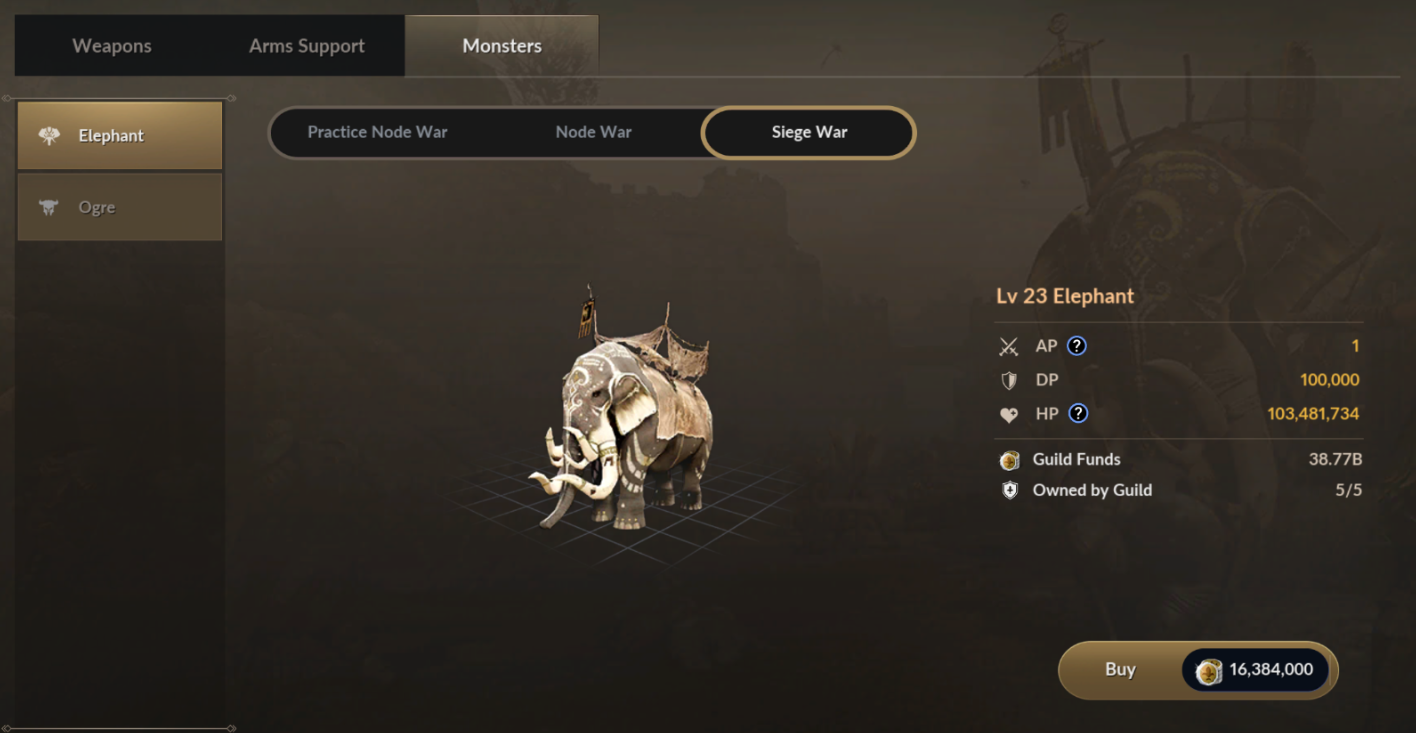
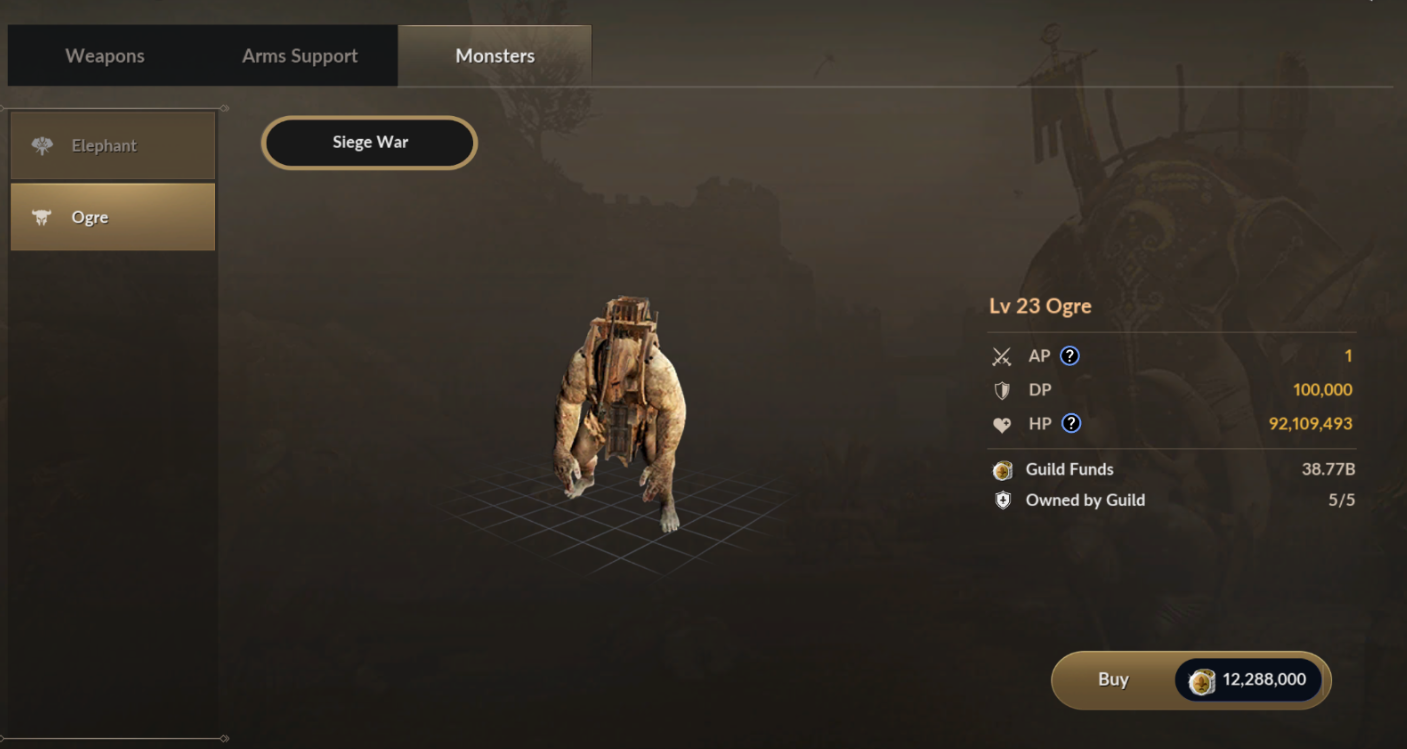
You can purchase Elephants and Ogres in preparation for Siege and to further strengthen your strategy during Siege War.
| Armory | Craft Cannons. |
| Den | Purchase Elephants and Ogres. |
Please note that the available Siege Weapons for Attackers and Defenders are different.
Siege Weapons can only be summoned by Guild Masters and Officers.
※Maximum number of summonable Guild Siege Weapons present at any stage of the battle are as follows:
| Max. Summon | Attackers | Defenders | |
| Ogre | 1 | O | X |
| Elephants | 1 | O | O |
| Cannons | 3 | O | O |
■ New Siege Weapon: Judgment of Aal
- Two players can mount Judgment of Aal: one person driving the weapon and one operating the cannon.
- The driver can accelerate while mounted.
ㆍDuring acceleration, Judgment of Aal will leave trails that decrease the move speed of enemy Adventurers.
- The gunner can check the direction of the cannon on the mini-map, identical to normal cannons, and can tune the firing distance by holding down the fire button.
- Adventurers mounting Judgment of Aal will be invincible until they dismount.
- Judgment of Aal can be checked in [Guild Fortress > Manage Weapons].
- Judgment of Aal can only be summoned by the attacking Guild, and is unavailable for the defending Guild.
- Judgment of Aal grows stronger with each failed siege, and the enhanced Judgment of Aal can be used in the next Siege War.
ㆍJudgment of Aal can go up to Level 6.
ㆍJudgment of Aal's Max HP varies depending on the Adventurers' CP rank, tallied each day (Elite, Knight, Count)
ㆍThe initial level after the update will be Level 1.
ㆍLevel increases by 1 for each failed siege.
- The enhancement from failed sieges will reset upon a successful siege using Judgment of Aal.
- Judgment of Aal can be redeployed 5 minutes after it is destroyed.
- Judgment of Aal can also grow stronger by defeating a certain number of enemy Adventurers.
ㆍThis enhancement can go up to Level 10 and will not reset when destroyed.
ㆍThe enhancement from Adventurer kills will reset at the end of every Siege War.
- The HP of Judgment of Aal will recover back to 100% upon switching sides in Valencian Siege War.
ㆍThe Guild that was initially defending the castle cannot use Judgment of Aal even after switching sides.
③ Guild Skills
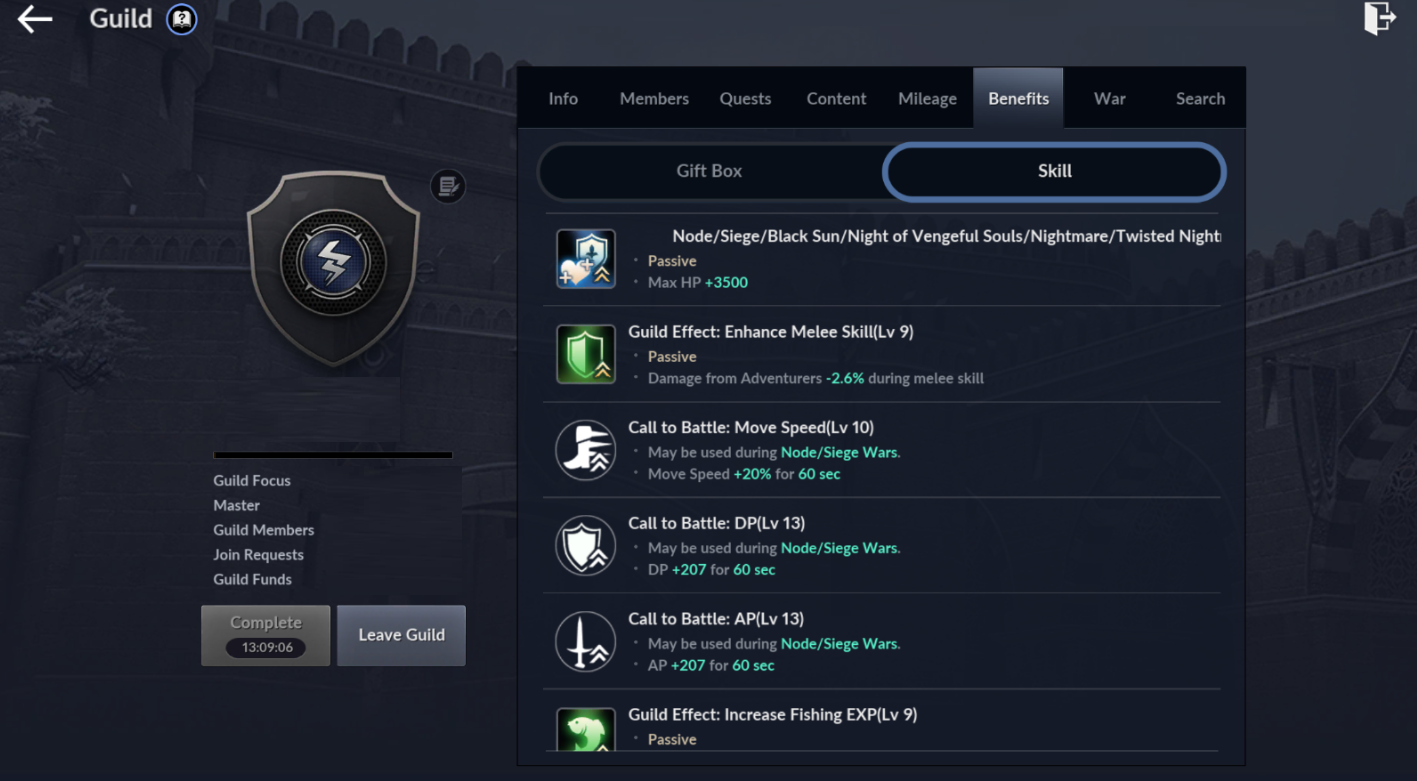
Only the Guild Masters and Officers can use a Guild Skill.
“Call to Battle” is a Guild Skill that can be leveled up during the Siege War. The leveled up effects of the skill will apply immediately, even during the Siege War.
 ■ Common
① The Attacking and Defending Guilds
A siege War is held between 1 defending Guild and 2 attacking Guilds (totaling 3 Guilds).
- Defending Guild: the Guild that possesses a castle due to having successfully attacked or defended in a previous game. If there is no such Guild, one of the 3 participating Guilds will be selected to defend.
- Attacking Guild: 2 Guilds selected after bidding for Siege War.
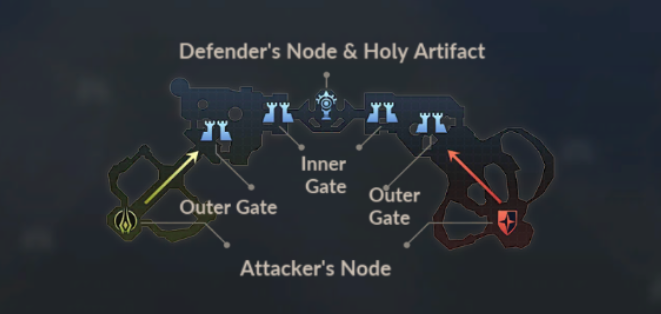
The sides attacking the Main Castle try to destroy the 2 Inner and Outer Gates, as well as the Defense Towers and the Holy Artifact.
The Guild defending the main castle has to block the opposing guilds that are approaching and attacking the Outer Gates on two fronts.
The attacking sides do not possess a Holy Artifact or Barricade.
② Attacking and Defending Guild Swap
After the Siege War begins, if the defending Guild protects the Holy Artifact for one hour, the battle ends and the defending Guild wins.
- If an attacking Guild destroys the Holy Artifact, they will swap roles and become the defending Guild. The Guild that failed in protecting the Holy Artifact will now become an attacking Guild.
- After the swap, the time limit will be set to the time it took to destroy the Holy Artifact. Each time the Holy Artifact is destroyed, the defending and attacking Guilds swap roles.
- Any Guild that successfully protects the Holy Artifact during the allocated time limit will win the Siege War.
- If the Holy Artifact was destroyed in under 10 minutes, the next round will be the final round of the game with a 10 minute time limit.
The Inner and Outer Gates are not restored. However, the stone Barricade, Holy Artifact, Guard Tower, Gate Sentry and Bridge will be restored.
- During the swap, the "Destroy Guild Barricade/Bridge" skill cooldown will not reset.
Any ongoing Siege War will end at 21:00.
- If a Siege War is not over by 21:00 the match will end with the victory of the Guild defending at the time.
③ Siege Weapon
Elephants, Ogres, etc. can be summoned to attack a castle in Siege War.
- If the Guild-swapping occurs while you are summoning a Siege Weapon, the summon will be canceled and the weapon will be available to summon again.
- Destroyed Siege Weapons cannot be summoned.
④ Notice
Siege War entry will be temporarily unavailable during the Guild swap.
※ Castle Perks are unavailable during the Siege War.
※ The ping system can be used to signal a cannon barrage, assemble guild members, and other various actions. However, pings can only be used 5 times, and one ping lasts for 30 seconds.
■ Calpheon Siege War
① Deploying Guild Memebers
During the preparation phase, The Guild Master or Officers can strategically deploy their Guild Members.
※Guild Members can only participate in Siege War if it occurs at least 7 days after the date they joined the Guild.
※Keep in mind that while it is possible to reassign Guild Members during the Siege War, those Guild Members will be moved to the Guild Fortress and will need to re-enter the Siege War.
Guild Members can be placed in 4 different areas. Each area can have various strategic purposes.
| Location | Max. Number of Guild Members that can be placed. |
| Main Castle | 50 |
| East Tower | 5 |
| West Tower | 5 |
| South Tower | 5 |
② Calpheon Siege War Main Castle Battle
In the Main Castle, both the attackers and defenders will fight for the Holy Artifact. The result of the battle in the Main Castle will be the deciding factor for the outcome of the Siege War.

③ Border Battle
There are 3 separate Borders: East, West and South, with each containing the Eastern Tower, Western Tower, and Southern Tower, respectively. If a Guild destroys the tower in a Border, it will be replaced by the attacking Guild’s tower. Likewise, if another Guild destroys the already conquered tower in the Outskirts, it will be replaced by that Guild’s tower.
Destroying Border Towers will activate special functions.
|
East Border Tower |
Provide Hwacha Bombardment Support on the Main Castle Battle. Hwacha bombardment Support - Damages enemy characters and enemy defenses. This cannot be targeted directly towards the Holy Artifact. However, it can receive damage if an attack on a specific character is made that is in the same range of the tower. |
|
West Border Tower |
Provide Cannon Bombardment Support on the Main Castle Battle. Cannon Bombardment Support - Deals huge damage on enemy characters that have entered the combat area, randomly selects and attacks a character, inflicting knockdown. However, Cannon Bombardment Support does not inflict damage on the Holy Artifact. |
|
South Border Tower |
The guild to deliver the defeating blow to the Battle-Hardened Ogre will get a powerful buff. |
- In the event of the destruction of the Outer and Inner gates, the target of the cannons and bombard support will not change. Also, the amount of damage of the bombardment support will depend on the max HP of the target.
- The Siege War is held with limited characters in these four areas: Main Castle, West Border, South Border, and East Border.
- During the battle in the borders, guilds will compete over auto-cannon bombardment, auto-hwacha bombardment, and Battle-Hardened Ogre buffs.
④ Battle-Hardened Ogre
The guild to deliver the defeating blow to the Battle-Hardened Ogre will get a powerful buff and have the Battle-Hardened Ogre fight on their side in Siege War.
※ The buff will continue when your character dies. The Battle-Hardened Ogre will disappear when defeated by the enemy guild
※ When Battle-Hardened Ogre is defeated by the opposing guild, the powerful buff and Battle-Hardened Ogre will pass onto them.
Buff 1: Ogre's Roar
- 1st Buff: AP +600 / DP +300
- 2nd Buff: AP +700 / DP +350
- 3rd Buff: AP +800 / DP +400
- 4th Buff: AP +900 / DP +450
- 5th Buff: AP +1000 / DP +500
Buff 2: Destroyer Instinct
- 1st Buff: Structure Damage +5%
- 2nd Buff: Structure Damage +10%
- 3rd Buff: Structure Damage +30%
- 4th Buff: Structure Damage +50%
- 5th Buff: Structure Damage +100%
- The buff you get from defeating Battle-Hardened Ogre will get stronger after each additional defeat of the Ogre.
※ Both of the buffs apply only to direct attacks by the player.
※ The additional damage granted by Destroyer Instinct only applies to Holy Artifacts, Guard Towers, and Barricades that can be leveled up.
⑤ Destroying Bridges/Barricades
The Guild Master of the defending Guild can choose to destroy Bridges or Barricades used by Attackers by spending Guild Funds. This will kill opposing Guild Members and destroy Siege Weapons in the area.
※Bridges and Barricades cannot be destroyed at the same time.

If the crossroads are destroyed, attackers must use an alternate path. This will also restrict how they are able to move their siege weapons. The destruction of bridges and barricades lasts for 10 minutes, so destroying it at the right time can bring strategic advantages.
⑥ Character Respawn
Adventurers will respawn at different locations based on the current state of the Siege War.

[No gates are destroyed]
- Attacker side 1: can respawn at the Holy Artifact
- Attacker side 2: can respawn at the Holy Artifact
- Defender side: can choose to respawn at the Holy Artifact, Outer Gate 1 or Outer Gate 2
[Outer Gate 1 is destroyed]
- Attacker side 1: choose to respawn from the Holy Artifact or Outer Gate 1
- Attacker side 2: can respawn at the Holy Artifact
- Defender side: Choose to respawn from Holy Artifact, Inner Gate 1 or Outer Gate 2
[Inner Gate 1 is destroyed]
- Attacker side 1: choose to respawn from the Holy Artifact or Inner Gate 1
- Attacker side 2: can respawn at Holy Artifact
- Defender side: choose to respawn from the Holy Artifact or Outer Gate 2
※The above stipulations also apply when the outer and inner gates are destroyed on the second attacker’s part of the map.


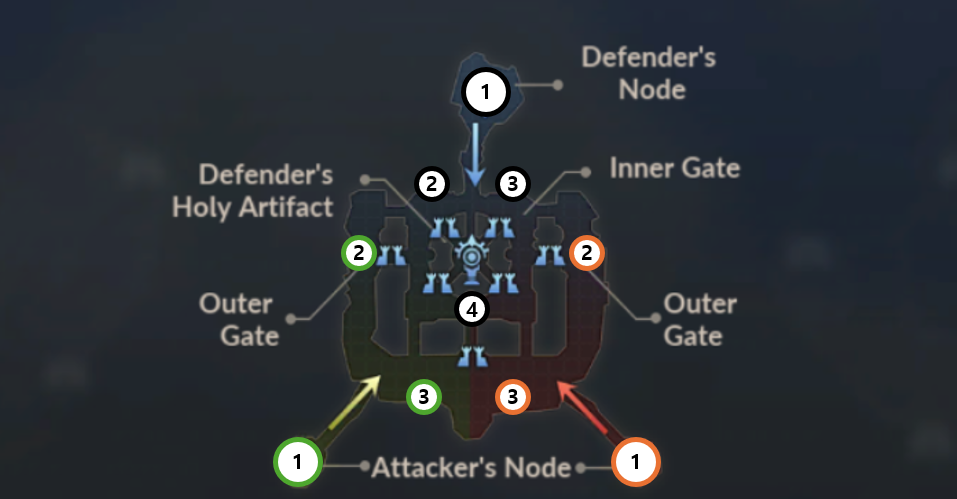
※ There are 3 Outer Gates in Valencian Siege War.
① Character Respawn
- The respawn points will change depending on the state and progression of the Siege War.
- The respawn points will change based on the factions.
[No gates are destroyed]
- Attacking Guilds 1 and 2: respawn at their respective Nodes.
- Defending Guild: can select to respawn at the Node or at points 1 - 3 on the defending side.
[Outer Gate 1 is destroyed]
- Attacking Guild 1: can select to respawn at the Node or point 1 on the attacking side.
- Attacking Guild 2: can respawn at Node.
- Defending Guild: can select to respawn at the Node or points 2 or 3 on the defending side.
[Outer Gate 2 is destroyed]
- Attacking Guild 1: can respawn at the Node.
- Attacking Guild 2: can select to respawn at the Node or point 2 on the attacking side.
- Defending Guild: can select to respawn at the Node or points 1 or 3 on the defending side.
[Outer Gate 3 is destroyed]
- Attacking Guild 1: can select to respawn at the Node or point 3 on the Guild 1 attacking side.
- Attacking Guild 2: can select to respawn at the Node or point 3 on the Guild 2 attacking side.
- Defending Guild: can select to respawn at the Node or Points 1 or 2 on the defending side.
②Important Notes
※ When the Holy Artifact is destroyed in under 10 minutes, the last round's time limit is equal to the time it took to destroy the Artifact.
- Example: If the Holy Artifact was destroyed in 6 minutes, the last rounds time limit will be set to 6 minutes.
※ One-Way Gate on the Inner Gate side disappears if the two Inner Gates on the defending side are destroyed.

If the attackers destroy the defenders’ Holy Artifact, the attackers win.
The winning Guild can collect tax as Guild Funds and distribute Guild Bonuses to Guild members while they occupy the castle.
Hidden Banquet Hall
Developer Commentary:
The Hidden Banquet Hall, available for entry when you and your guild members successfully occupy a Node, is one of the most important guild objectives.
However, opinions were divided on how participation has been handled, as each Adventurer in a guild has their own playstyle.
With this in mind, we've made several improvements to reduce inconvenience regarding this scheduling.
First, the schedule has been adjusted because if you were logged in at the exact time, it was difficult to participate within the allotted hour from the reclaim attempt.
Now, entry is available for guild members at their desired time, as with Chaos Rifts, when you are occupying a Node that allows you to attempt reclaim in the Hidden Banquet Hall.
Next, we made changes to the Hot Time buff. We aim to reduce the inconvenience of having to use Hot Time items at the time of entry by increasing the reward amount and EXP gain.
Hot Time buffs will not be applied in the Hidden Banquet Hall, and rewards and EXP Scrolls can be obtained based on the specific amount of Hot Time applied.
We hope that all guild members can use the Hidden Banquet Hall more conveniently through the revamp, and hope it will be an important objective achieved by joining forces with guild members and aiming for victory.
- Revamped the Hidden Banquet Hall.
ㆍ Adventurers who are Guild Masters no longer need to attempt to reclaim it in order to enter.
ㆍ You can enter by using the [Conqueror's Scroll].
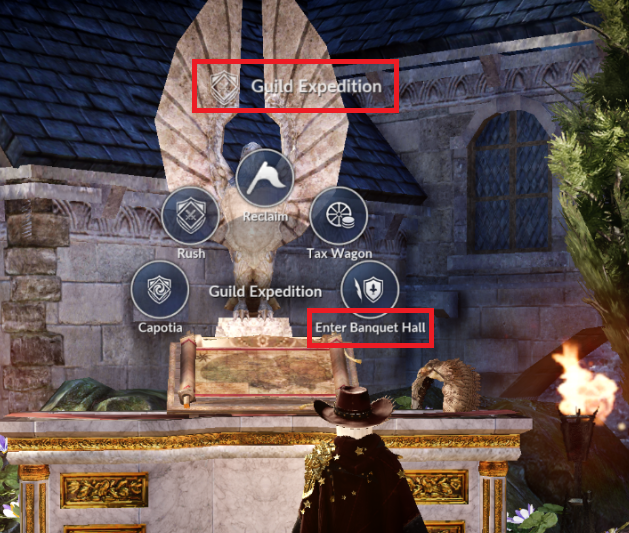
- You can enter the Hidden Banquet Hall through [Guild Expedition - Enter Banquet Hall] in the Guild Fortress.
- You can purchase a Conqueror's Scroll from the NPC Duncan at the Guild Fortress with 100 million Silver.
ㆍ When occupying a Node that allows entry to the Hidden Banquet Hall, you can make a purchase once a week.
ㆍ You can only purchase after 7 days of joining a guild.
ㆍ When used, 1 hour is granted for entry to the Hidden Banquet Hall.
ㆍ After use, if you are not logged into the game, the entry time does not decrease.
- Changed the Hidden Banquet Hall daily quest to a weekly quest and increased the amount of rewards by around 7 times.
- Significantly increased the rewards obtainable through Spoils of Battle in Hidden Banquet Hall.
ㆍ The adjustment will increase the effect of a certain level of Hot Time by approximately 7 times.
ㆍ Server Hot Time and Item Hot Time effects will no longer apply.
ㆍ The effects of Relics, Meal items, Lucky Black Dragon, and Fortune Scroll buffs will apply.
- The "EXP Buff Bonus" effect that was applied upon entry will no longer apply.
- Decreased the EXP obtained from defeating monsters.
- Increased the quantity of Advanced EXP Scrolls from the list of rewards obtainable through "Spoils of Battle."
ㆍ You can obtain the quantity of Advanced EXP Scrolls as much as the "EXP Buff Bonus" effect and the pre-adjustment monster kill EXP.
- Increased the rewards for defeating the Former Lord of Cron Castle.
- Greatly decreased the max HP of the Former Lord of Cron Castle.
- You can use the Faded Crown of the Former Lord that you owned before the update check.
- You will obtain the pre-check reward when you defeat him.
- You can use both the pre-revamp "Faded Crown of the Former Lord" and the post-revamp "Faded Crown of the Former Lord" at the same time.
- If the Former Lord of Cron Castle is summoned at the same time, he is very powerful, so caution is needed when defeating him.
Hidden Outer Castle
- Added the "Hidden Outer Castle," a competitive monster zone in which all guilds occupying a castle can enter and battle.
- The Hidden Outer Castle will be available for 2 hours after the guild master reclaims the Hidden Outer Castle via [Guild Fortress - Guild Expedition building - Reclaim] once within the period in which the castle is occupied.
ㆍThe "castle occupying period" starts after the Siege War on Saturday ends to the next Siege War bidding.
ㆍThe Hidden Banquet Hall can be reclaimed once from the next day the castle is occupied (Sunday) to the next Siege War bidding (Friday before 23:59).
ㆍAdventurers of guilds in possession of a different castle can also participate.
ㆍIn the monster zone, you'll be able to attack Adventurers from other guilds.
- The guild that can open the Hidden Outer Castle will change every other week.
- Ex) If the guild occupying Calpheon Castle this week opens the new Banquet Hall, the guild occupying Valencia Castle will be able to open the Banquet Hall the following week.
ㆍThe guild that occupies Calpheon Castle on the first week (Sat) can reclaim the Hidden Outer Castle once from the first week (Sun) to the second week (Fri) until 23:59.
ㆍThe Hidden Outer Castle cannot be reclaimed on the Saturday of the Siege War.
ㆍThe guild that occupies Valencia Castle on the second week (Sat) can reclaim the Hidden Outer Castle once from the second week (Sun) to the third week (Fri) until 23:59.
ㆍIf a guild is able to open the new Banquet Hall but doesn't, the authority to open will still transfer over to the guild occupying the other Castle the following week.
ㆍDrop rates have been increased by 50%, and Hot Time effects will no longer apply. (Updated)
Guilds Occupying a Tier 3 Node
- You can check out the Nodes expected to be designated for the Banquet Hall from the Node War menu.
- The guild master can open the Hidden Banquet Hall and will be granted entry for 1 hour every day via [Guild Fortress - Guild Expedition building - Reclaim].
- The Tier 3 Node that can open The Hidden Banquet Hall will change every week. Once Node War ends, you can check whether your guild's occupied Node is the specific Node that can open The Hidden Banquet Hall the following week.
Thank you.